User guide Bad weather and flexible hours
This guide shows, step by step, how to calculate compensation in the event of bad weather, track deadlines, and maintain the flexible hours balance for the year. The orange numbers on the images refer to the text. All results are indicative.
1. Getting started
1Opening the studio
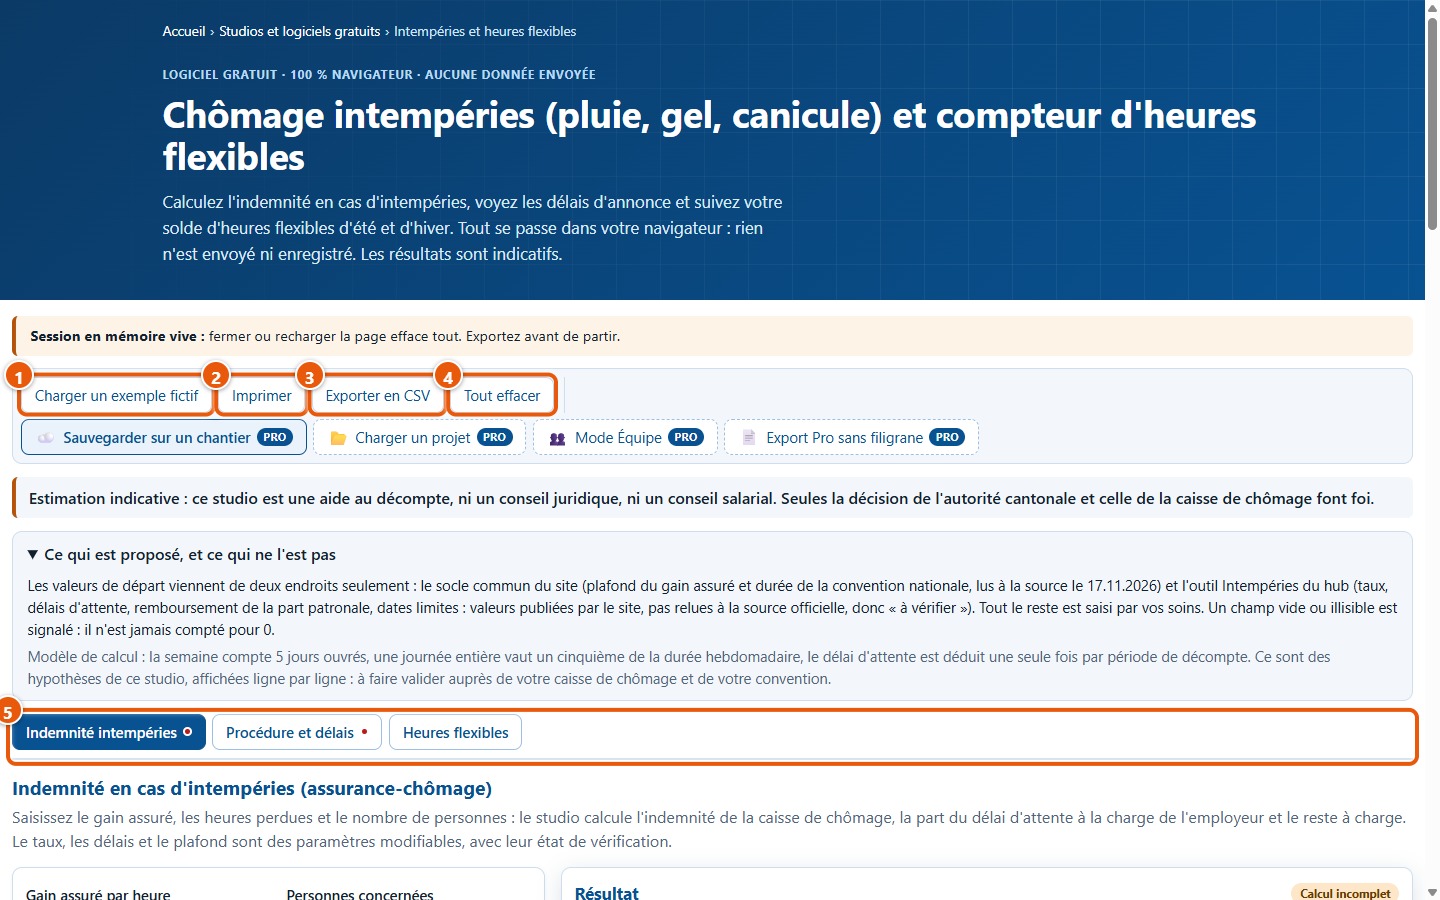
The studio runs in your browser, without an account or installation. The top buttons load an example (1), print (2), export to CSV (3), or clear everything (4). The three tabs (5) are Indemnité intempéries, Procédure et délais, and Heures flexibles; on your keyboard, the ← and → arrows switch between them.
2Reading the disclaimer
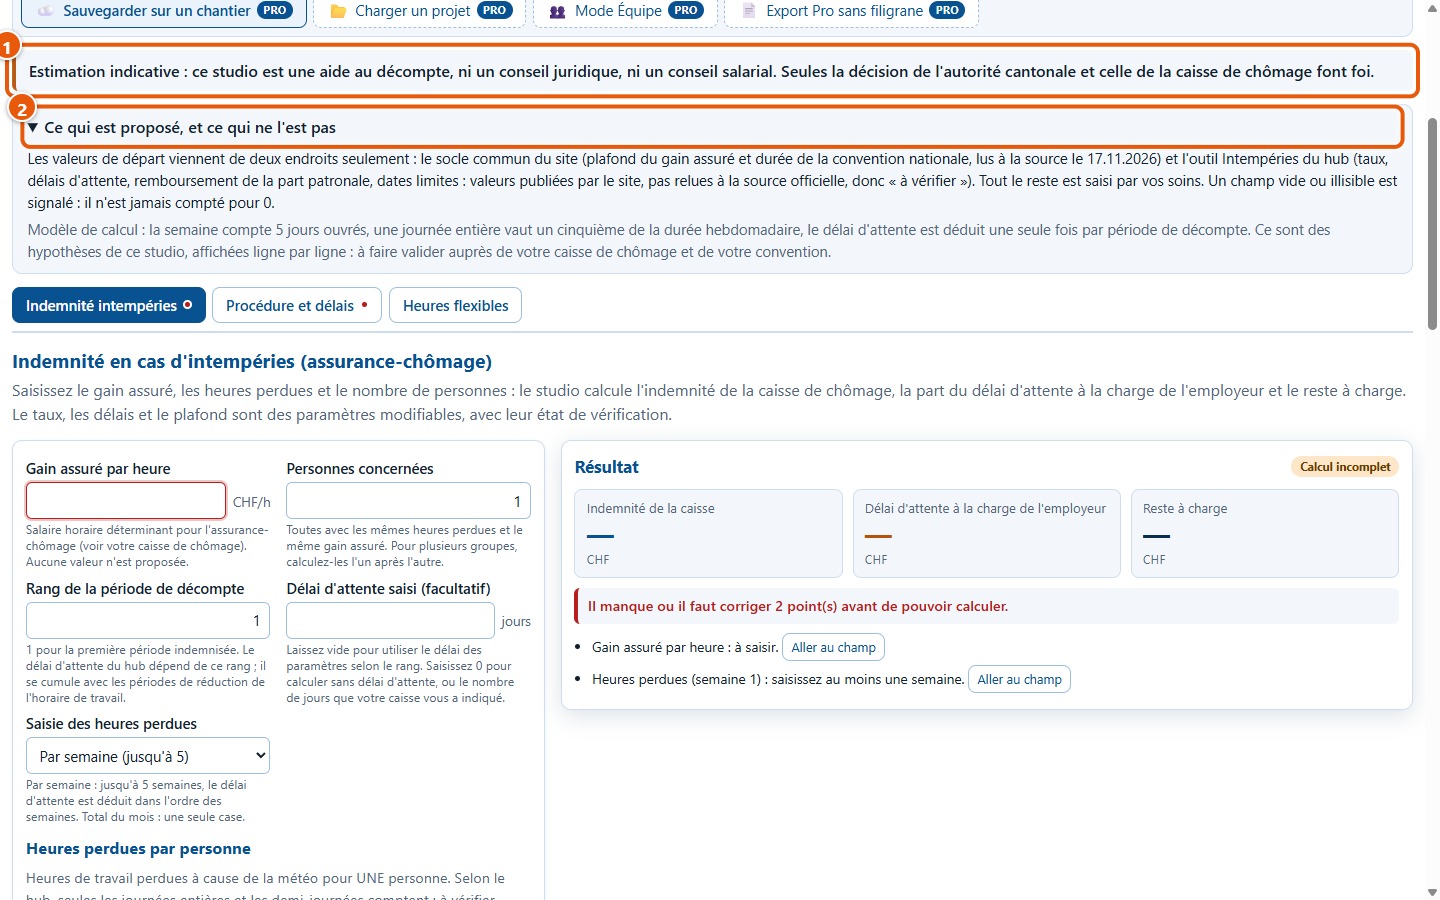
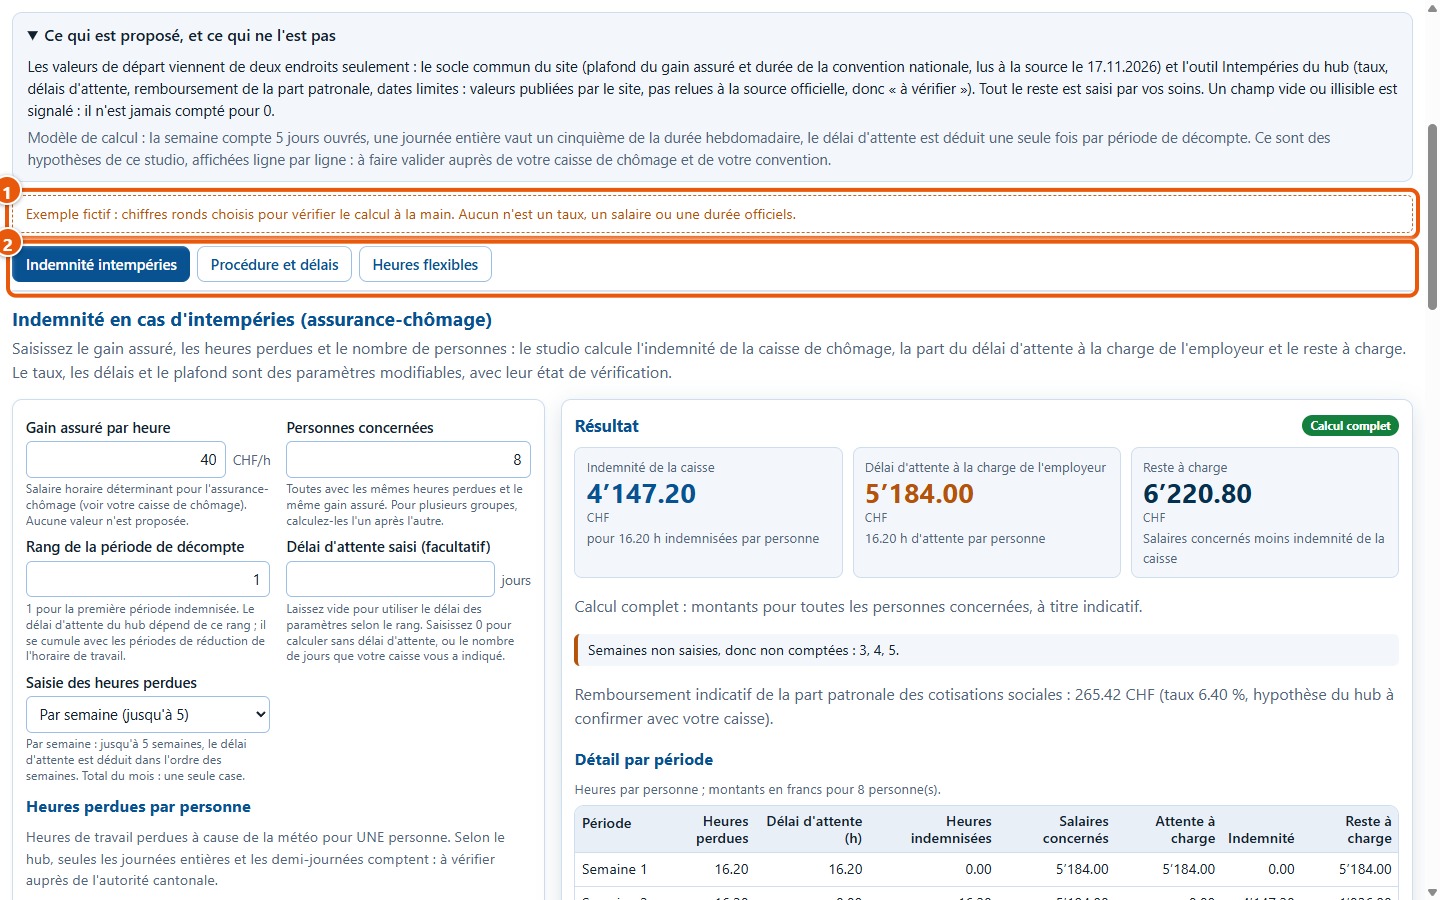
The studio is an aid for calculations: it is neither legal advice nor payroll advice (1). Only the decisions of the cantonal authority and the unemployment fund are authoritative. The box Ce qui est proposé, et ce qui ne l'est pas (2) states where the initial values come from: some are read from a source, others come from the site's bad weather tool and remain « à vérifier ».
3Understanding « Calcul incomplet »
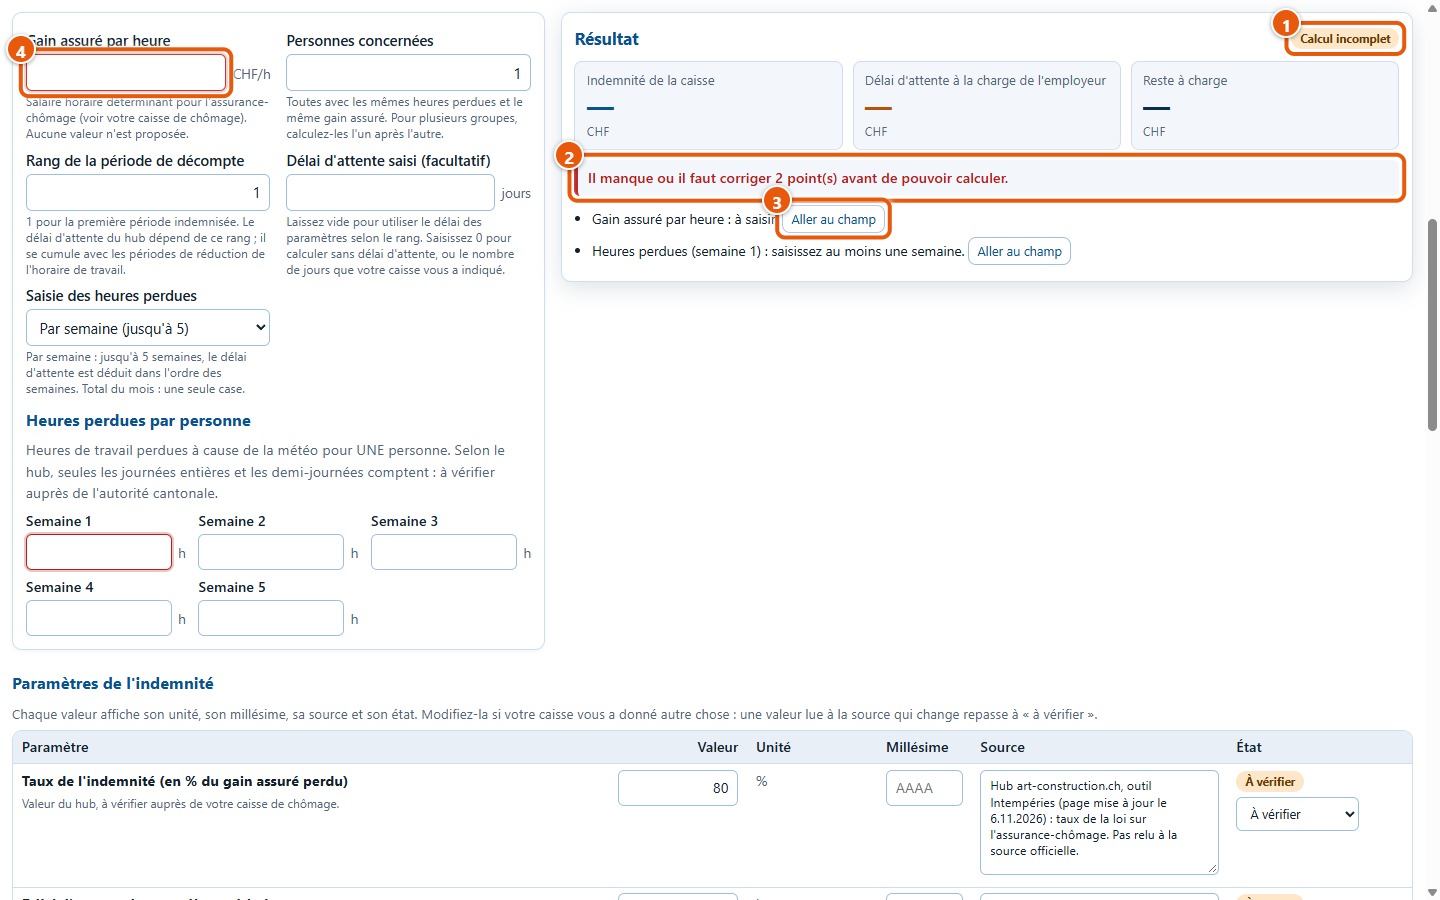
Initially, the insured earnings and lost hours are not filled in. The result displays Calcul incomplet (1) and no total: an empty field is never counted as 0. The list (2) indicates what is missing, with a button Aller au champ (3); fields to complete have a red outline (4), and a red dot on a tab indicates that something remains to be filled in there.
4Going to the field to complete
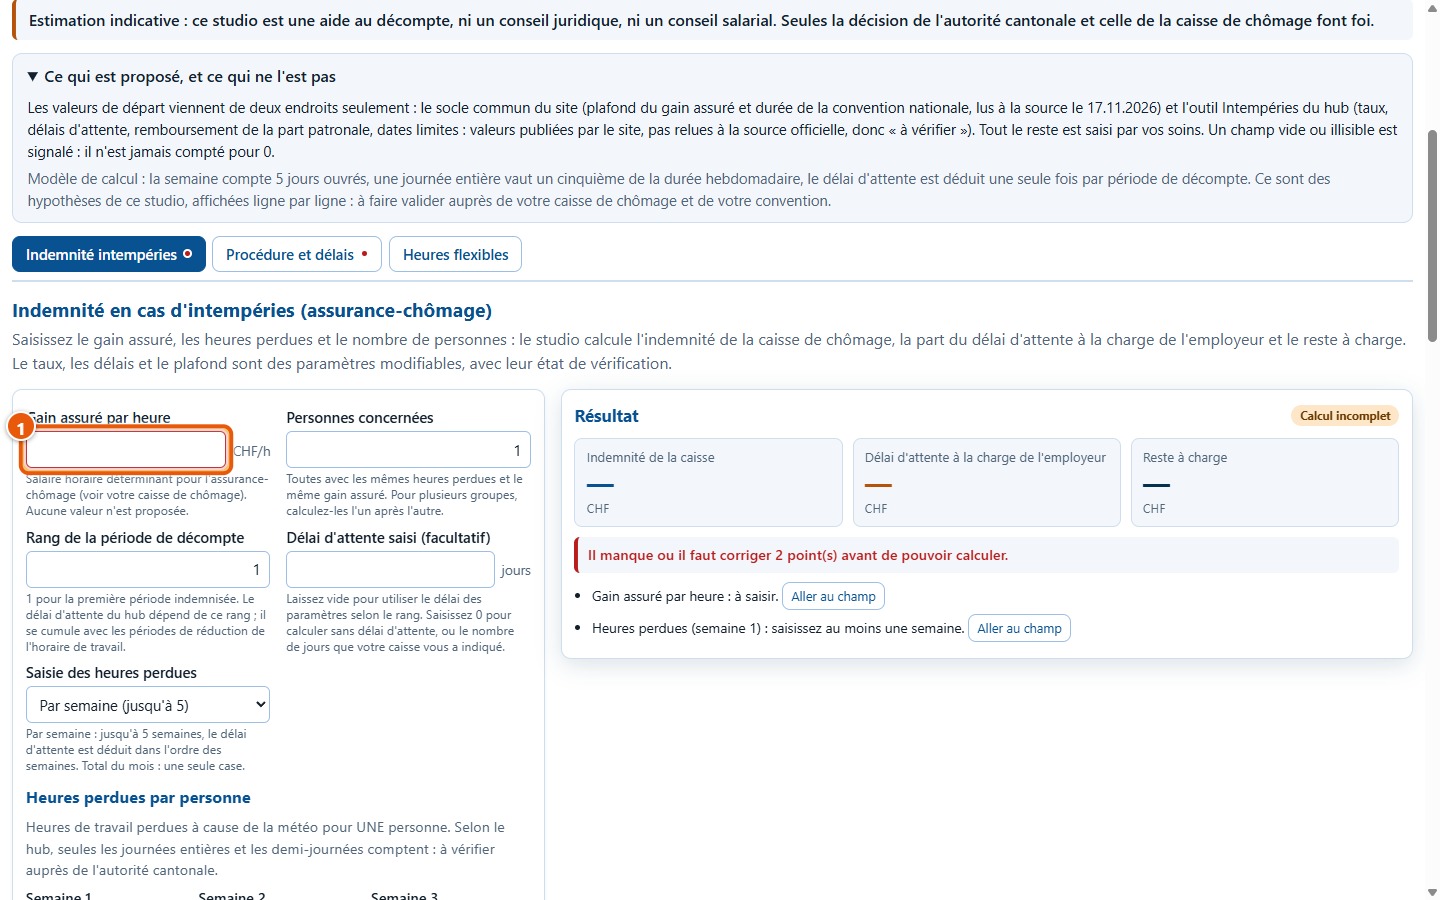
The button Aller au champ opens the correct tab and places the cursor in the relevant field (1). You only need to enter the value.
5Loading a mock example
To test without entering anything, click on Charger un exemple fictif. A banner (1) reminds you that these are rounded test figures: none are official rates, wages, or durations. All three tabs (2) are filled in and the calculation is complete.
2. Calculating bad weather compensation
6Entering the situation
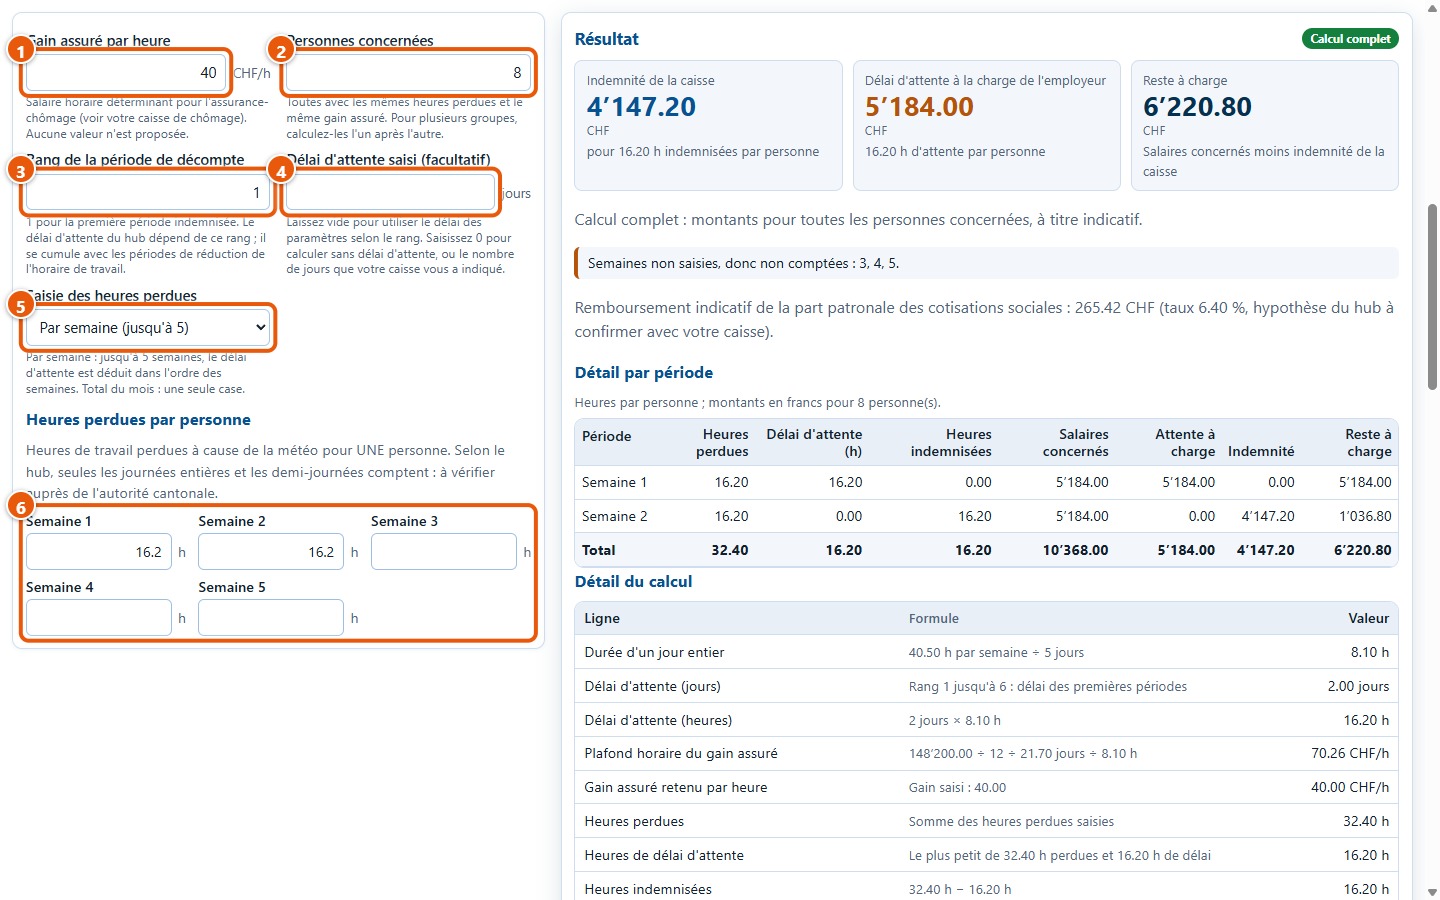
In the tab Indemnité intempéries, enter the insured hourly earnings (1), the number of people (2), and the ranking of the accounting period (3): 1 for the first compensated period. The entered waiting period (4) is optional: left empty, the studio uses the one from the settings based on rank; 0 calculates without a waiting period. Choose weekly entry (5), then the hours lost by one person for each week (6), up to five weeks.
7Entering the monthly total
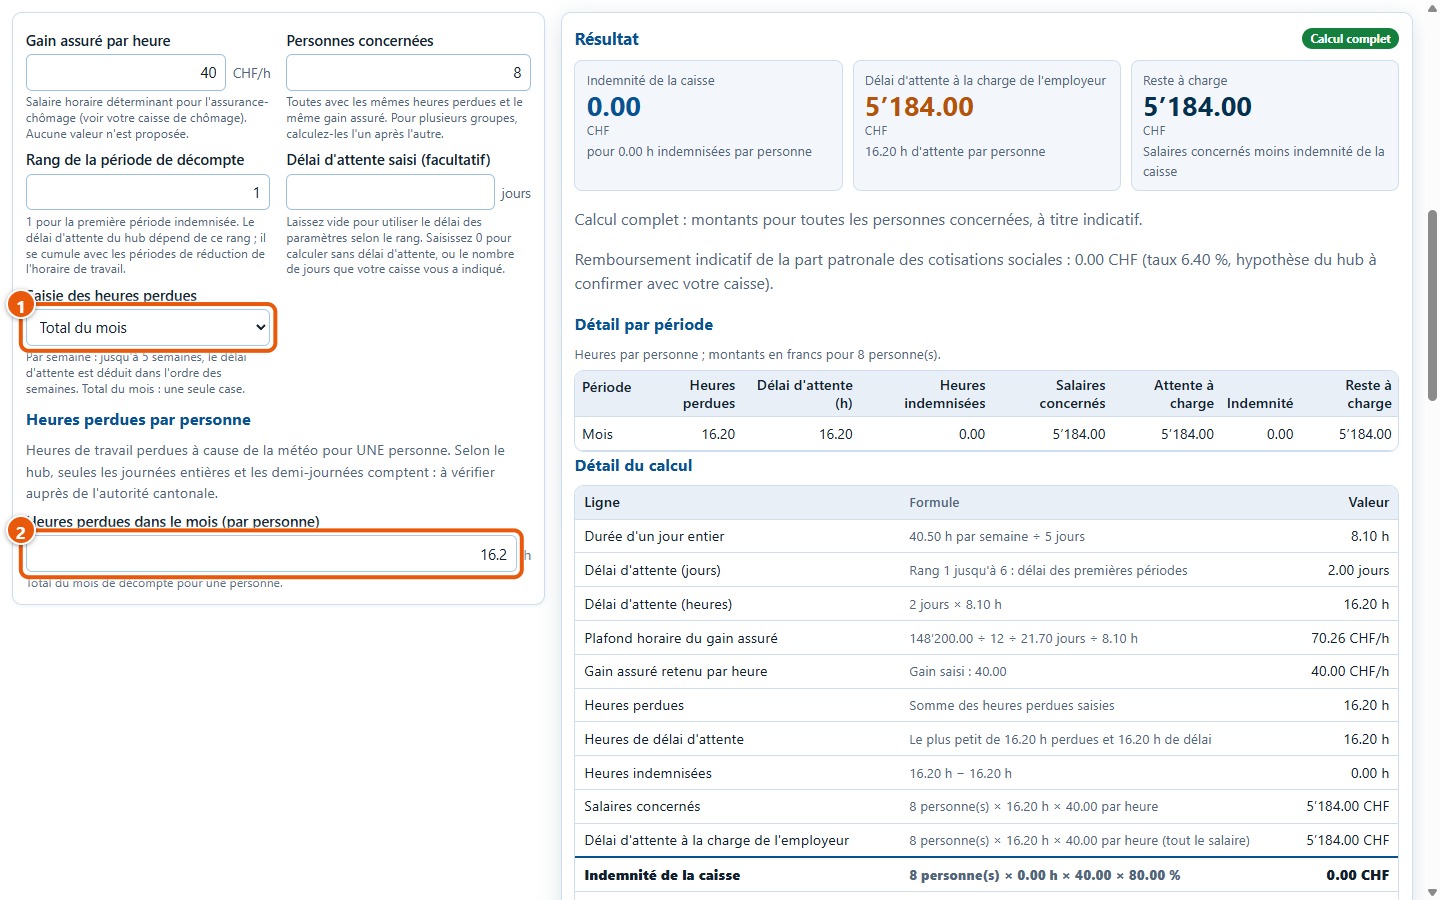
The option Total du mois (1) replaces the five boxes with a single one (2): the total lost hours in the month, for one person. When you return to weekly entry, your figures for each mode are kept.
8Reading the result
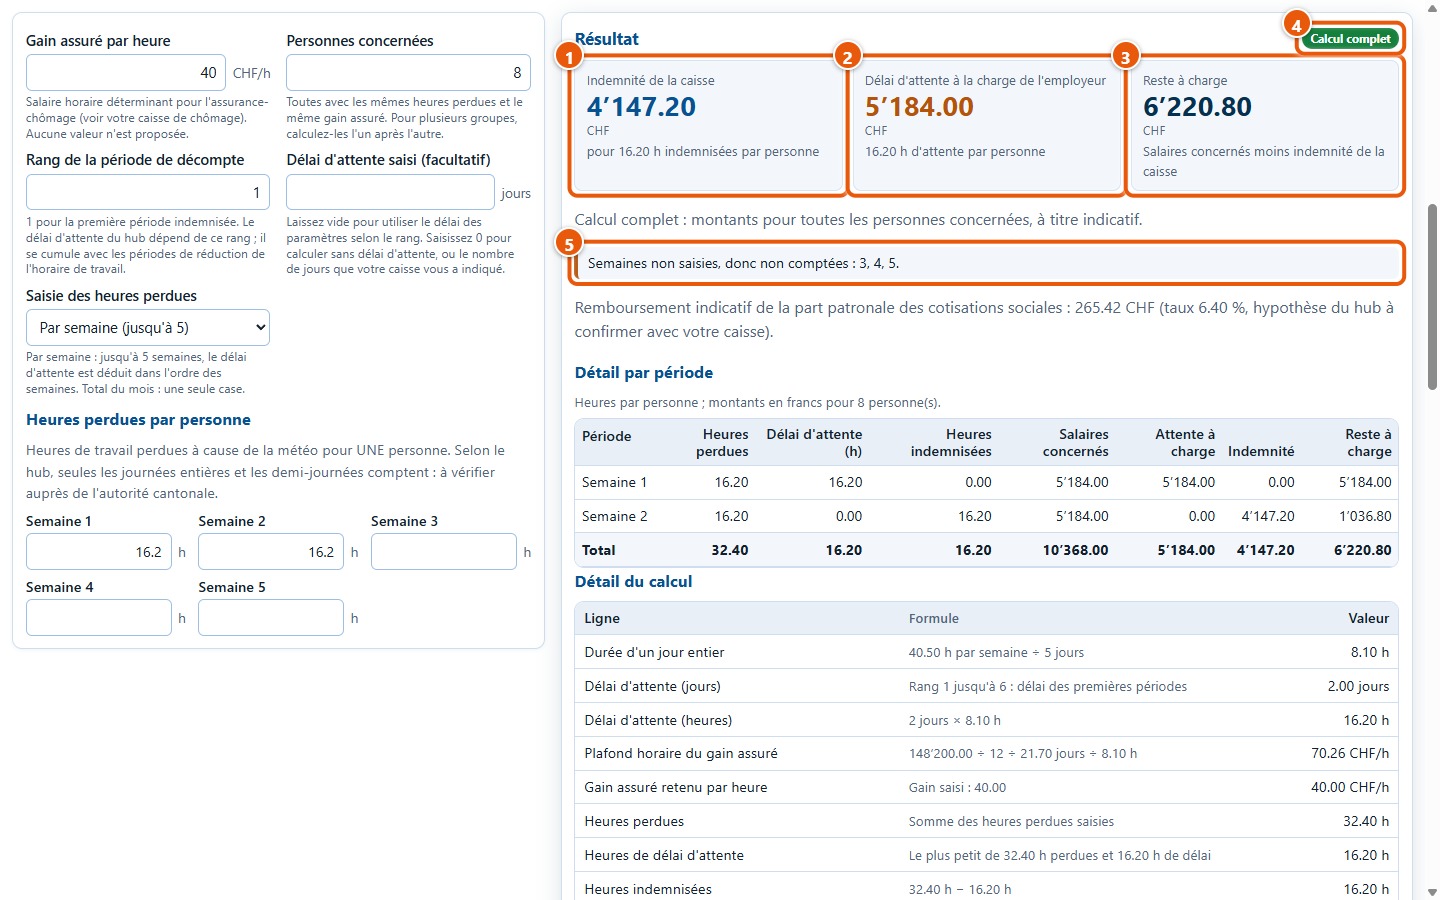
On the right, the result updates with each entry: compensation from the fund (1), waiting period payable by the employer (2), and the remaining employer share (3). Calcul complet (4) appears when nothing is missing. Weeks left empty are not counted, and the studio states this (5).
9Viewing the period breakdown
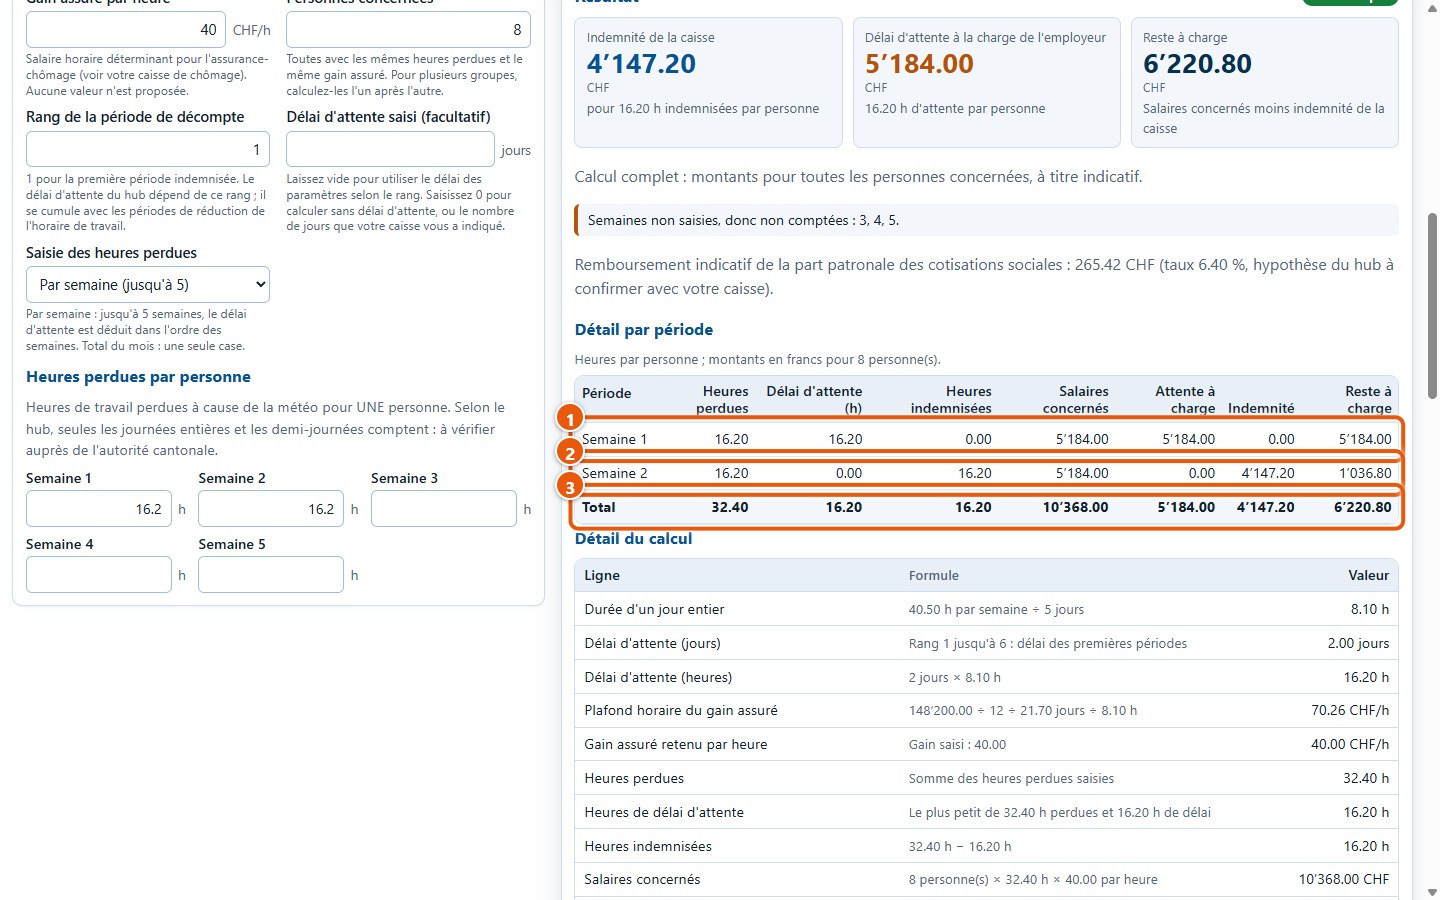
The table Détail par période provides, for each week (1) (2) and for the total (3), the lost hours, waiting period, compensated hours, relevant wages, and amounts in francs. The waiting period is deducted only once, in chronological order of the weeks.
10Recalculating manually
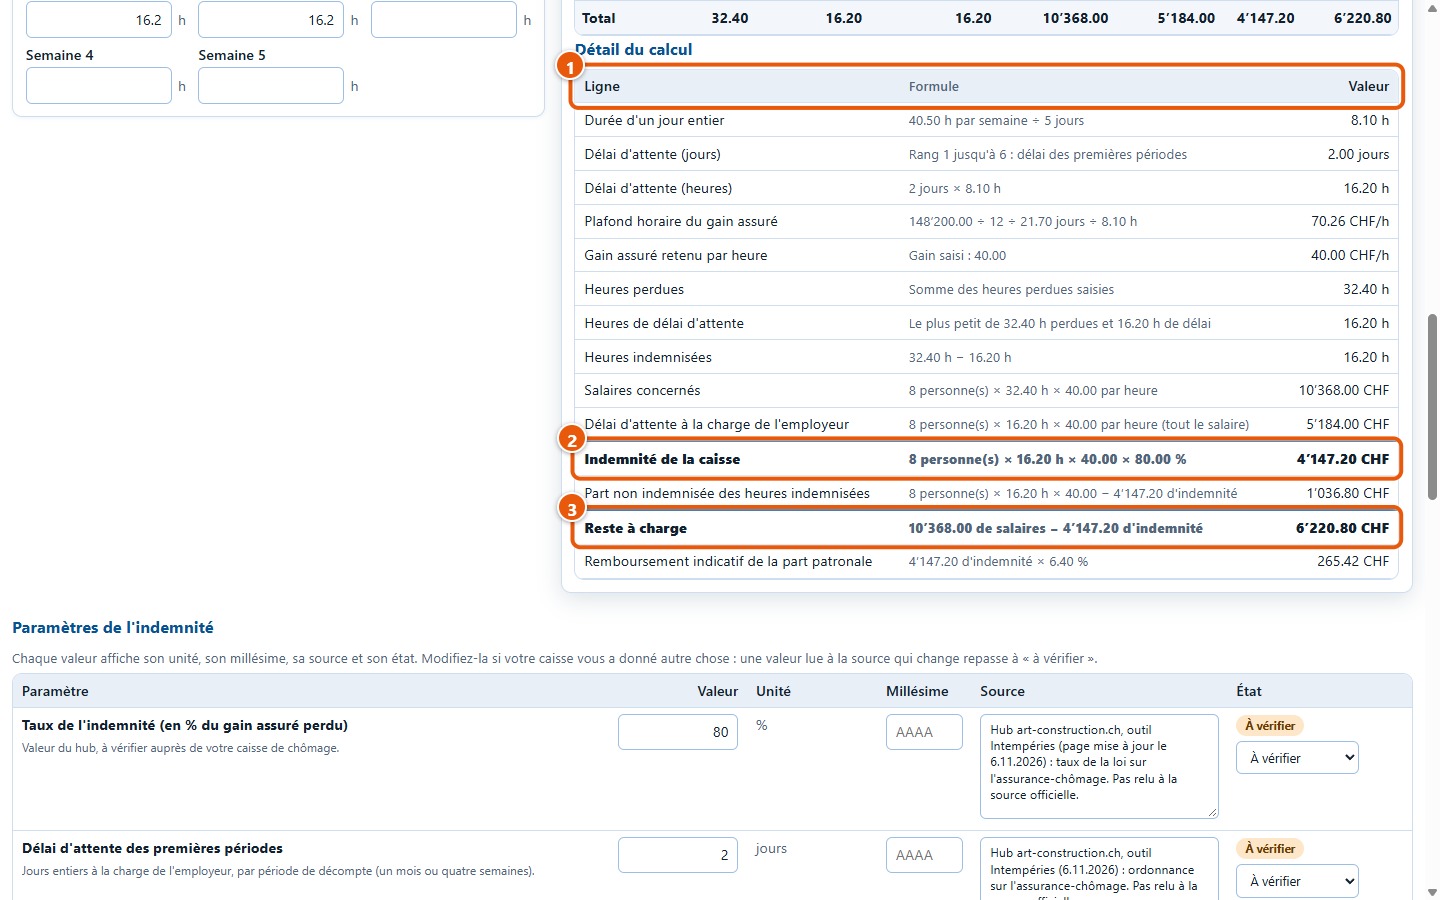
The Détail du calcul (1) shows the formula for each line using your figures. The compensation from the fund (2) is the number of persons × compensated hours × taken earnings × rate; the remaining cost (3) is the relevant wages minus the compensation.
11Earnings above the ceiling
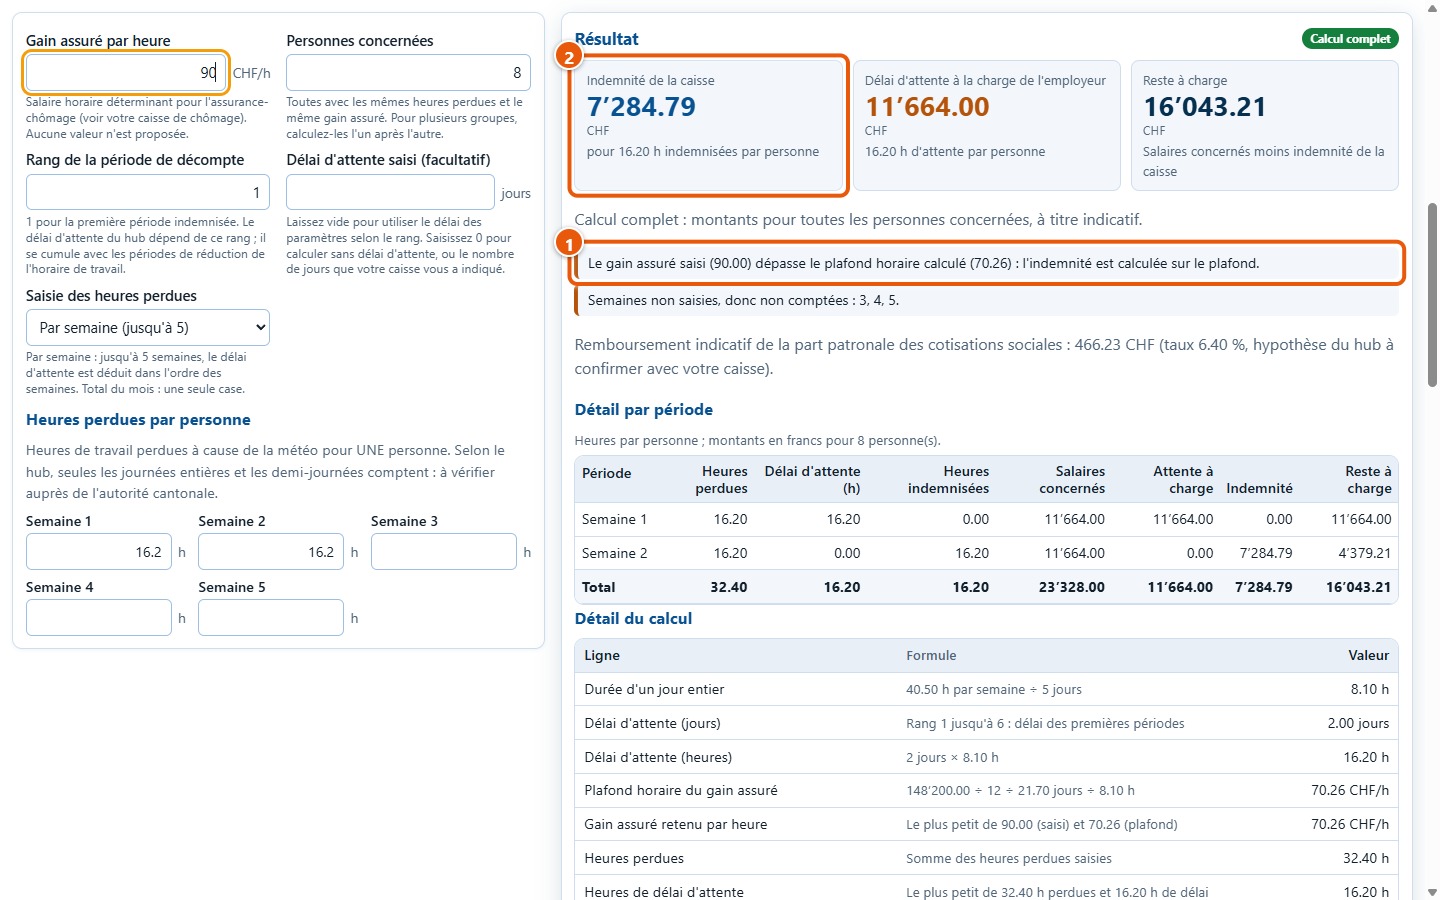
If the entered earnings exceed the hourly ceiling calculated from the annual insured earnings ceiling, the studio flags it (1) and calculates the compensation based on the ceiling (2). In the image, earnings of 90 are brought down to the calculated hourly ceiling of 70.26.
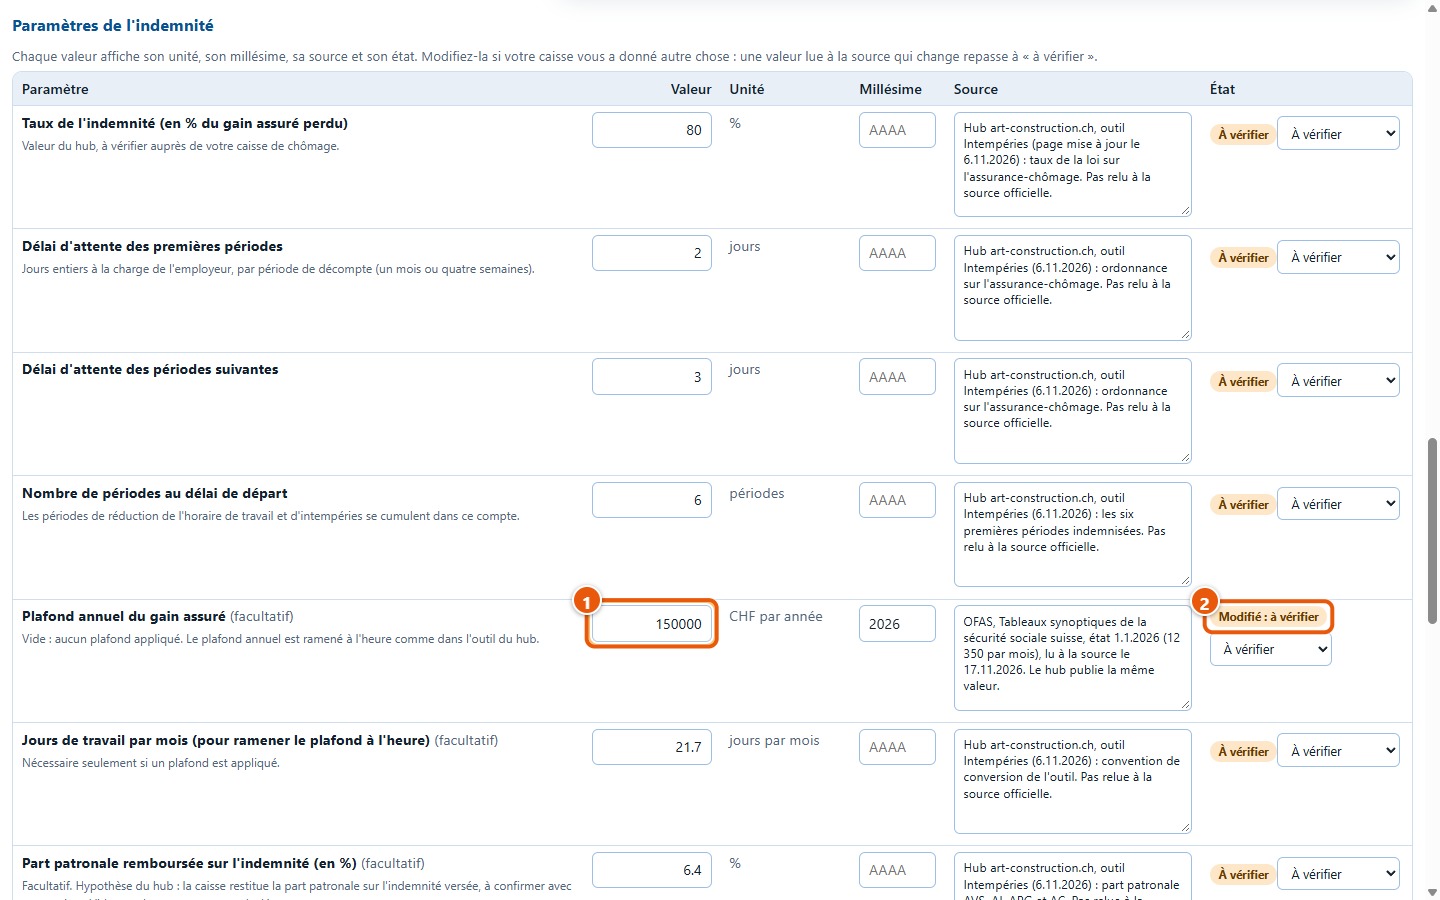
12Reading the parameters
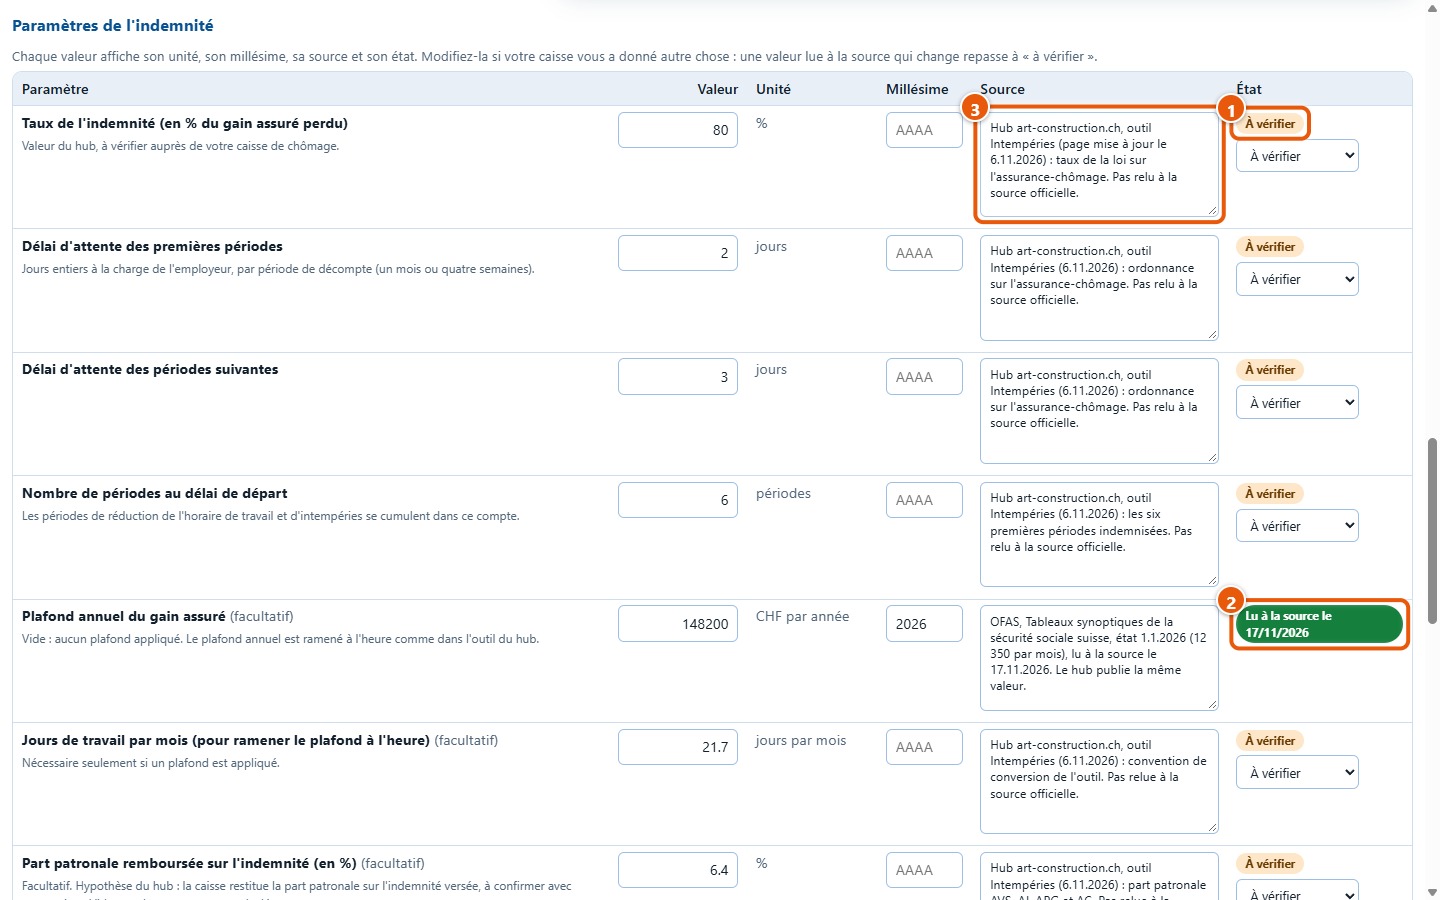
Below the result, each parameter (rate, waiting periods, ceiling, weekly hours…) displays its value, unit, reference year, source and status. À vérifier (1) means the value comes from the site's Intempéries tool and has not been checked against the official source; Lu à la source (2) gives the date it was checked. You can also edit the source text (3).
13Modifying a value
If your fund provided a different value, replace it (1). The status of a value « lue à la source » then switches to Modifié : à vérifier (2), and the result updates immediately.
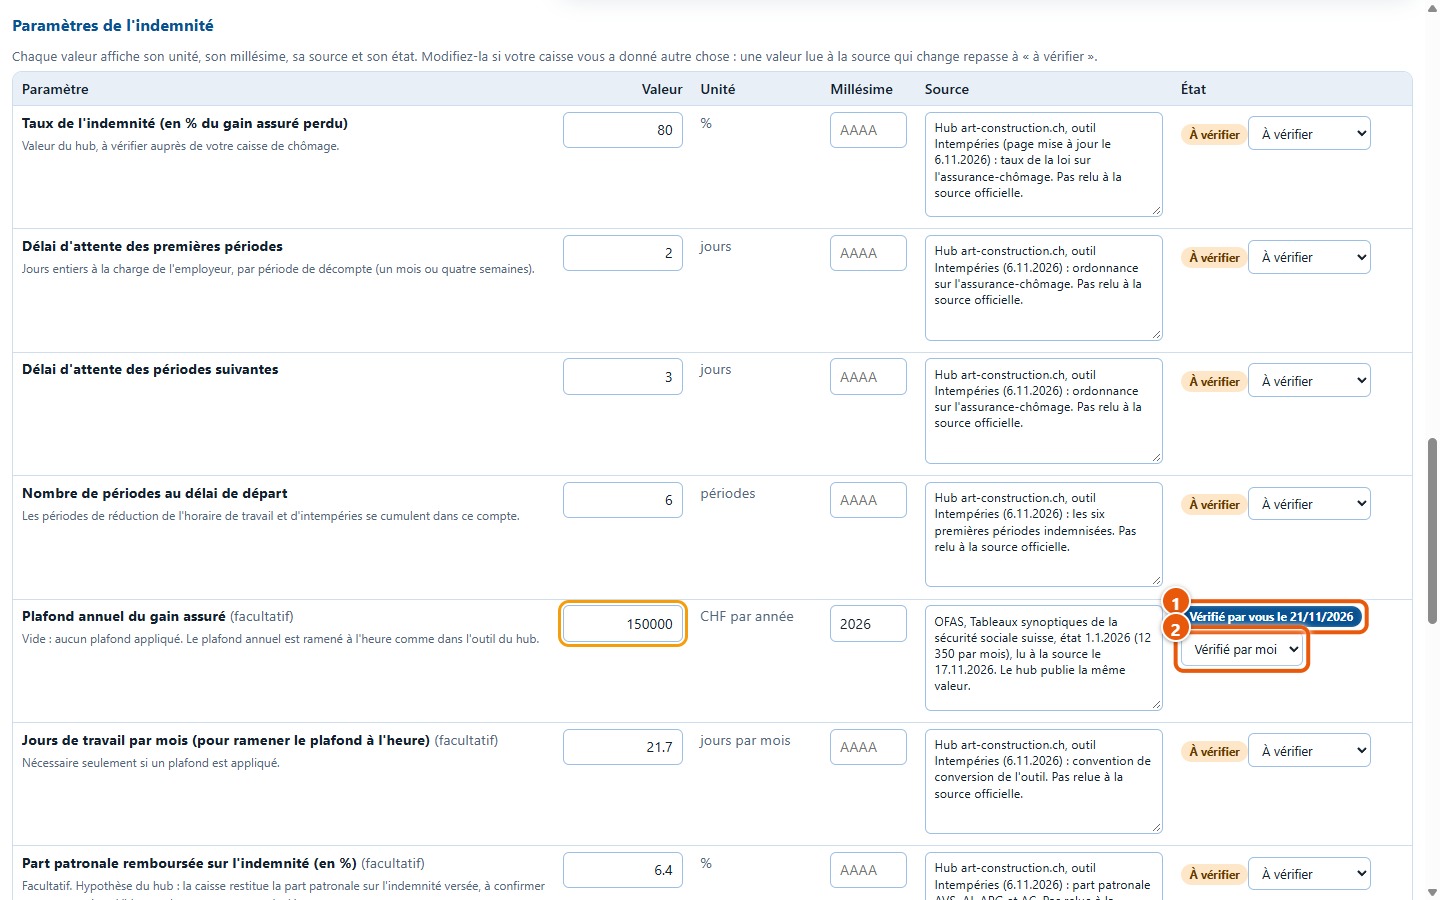
14Marking as « Vérifié par moi »
Once you have verified a value in your documents, select Vérifié par moi from the list (2): the line displays your check and today's date (1). This note remains on the page as long as it stays open; it is not saved.
3. Procedure and deadlines
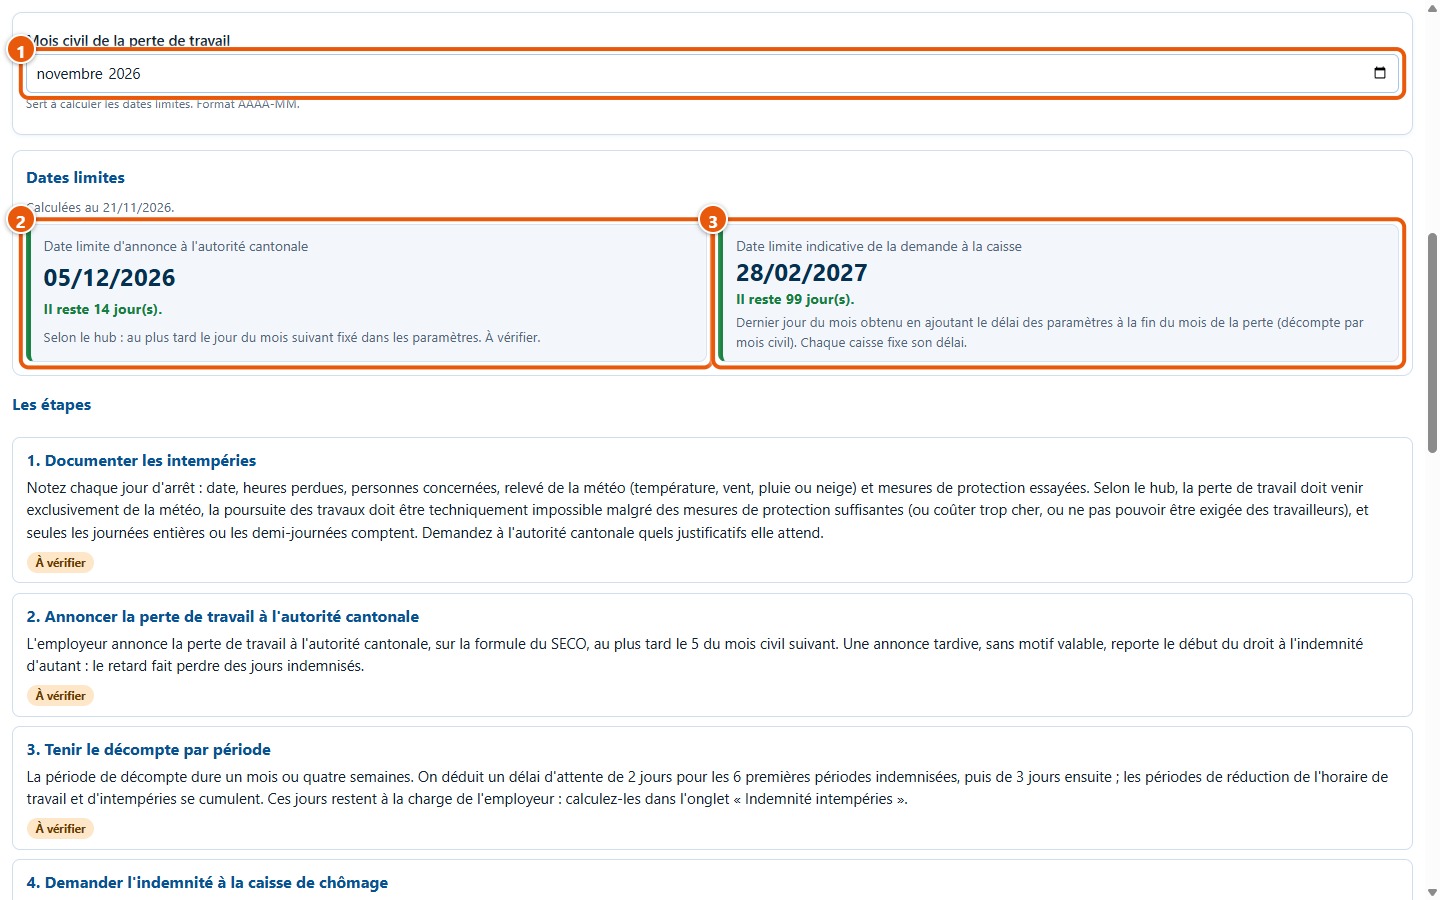
15Calculating deadlines
Under the Procédure et délais tab, select the calendar month of the work loss (1). The studio calculates the deadline for reporting to the cantonal authority (2) and the indicative deadline for applying to the fund (3), along with remaining days, « urgent » or « date dépassée ». Remaining days depend on the day you open the page; in the images, the current date is 21.11.2026.
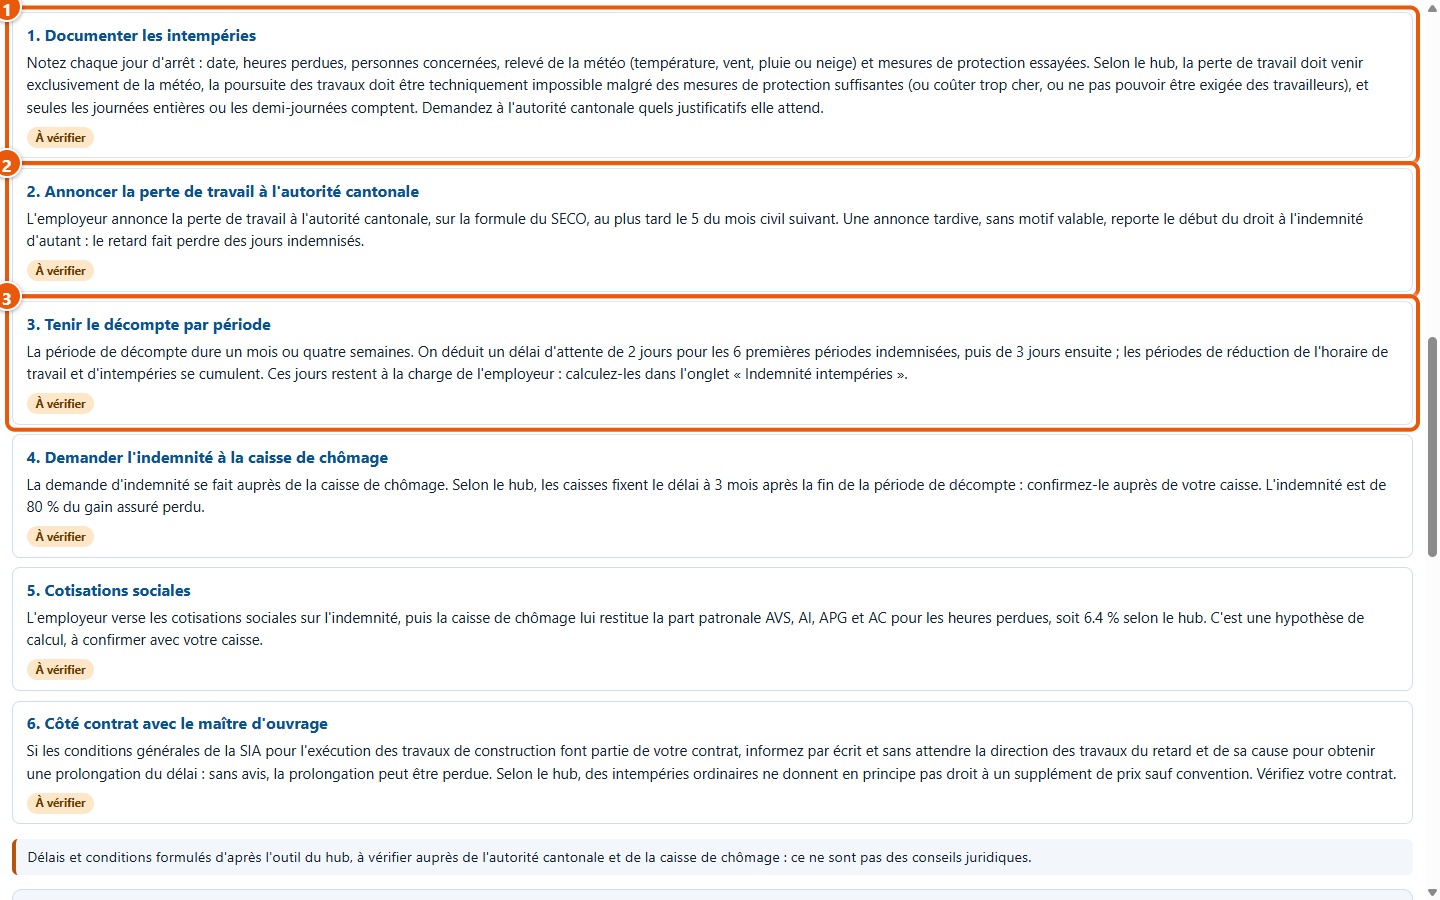
16Following the six steps
Six steps: document the bad weather (1), report the work loss to the cantonal authority (2), maintain records by period (3), then claim compensation from the fund, settle social contributions and review the contractual side. Deadlines shown in the text are based on parameters: if you change them, the text changes. Each step is marked « À vérifier ».
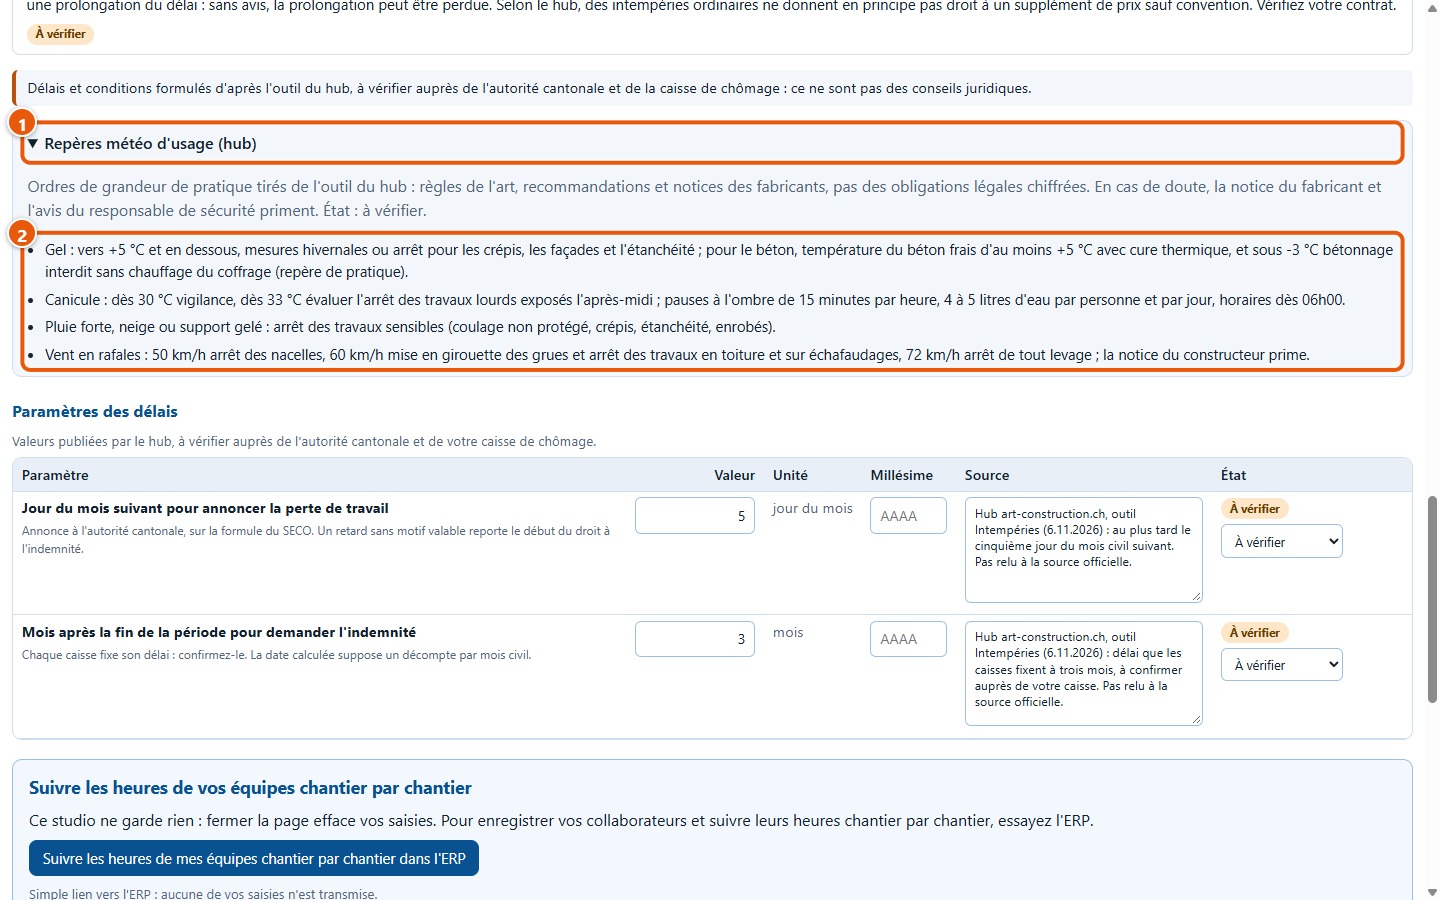
17Consulting standard weather benchmarks
The Repères météo d'usage box (1) opens with a click. It provides practical standard guidelines for frost, heatwaves, rain and wind (2). These are not legal requirements: manufacturer instructions and the safety officer's assessment take precedence.
4. Maintaining the flexible hours balance
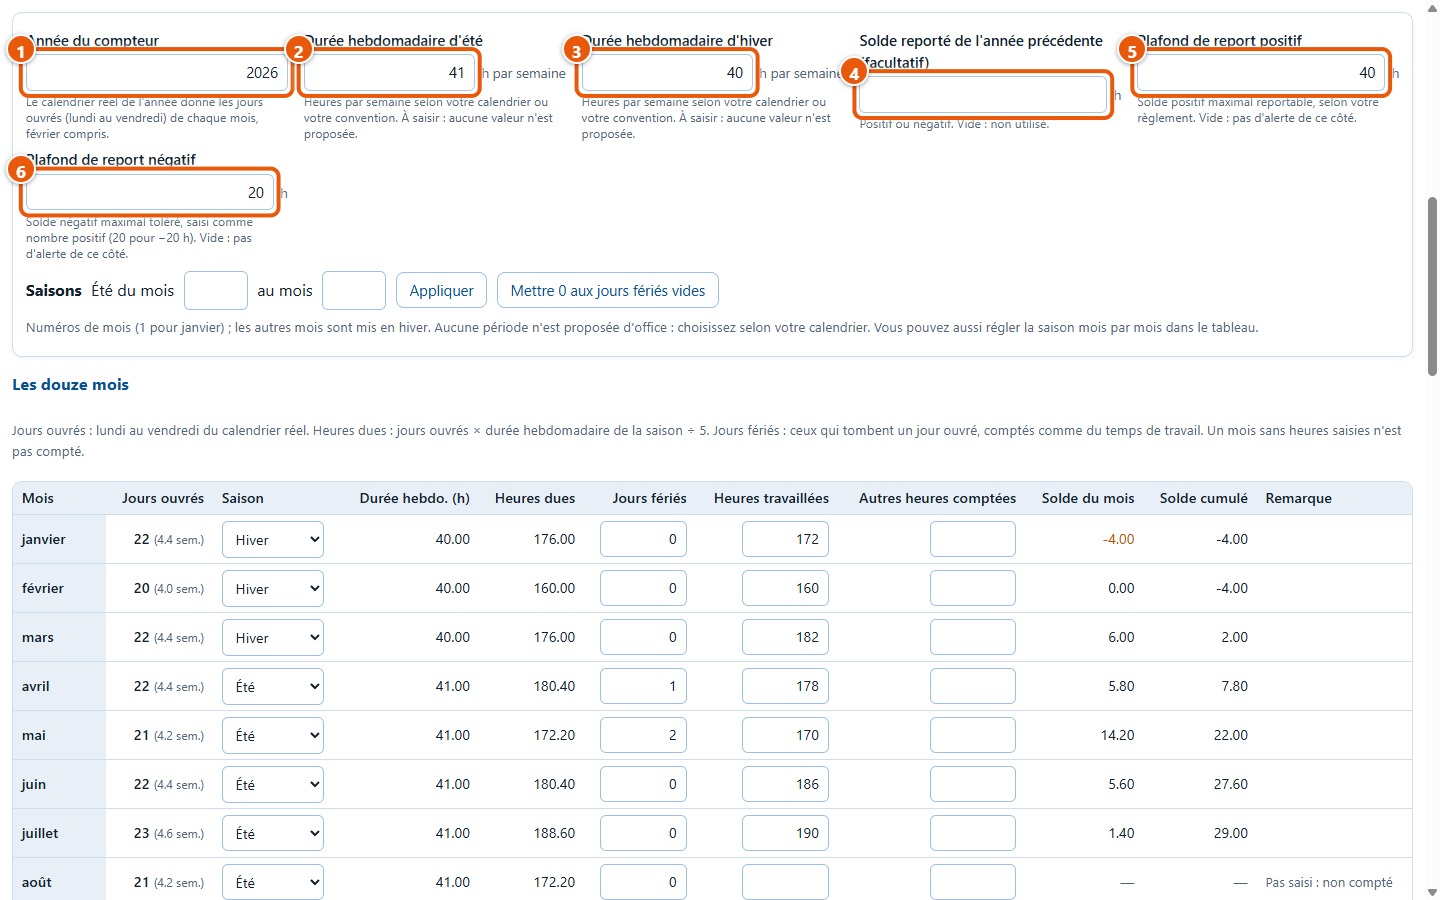
18Setting the year
Under the Heures flexibles tab, enter the year (1), the weekly summer hours (2) and weekly winter hours (3). The balance carried over from the previous year (4) is optional. The positive (5) and negative (6) carryover caps are used for alerts; enter the negative limit as a positive number (20 for −20 h).
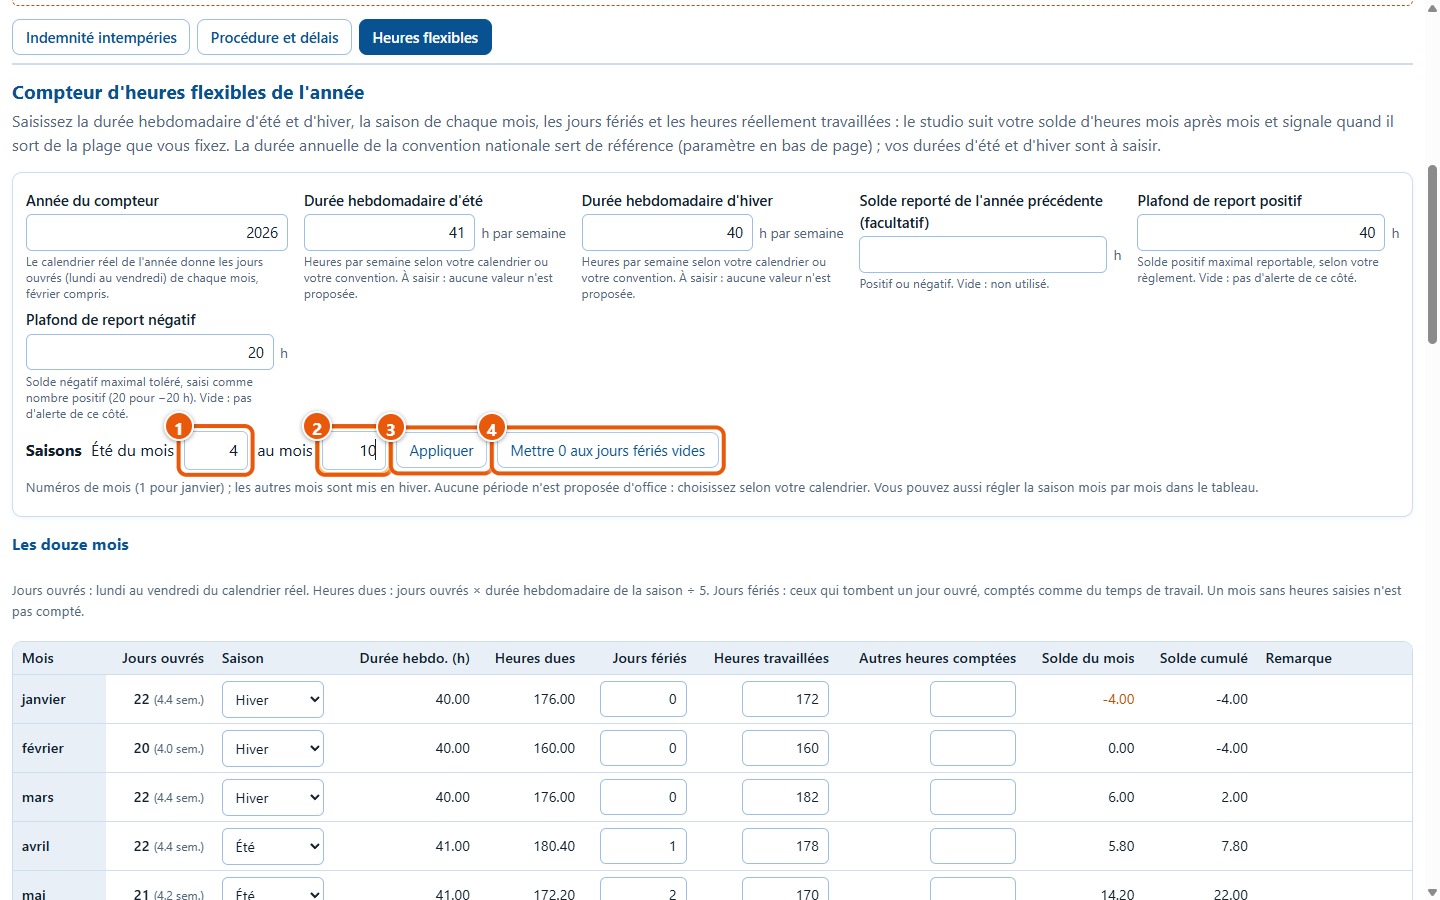
19Selecting seasons
Enter the start month (1) and end month (2) for summer, such as 4 and 10, then click Appliquer (3): these months switch to summer, the others to winter. No period is suggested automatically. Button (4) is explained below. The video demonstrates the actions for this section, from entering hours to the chart, using sample figures.
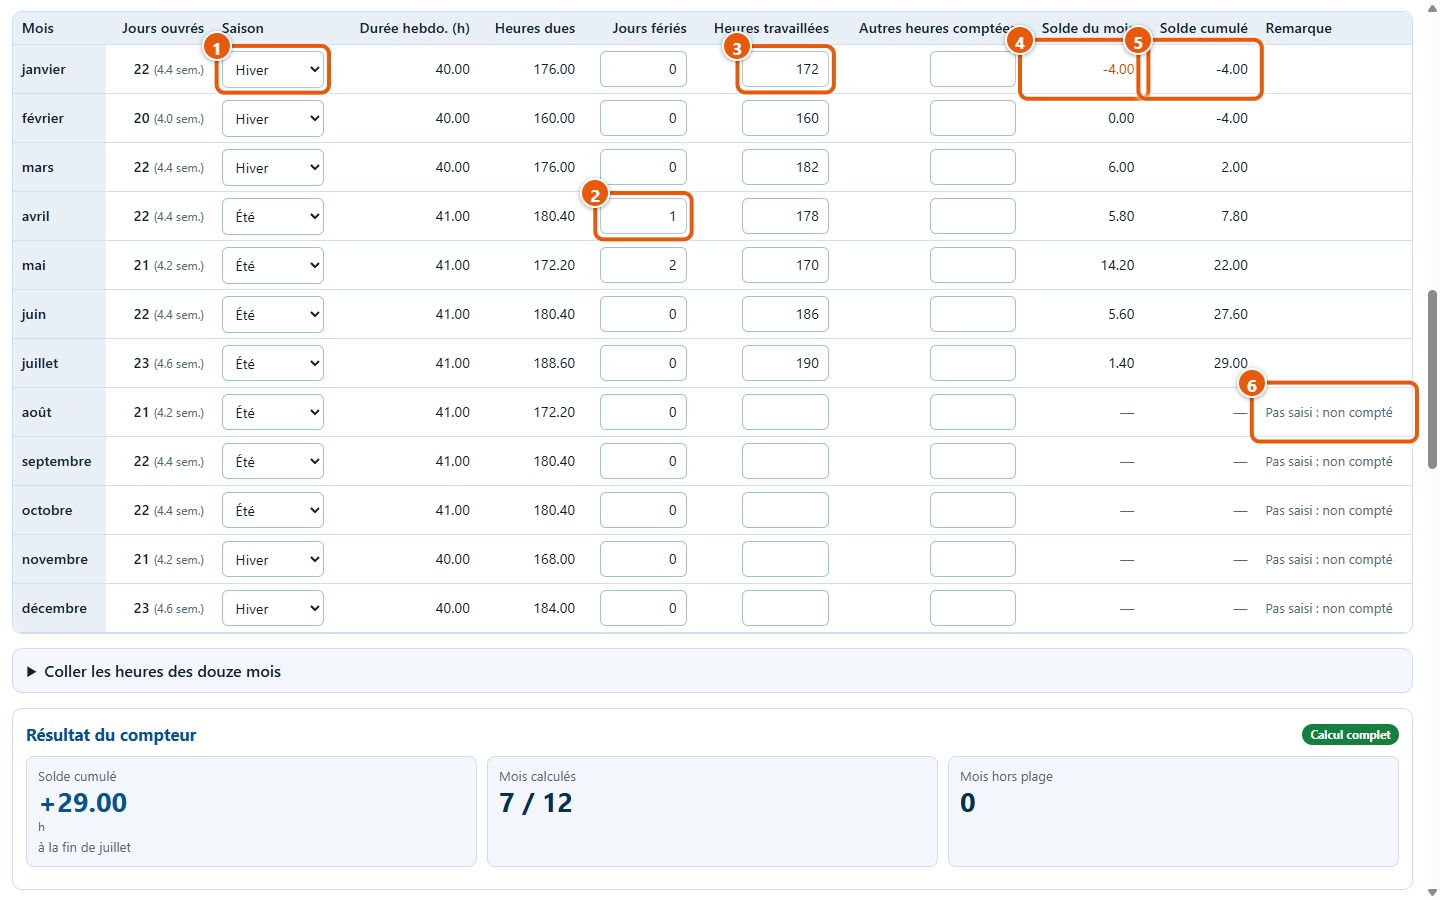
20Reading the twelve months
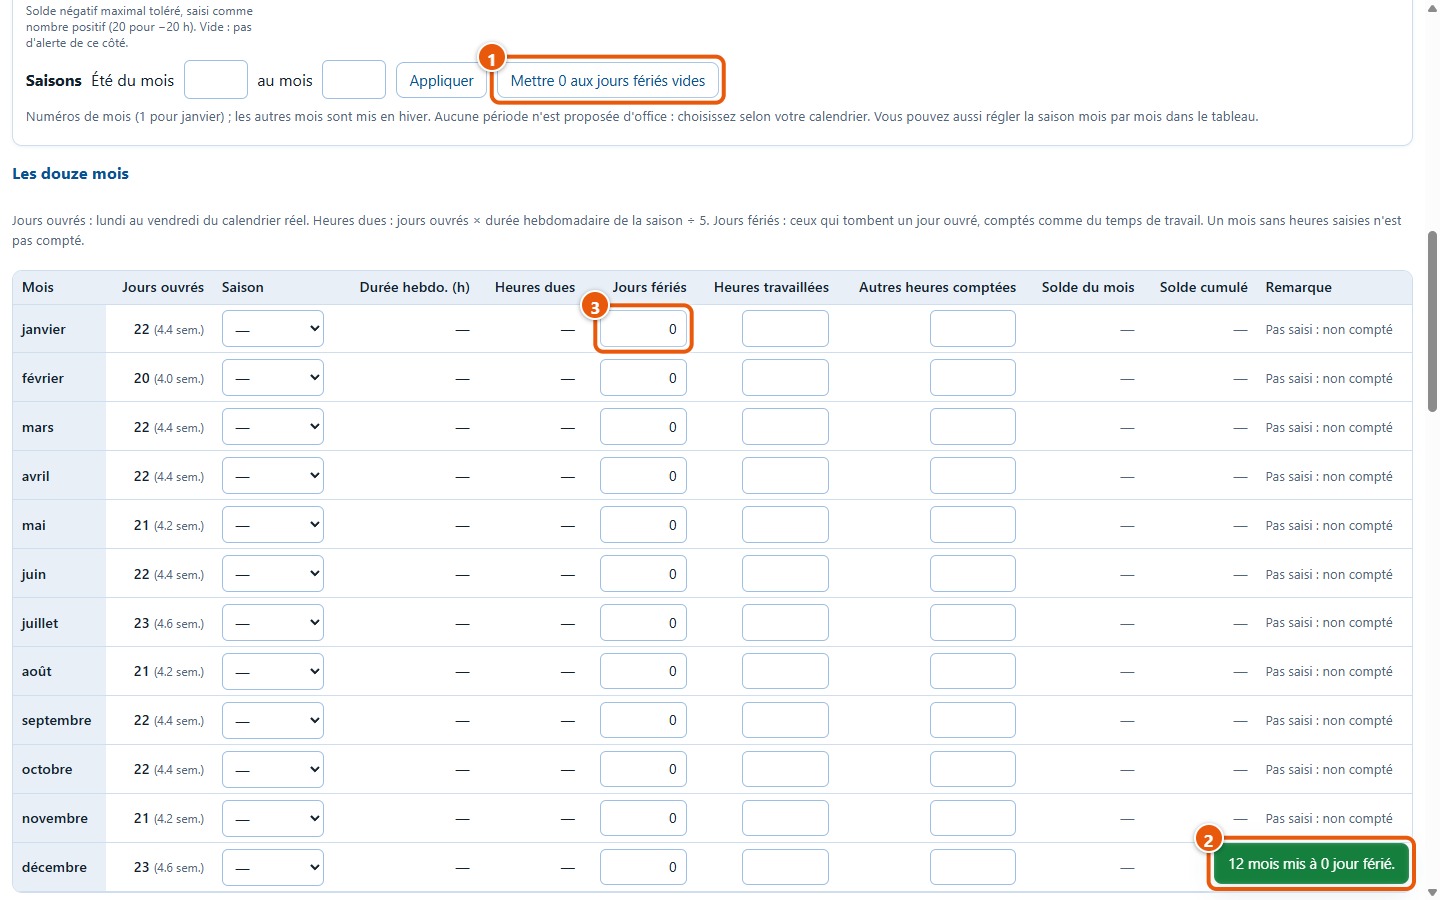
For each month, the table gives the working days of the actual calendar (Monday to Friday), the season (1) and the weekly hours. The hours due are working days × weekly hours ÷ 5. Enter public holidays that fall on a working day (2) and hours actually worked (3); the balance for the month (4) and the cumulative balance (5) are calculated automatically. A month without entered hours is not counted (6).
21Set 0 for empty public holidays
An empty field is never counted as 0. If no month has a public holiday, click Mettre 0 aux jours fériés vides (1): a message (2) states how many months were populated and the fields change to 0 (3). This is the only case where the studio enters a 0 for you, and only upon your request.
22Paste hours from a spreadsheet
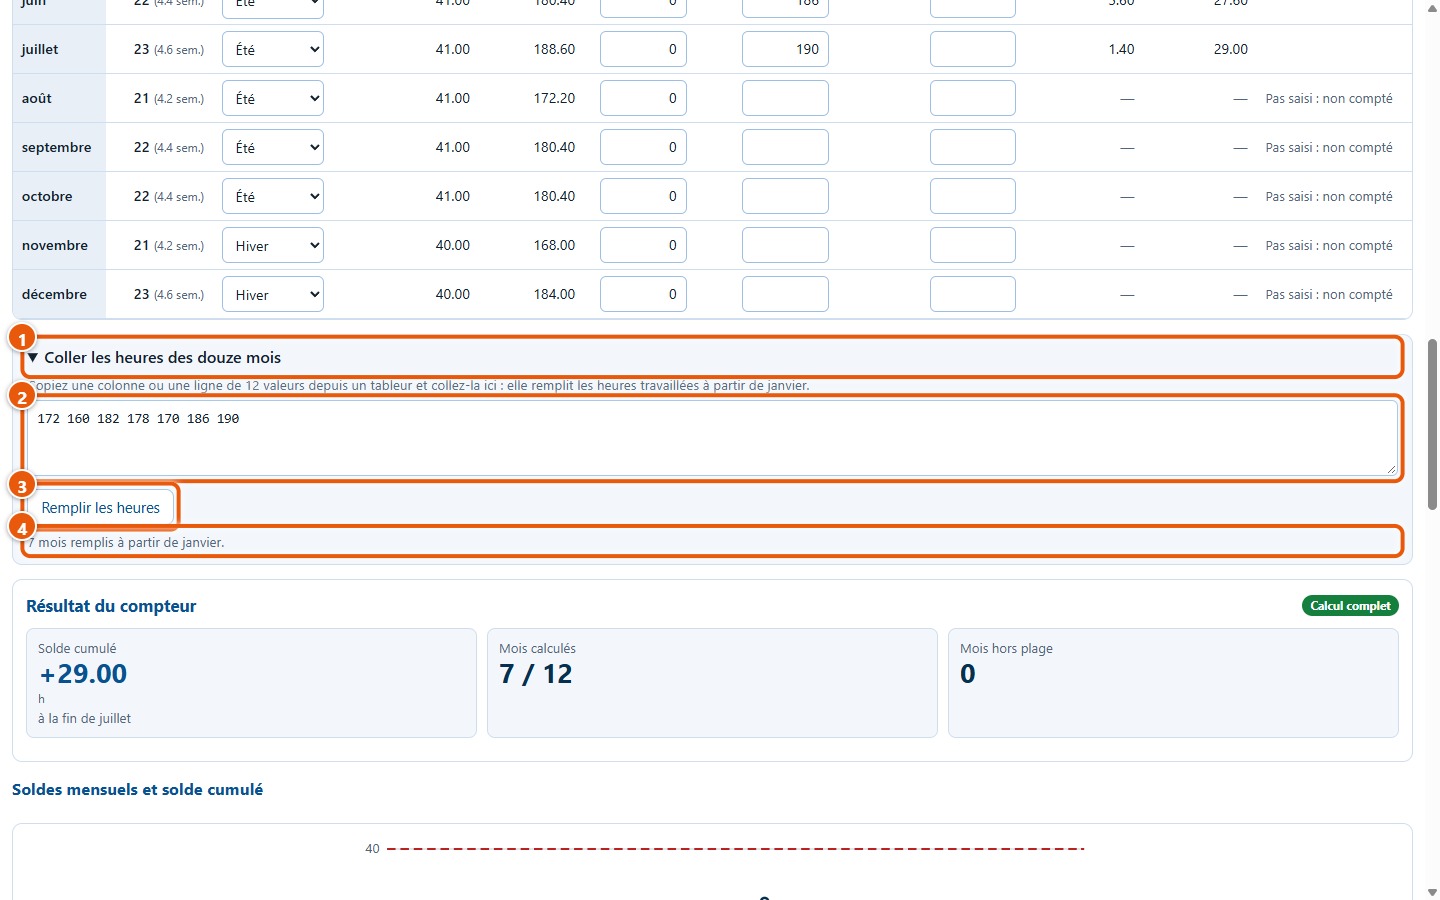
Copy a row or a column of values in your spreadsheet and paste it into Coller les heures des douze mois (1) (2). Clicking Remplir les heures (3) fills in the hours worked starting from January; a message states how many months were filled (4). Beyond twelve values, any surplus is ignored and flagged.
23Read the hours tracker result
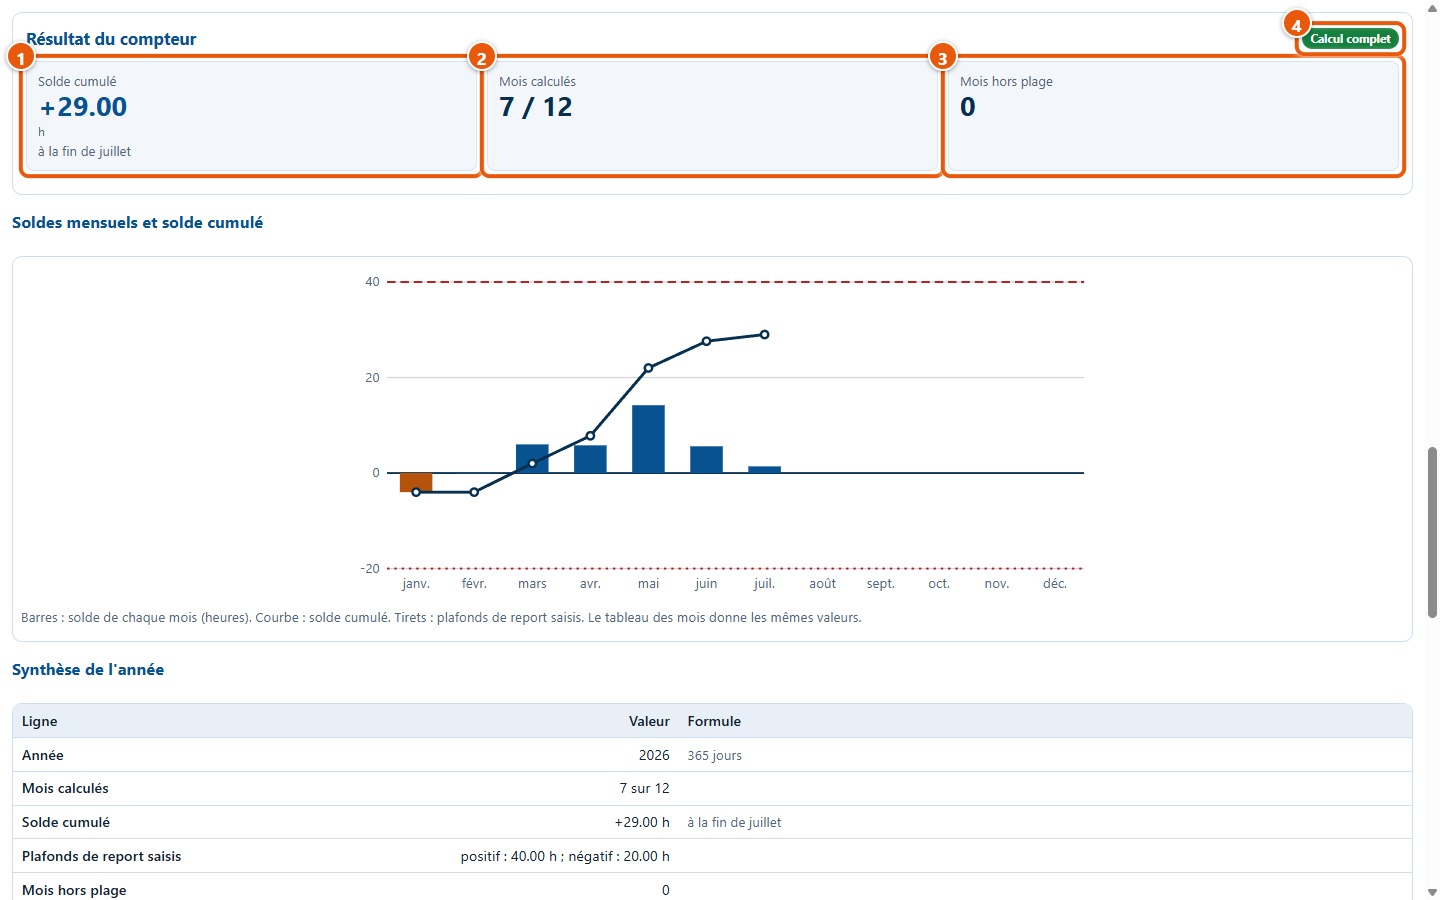
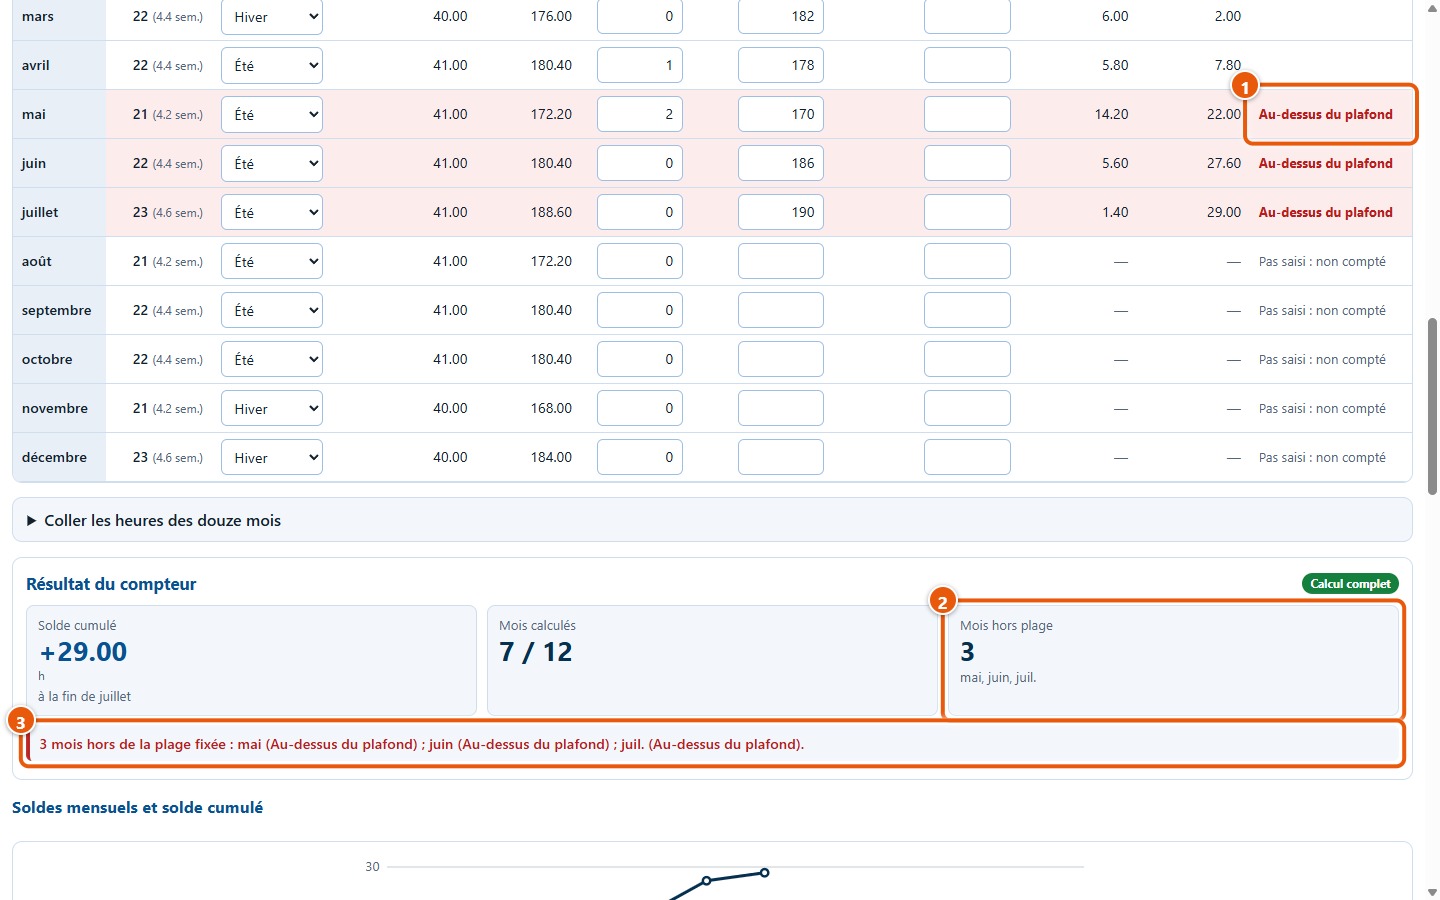
The cumulative balance (1) is that of the last calculated month: here +29.00 h at the end of July. Mois calculés (2) counts the months with entered hours. Mois hors plage (3) counts the months falling outside the caps you entered. Calcul complet (4) states whether anything is missing.
24Read the chart
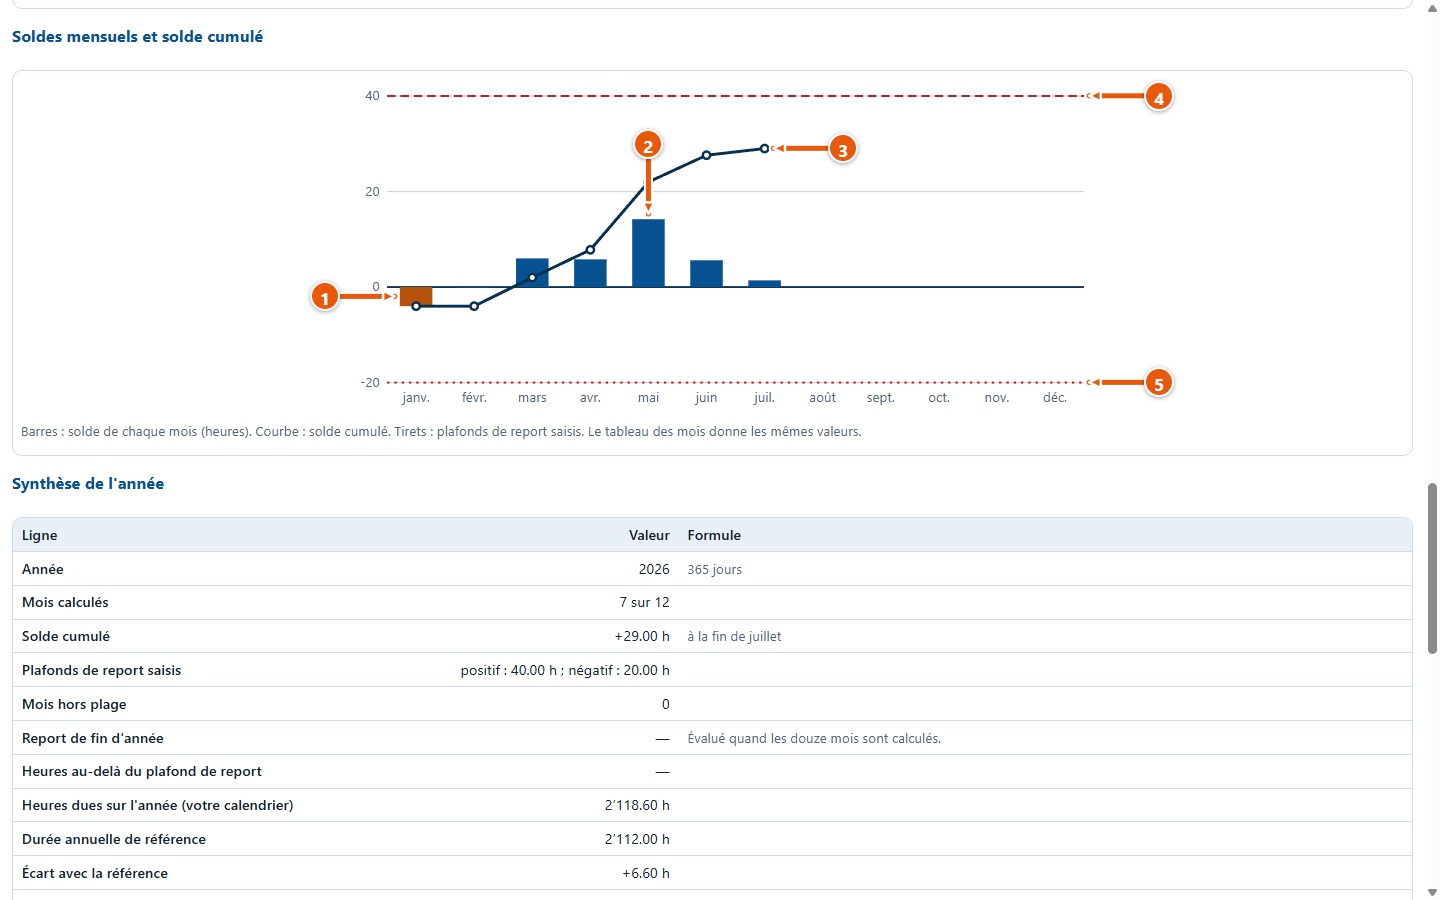
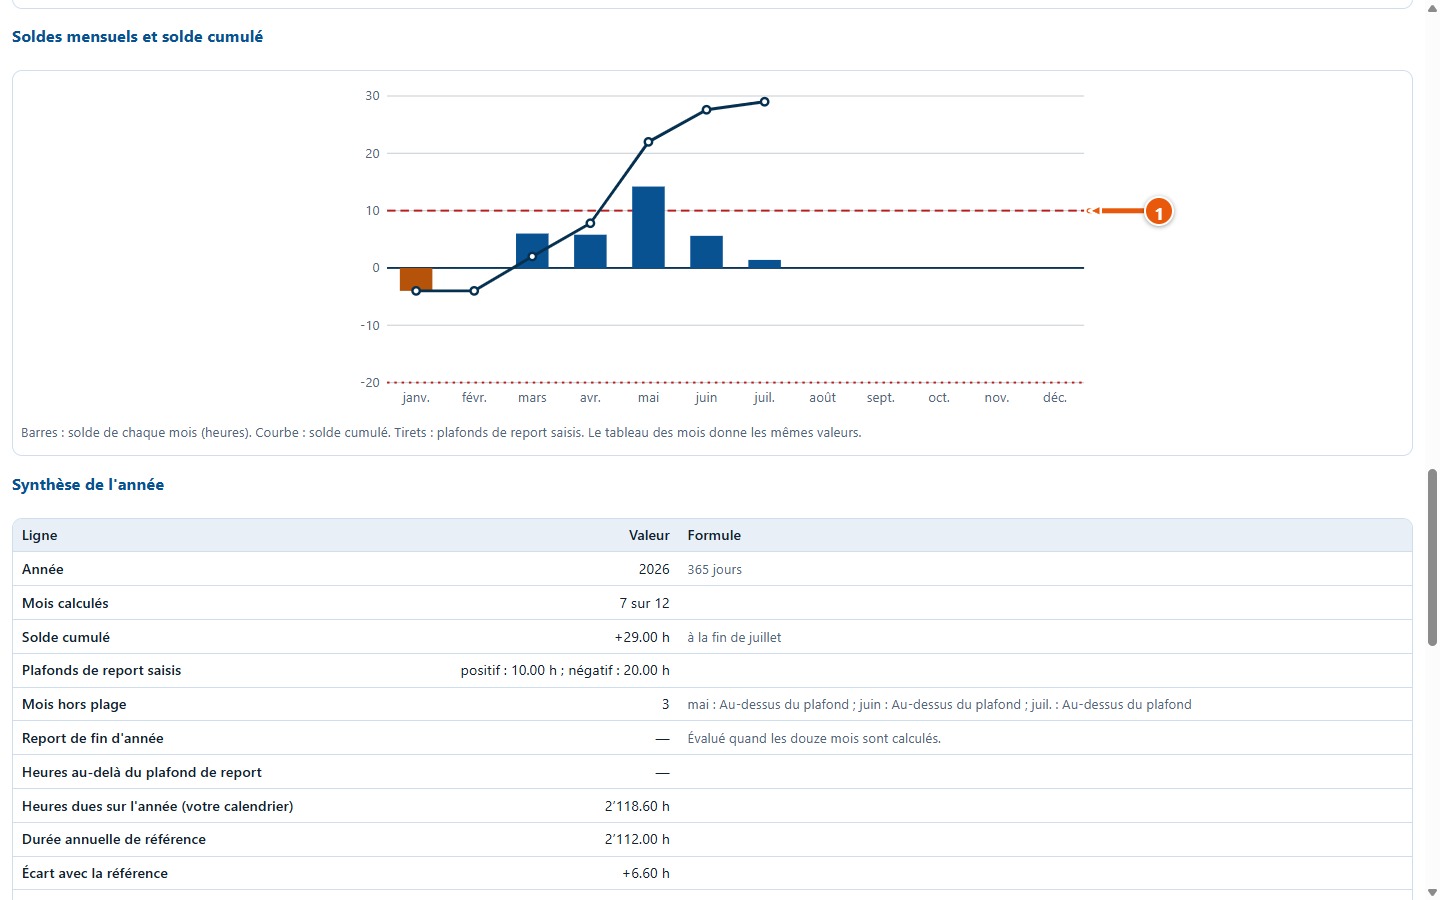
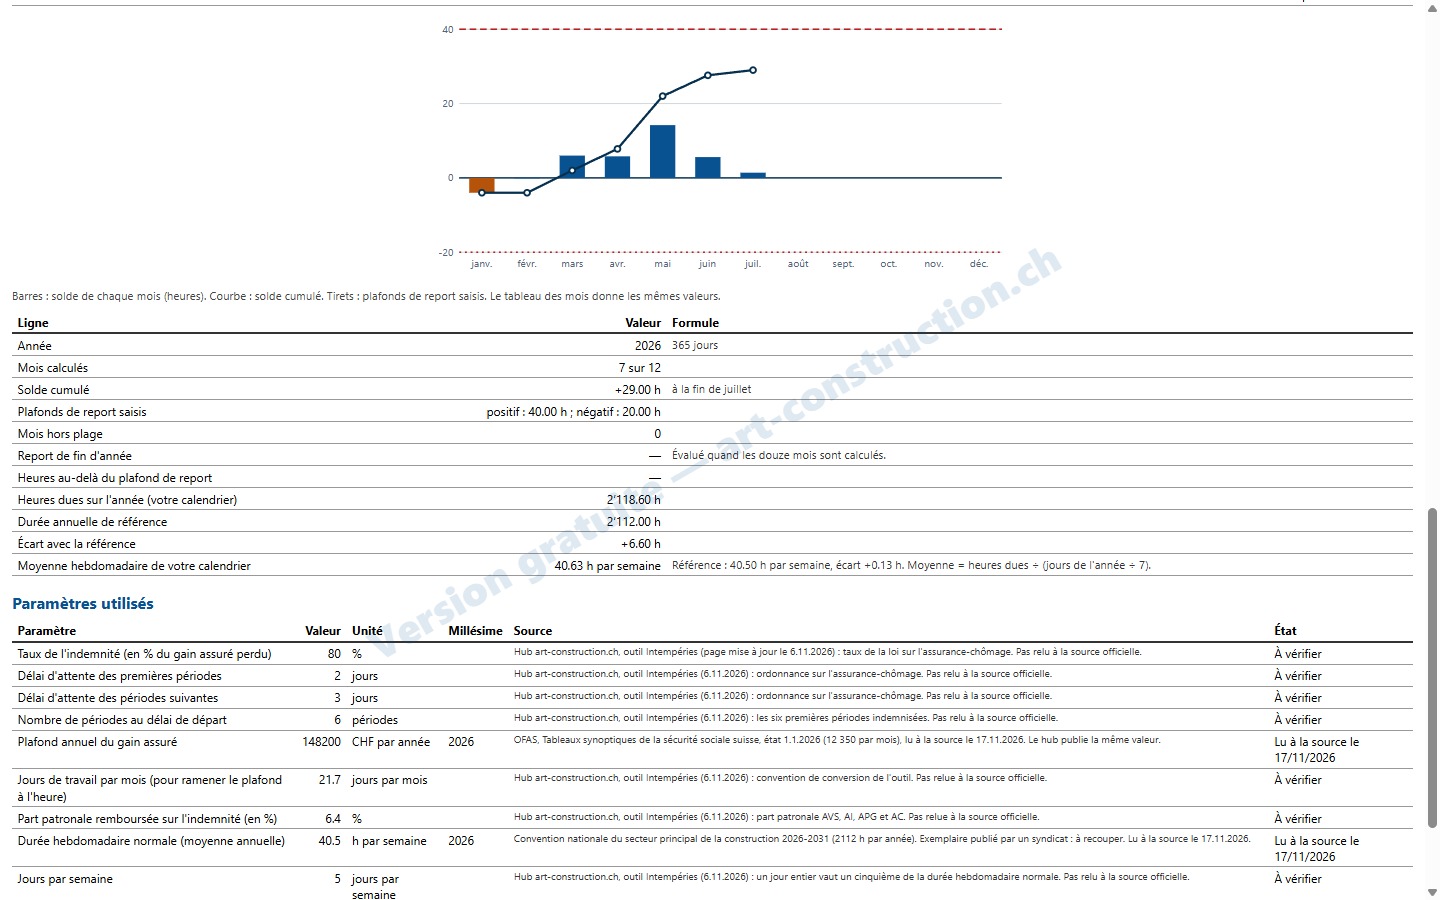
Each bar represents the balance for a month: orange below zero (1), blue above (2). The curve (3) shows the cumulative balance. The red lines are your carryover caps: dashed for positive (4), dotted for negative (5). The monthly table provides the same values.
25View out-of-range months
When the cumulative balance exceeds an entered cap, the row for the month is highlighted and displays the note Au-dessus du plafond (1), or Sous le plafond négatif. The Mois hors plage counter (2) and a message (3) provide the list. Here, with a positive cap of 10 h, May, June and July are flagged.
26The cap on the chart
The dashed line (1) sits on the positive cap you entered, here 10 h: the cumulative balance curve rises above it from May onwards.
27Read the annual summary
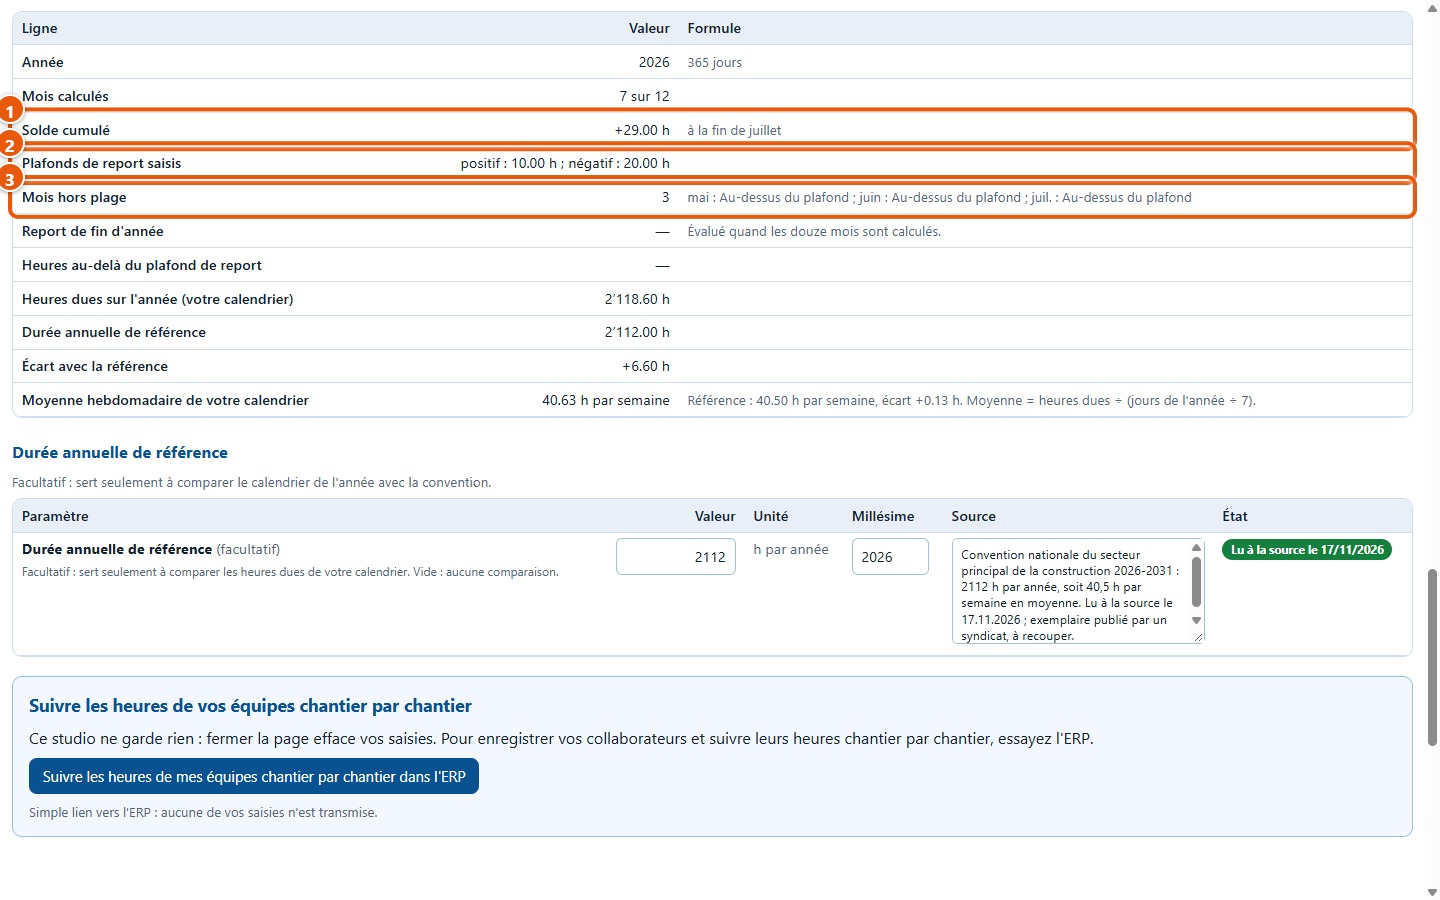
The summary brings together the cumulative balance (1), the entered caps (2) and the out-of-range months (3). It adds the year-end carryover (assessed once all twelve months are calculated), the hours due over the year under your calendar, the difference from the agreement's standard annual hours, and the weekly average.
5. Print, export and clear
28Export to CSV: the selection window
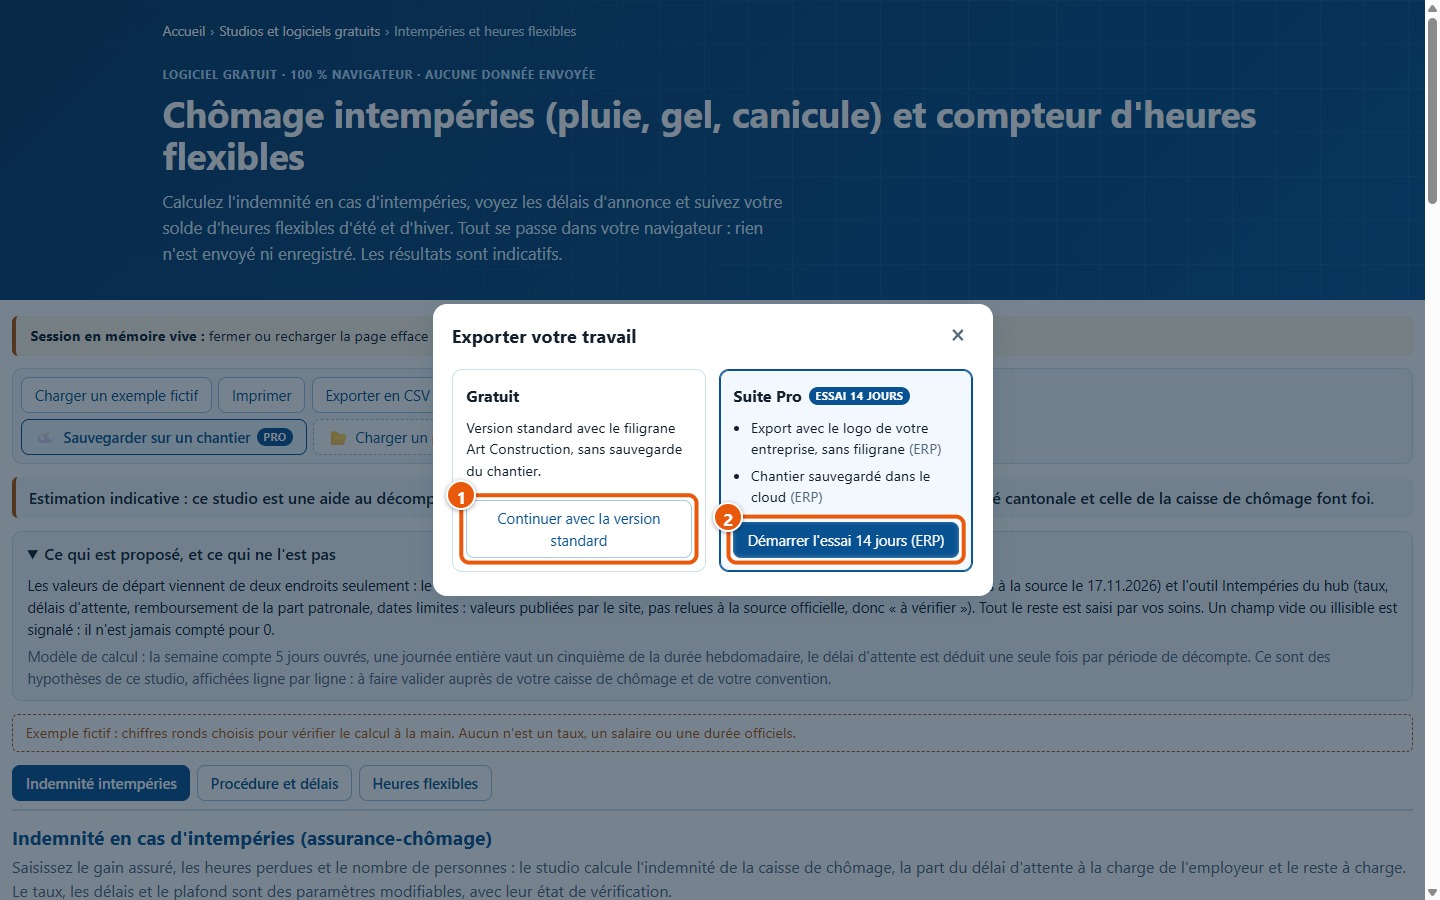
Clicking Exporter en CSV first opens the Exporter votre travail window. Choose Continuer avec la version standard (1): the file downloads immediately, with the notice « Art Construction — version gratuite — art-construction.ch » at the beginning and end. It includes the compensation, procedure, tracker and parameters used. The other choice (2) opens the 14-day ERP trial in a new tab, without sending it your entries. Once the standard version is chosen, the window does not reopen during the visit.
29Print the sheet
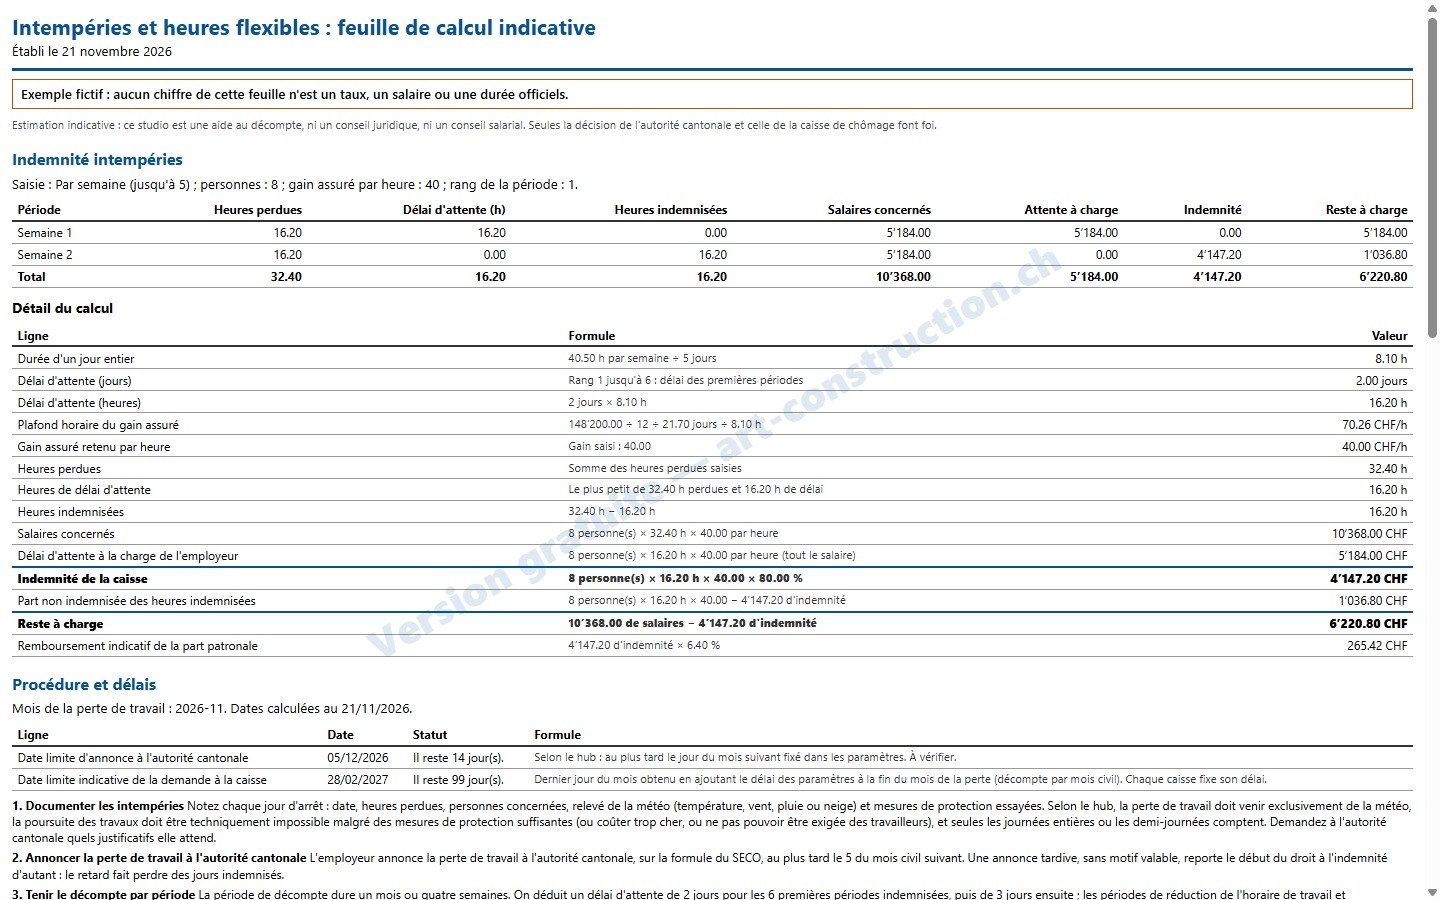
Imprimer prepares a sheet covering the entire studio: compensation, procedure with deadlines, tracker and its chart, then the parameters used with their year, source and status. The image shows the sheet as formatted for printing; a diagonal watermark indicates the free version. With the example, it runs to about four pages. Printing is handled through your browser's print window.
30The chart and parameters on the sheet
The rest of the sheet includes the chart, the annual summary and the table of parameters used. Anyone reading your sheet can thus see which values were « À vérifier » and which were « Lues à la source ».
31Clear everything
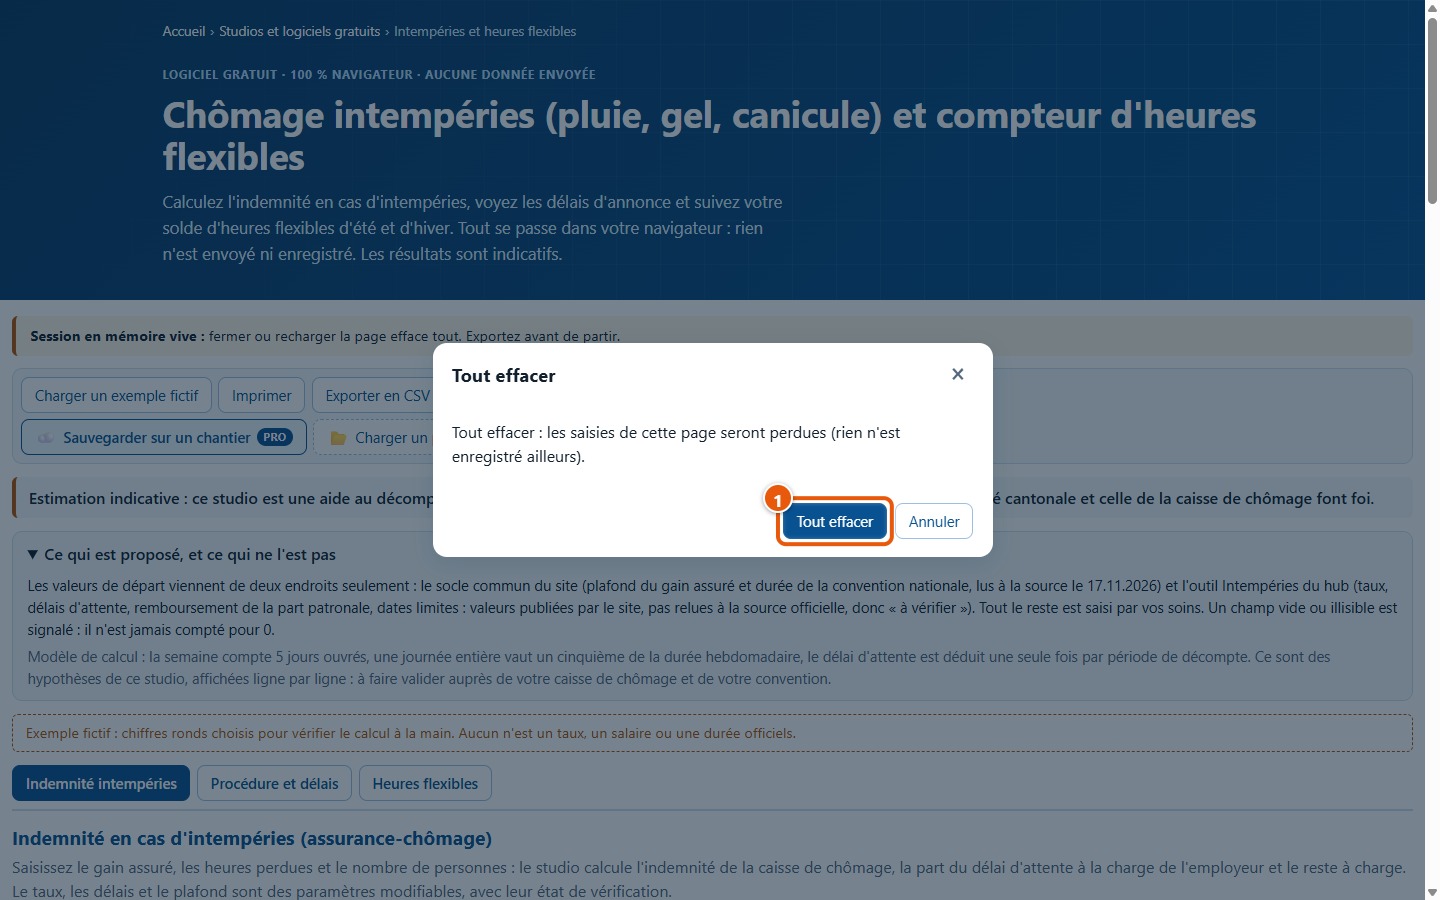
Tout effacer asks for confirmation (1), then resets the page: your entries are lost, nothing is saved elsewhere. Click Annuler to keep your work.
6. Going further
32The link to the ERP
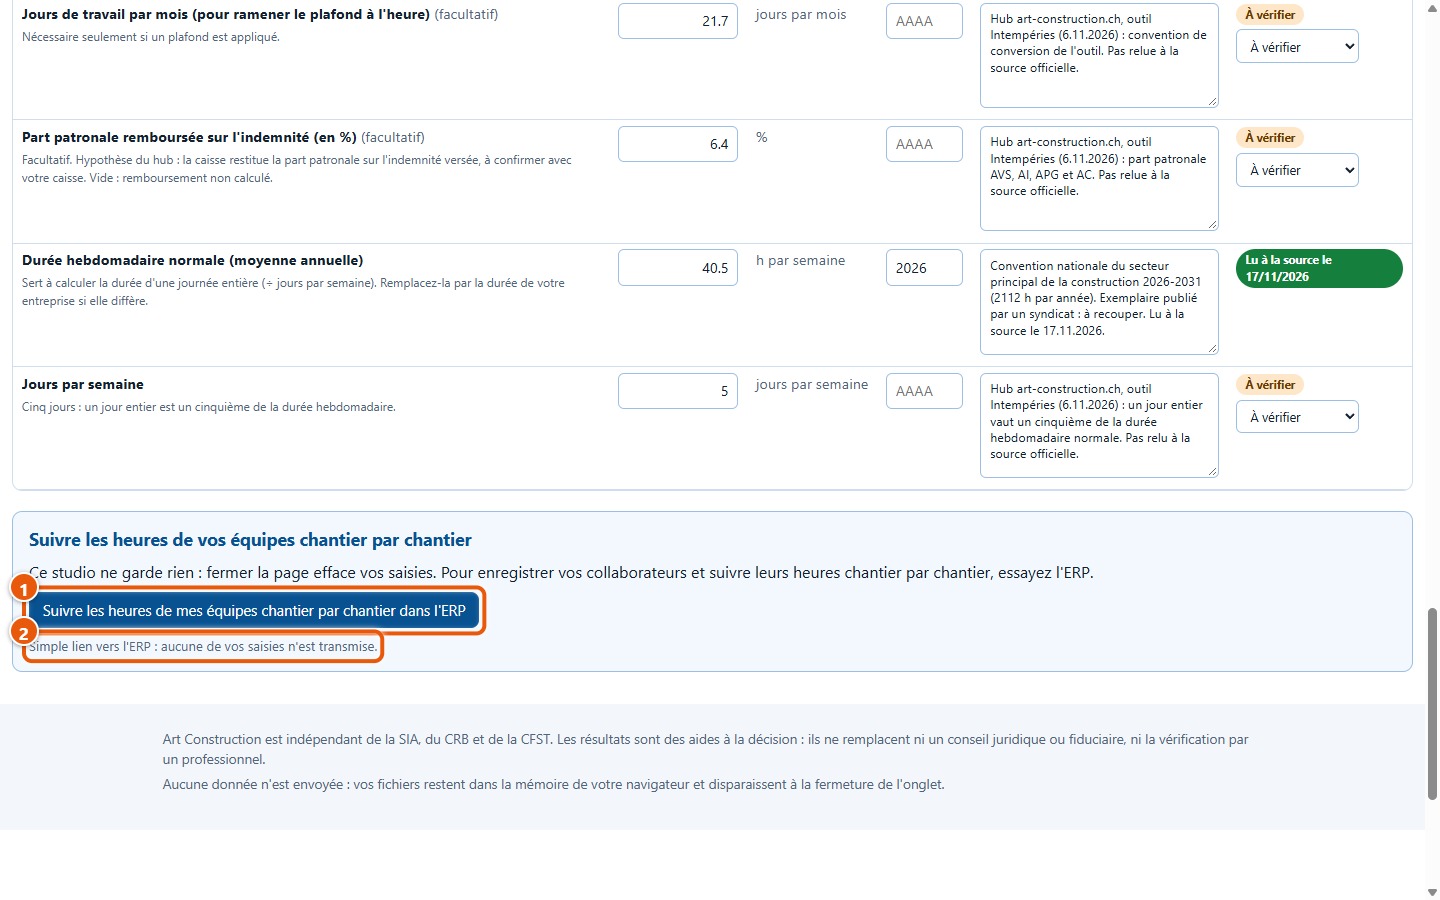
At the bottom of the page, a section offers to track your team hours construction site by construction site in the ERP. Button (1) is a simple link: it opens the ERP offers page in a new tab, without any of your entries (2).
33The buttons marked PRO
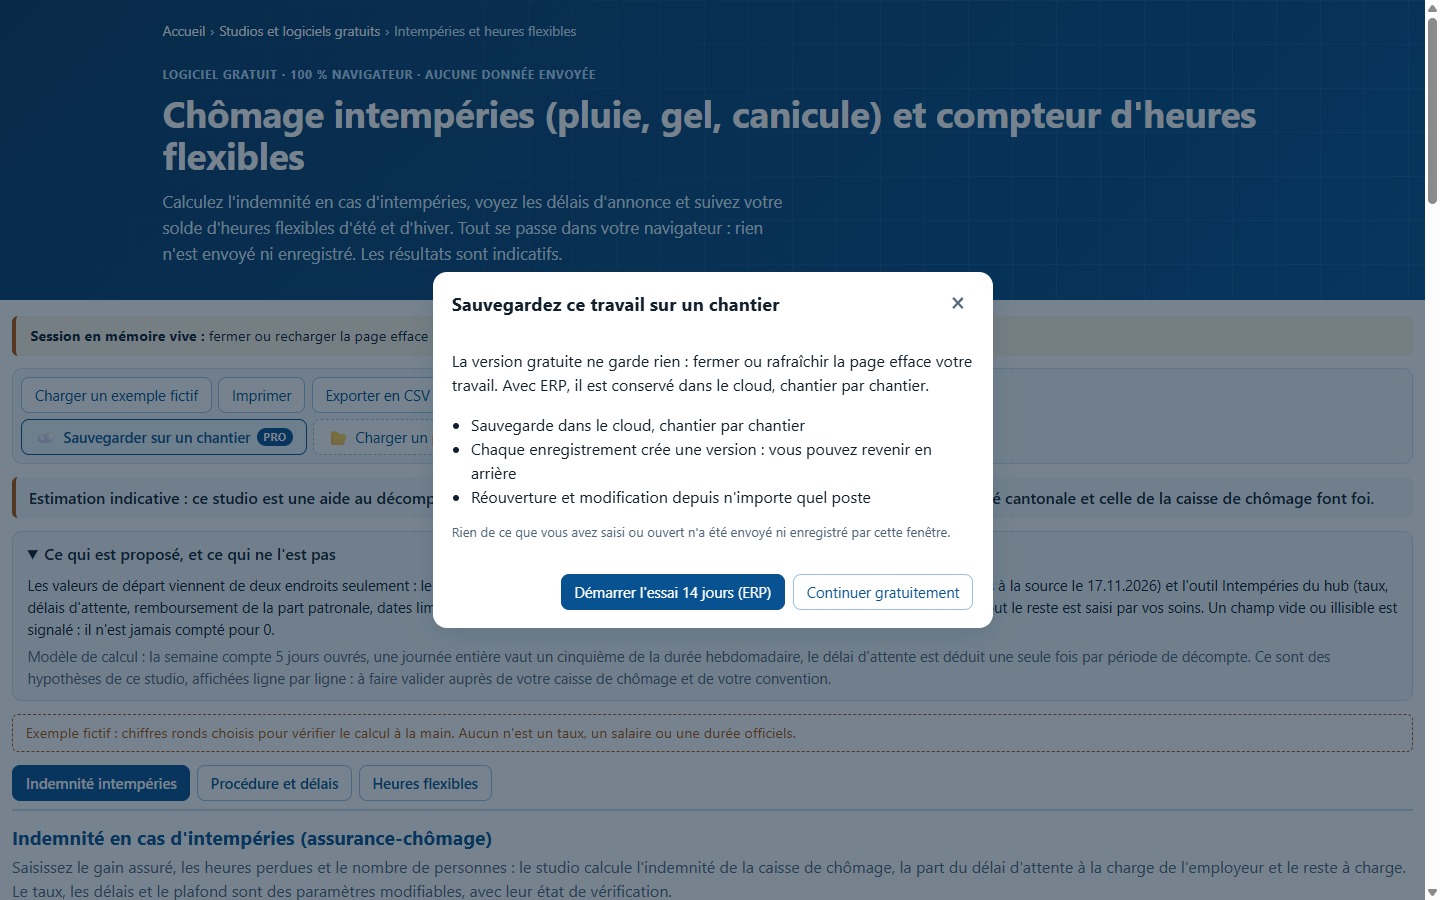
The four buttons marked PRO (Sauvegarder sur un chantier, Charger un projet, Mode Équipe, Export Pro sans filigrane) are not active in this version: each one opens a window presenting what the ERP provides. The image shows the save window. Nothing you entered is sent.
7. What this software does not do
- It does not replace decisions from the cantonal authority or the unemployment fund. It is neither legal advice nor payroll advice. It transmits nothing to the authority or the fund.
- The default values (rates, waiting periods, employer share, deadlines) come from the site bad weather tool and have not been cross-checked against official sources: they are « À vérifier ». Only the insured earnings ceiling and the collective agreement duration are « Lus à la source », on the indicated date.
- It does not assume any insured earnings, summer or winter durations, or carryover ceilings: they must be entered. Any empty or unreadable field is flagged, never silently counted as 0.
- It assumes the same lost hours and the same earnings for all individuals in a calculation, and a five-day working week. It does not check whether the entered hours correspond to full days or half days.
- It does not determine who bears the uncompensated share of the compensated hours: this depends on your contract or your collective agreement.
- The tracker is unaware of cantonal public holidays, joint committee calendars, overtime hours and their supplements, or the compensation rules of your regulations: everything is entered by you.
- It retains nothing: no saving, no resuming work, no account. Closing or refreshing the page clears everything.
- It does not generate a PDF file: it prepares a sheet that you send to your browser's print dialogue, and a CSV file.
Any questions? Send a request to support.