2D Thermal Bridge Studio Guide
This guide shows, step by step, how to calculate a thermal bridge in the 2D Thermal Bridge Studio: choosing a junction, setting materials and climate, reading the Ψ-value, the fRsi factor and the temperature map, then the quantities. The studio is free and runs in your browser.
1. Getting started
1Locating screen areas
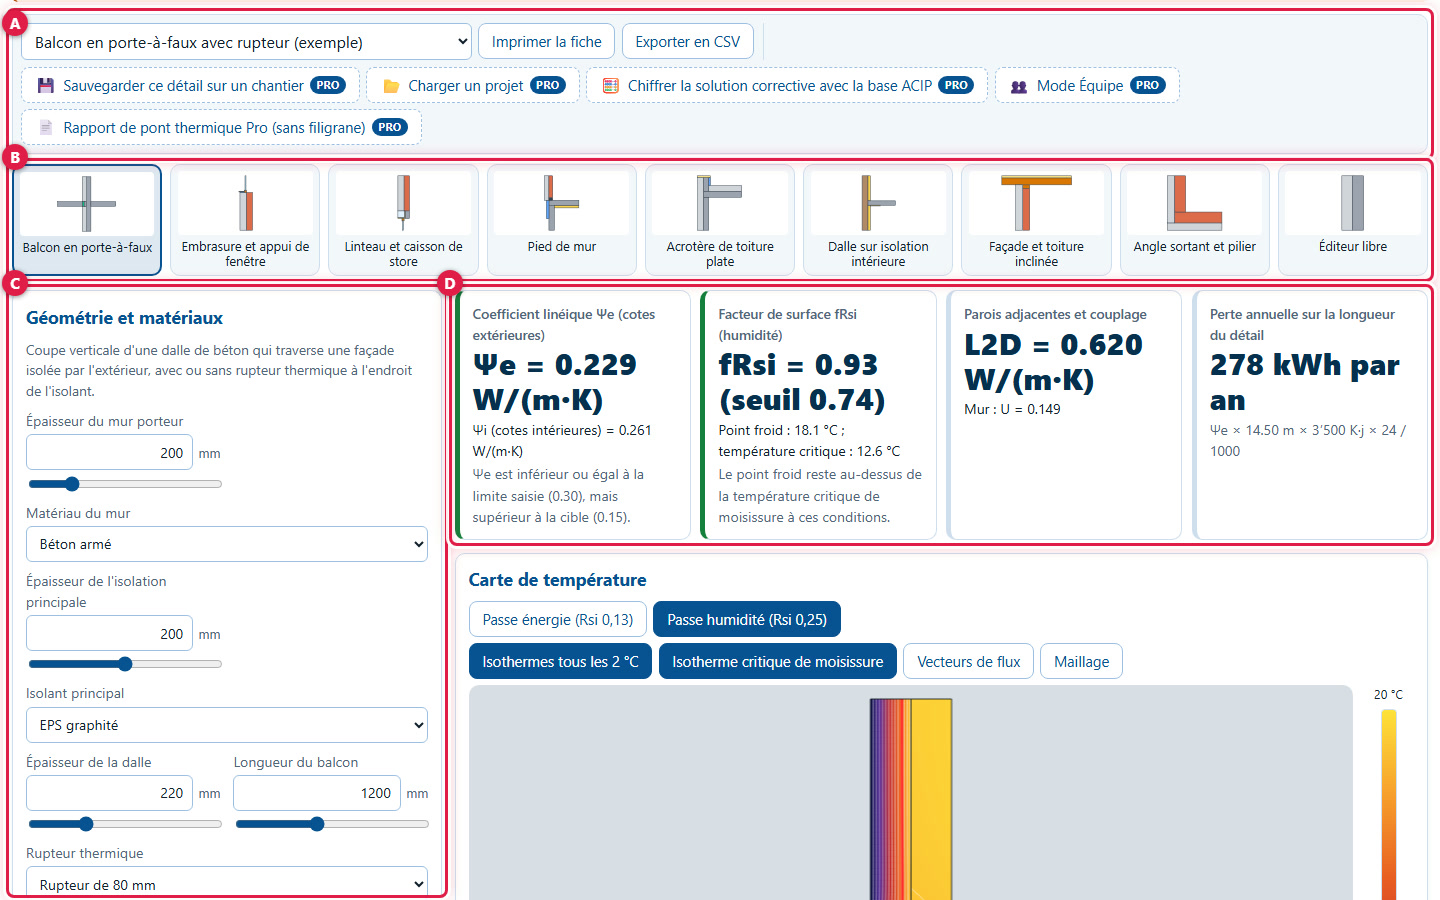
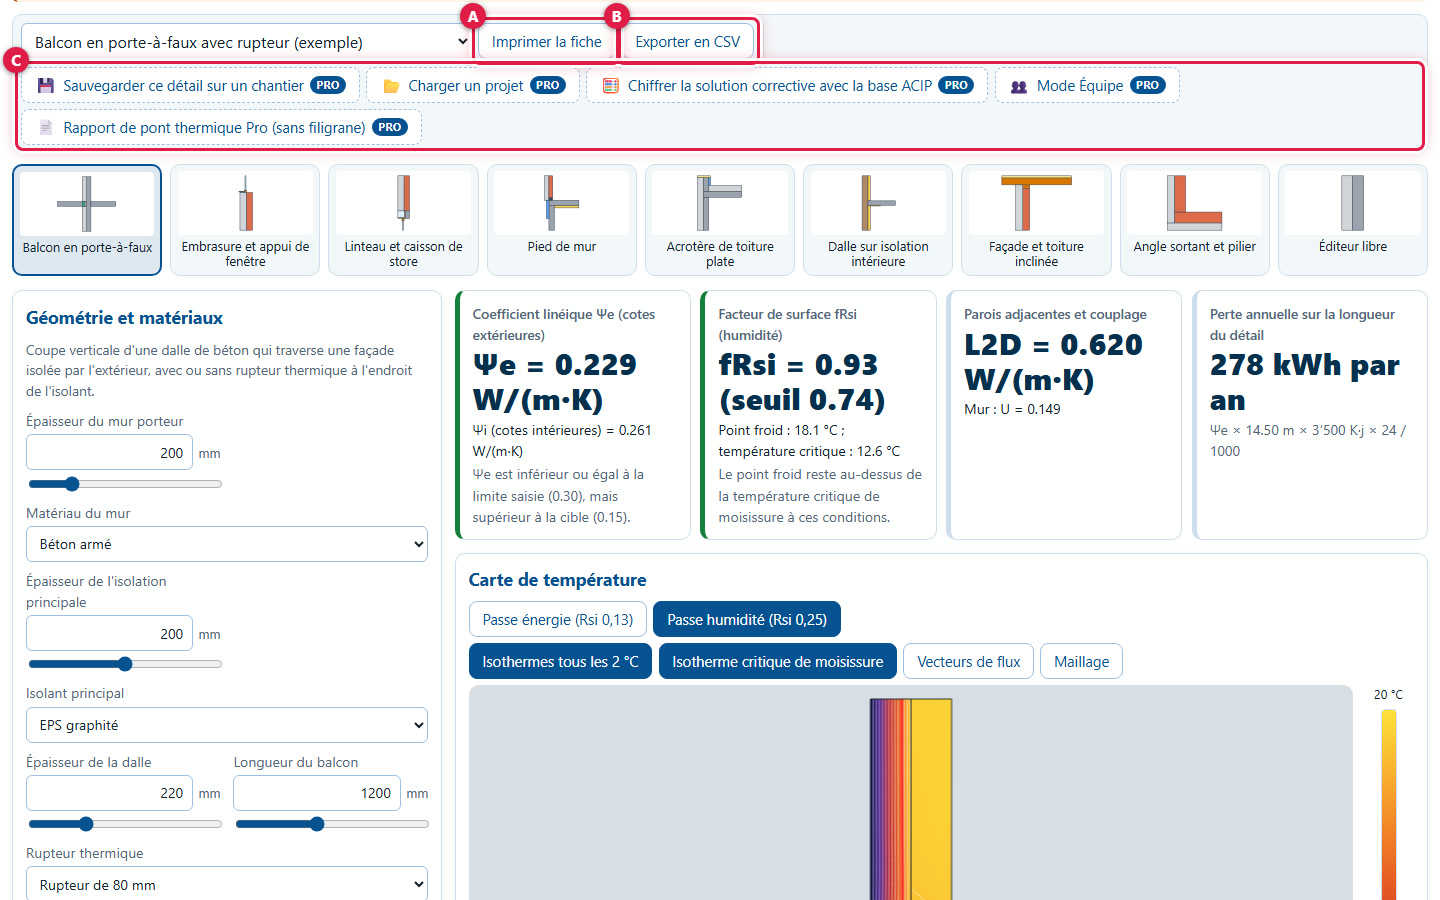
Everything happens on a single page. Above the tool, a blue banner shows the title and reminds you that nothing is sent: screenshots start below this banner. At the top of the tool, (A) the bar with the list of examples, printing, CSV export and Pro buttons. Below, (B) the nine junctions. On the left, (C) your settings: geometry, site and climate, requirements. On the right, (D) the four result maps, followed by the temperature map and the detail tabs.
Everything is calculated in your browser. Nothing is sent or saved: if you close or reload the page, your work will disappear. Export before leaving.
2Opening a starting example
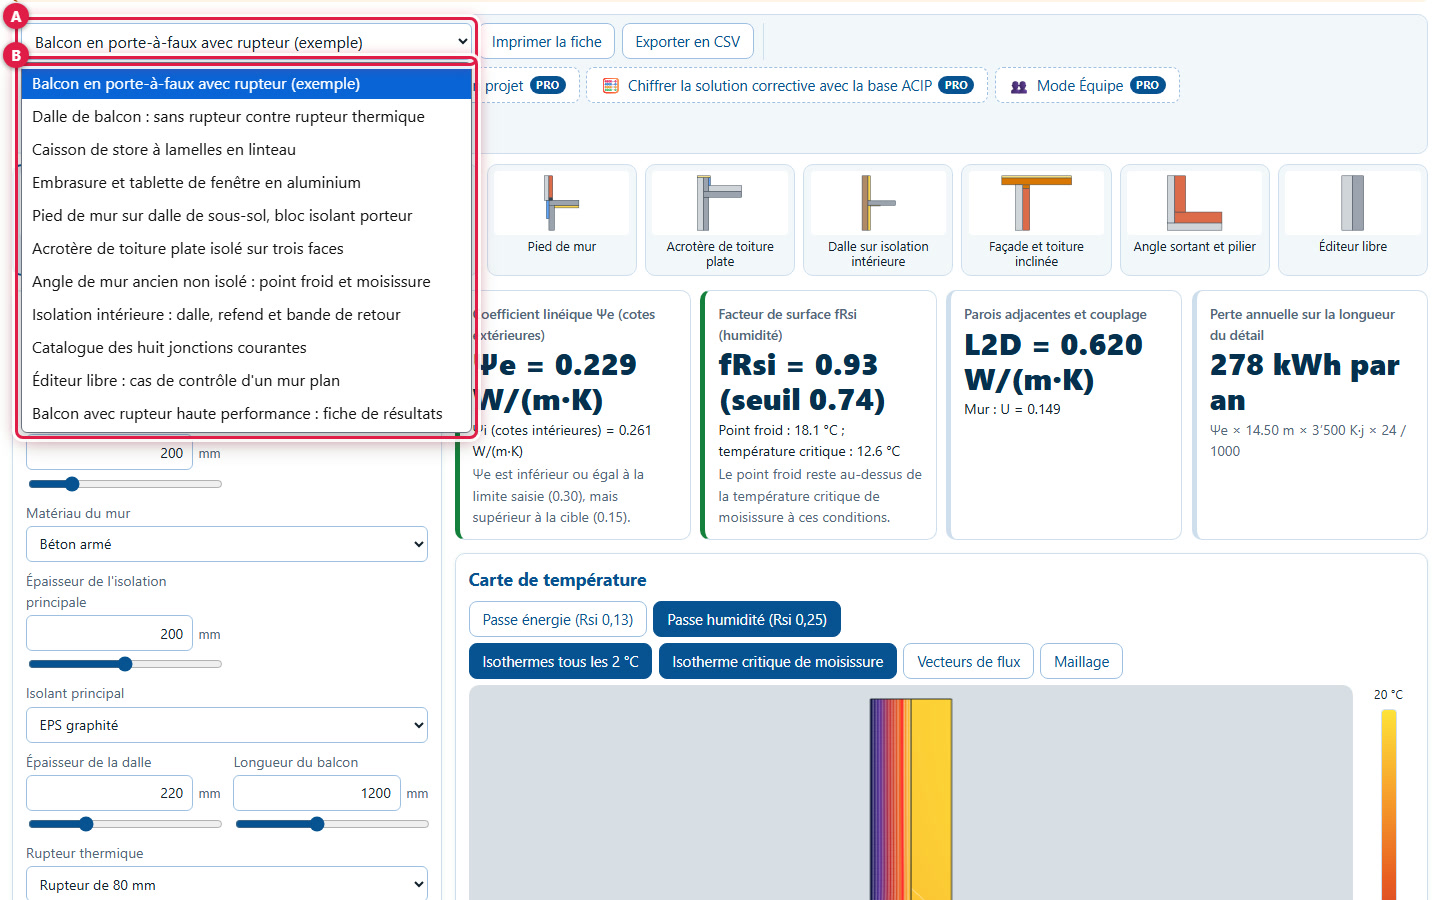
The list (A) at the top left offers 11 examples (B): for example "Balcony slab: without thermal break vs with thermal break", "Slatted blind box in lintel" or "Old uninsulated wall corner: cold spot and mould". Each example loads a junction with its starting values.
These are working examples, not recommended details: change the values for your case.
3Choose a junction
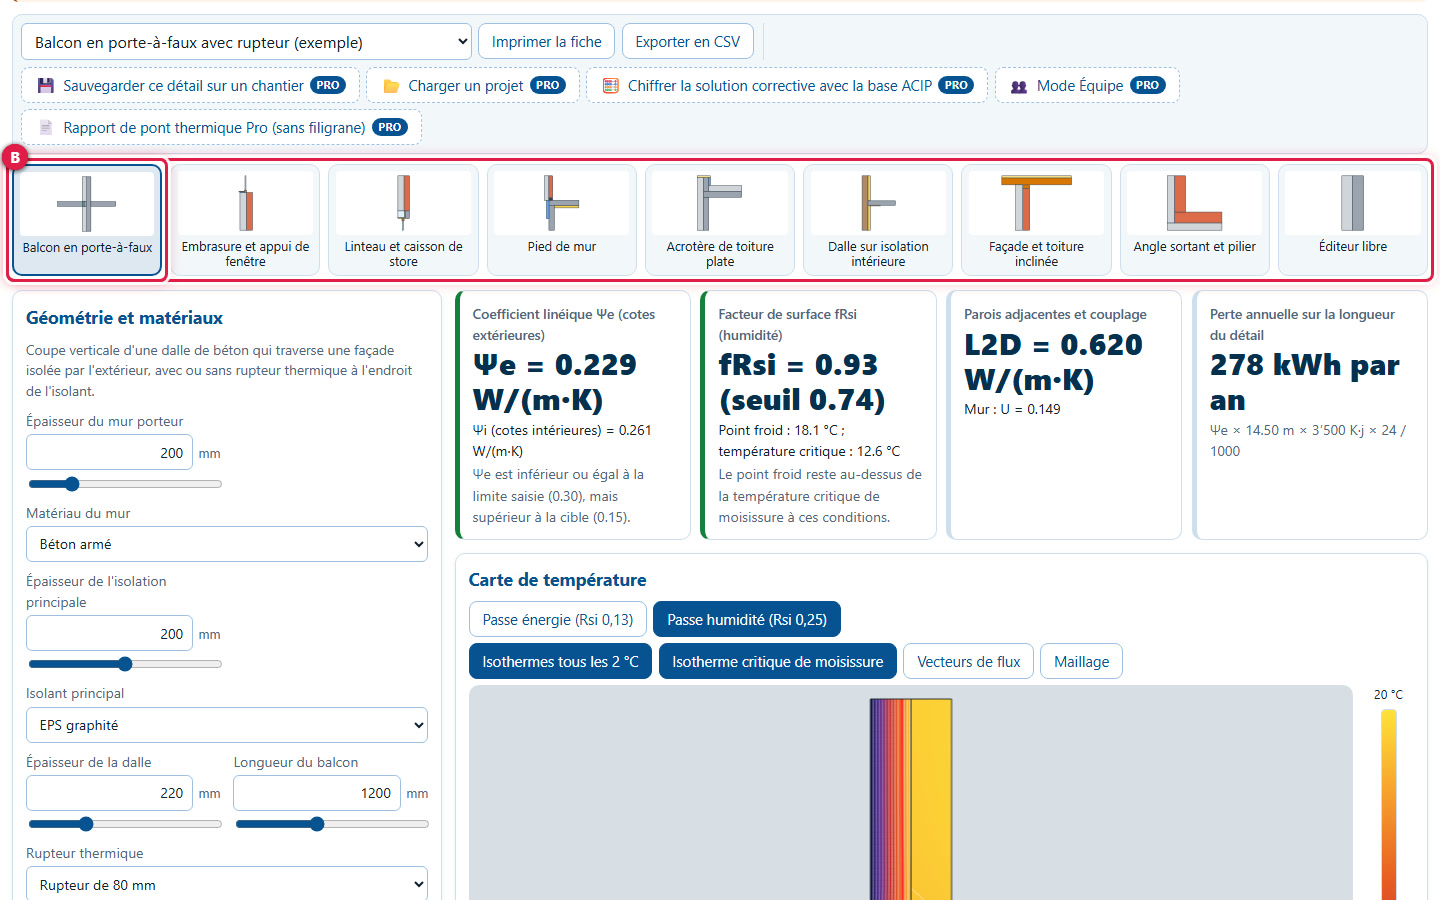
The thumbnails (A) show the nine junctions: "Cantilevered balcony", "Reveal and window sill", "Lintel and blind box", "Wall base", "Flat roof parapet", "Slab on internal insulation", "Façade and pitched roof", "External corner and pillar" and "Free editor". Clicking on a thumbnail (B) loads the junction with its default values.
The site (climate, detail length) is kept. The limit value and target value are replaced by those of the new junction, and the before-after comparison is unchecked.
4Read the four result cards
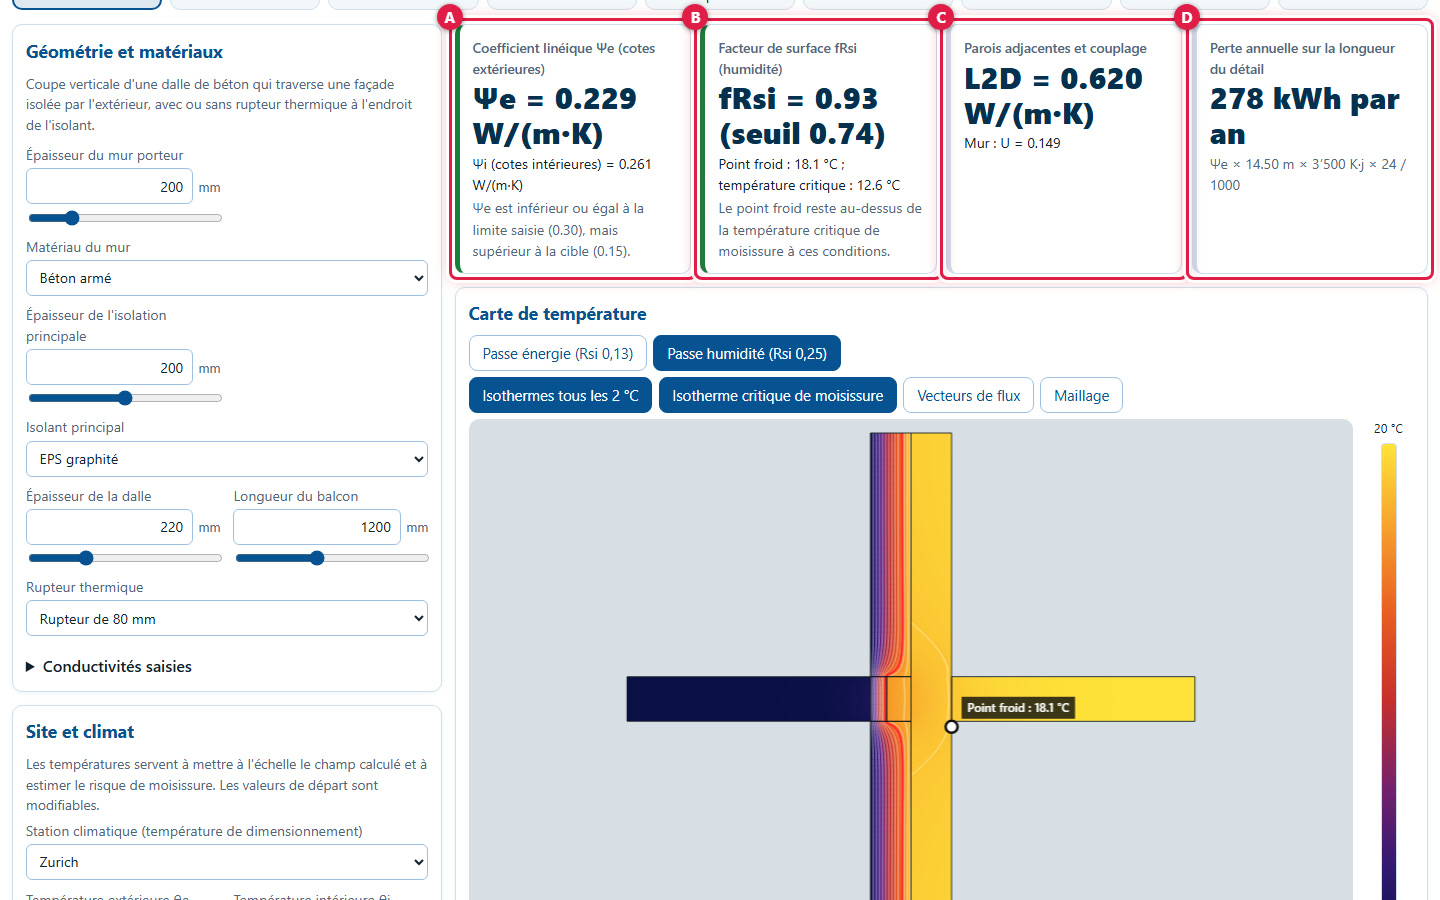
(A) The Ψe coefficient at outer dimensions (0.229 W/(m·K) here) and Ψi at inner dimensions (0.261), compared to the limit value and target value you entered. (B) The fRsi factor (0.93, threshold 0.74), the cold spot (18.1 °C) and the critical mould temperature (12.6 °C).
(C) The L2D coupling (0.620 W/(m·K)) and the U-value of each plain wall. (D) The annual loss over the detail length (278 kWh per year). The border of each card takes the colour of the verdict.
2. Adjust the detail
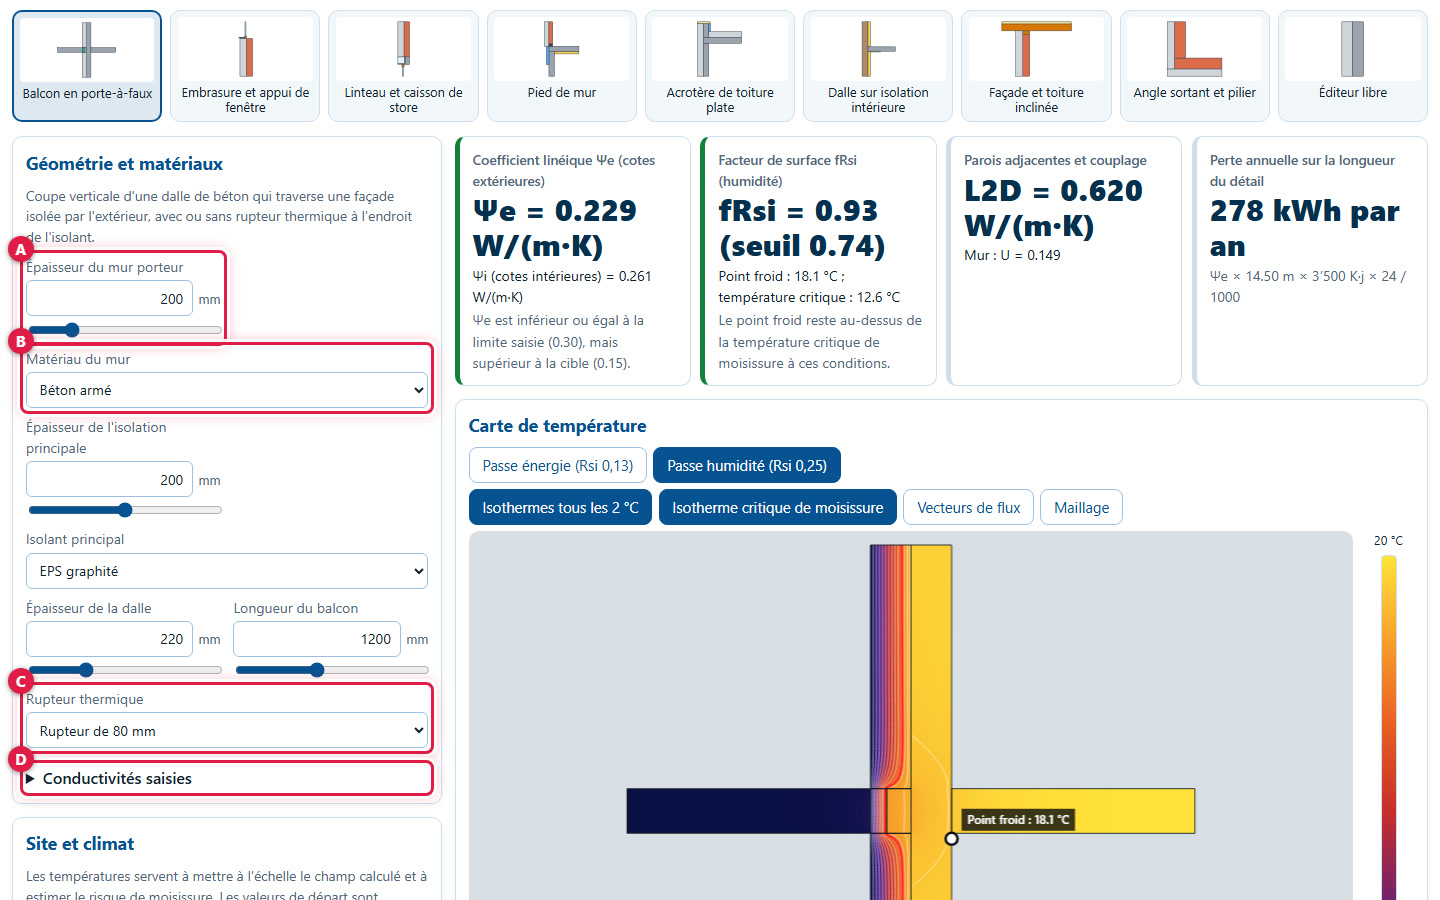
5Adjust geometry and materials
The "Geometry and materials" panel changes with the junction. (A) A thickness is adjusted by typing a value in mm or with the slider. (B) A material is chosen from a list (reinforced concrete, bricks, insulation…). (C) Each junction has its own fields, here the thermal break. (D) "Entered conductivities" opens the conductivities.
Each entry immediately recalculates the cards and the temperature map.
6Choose the thermal break
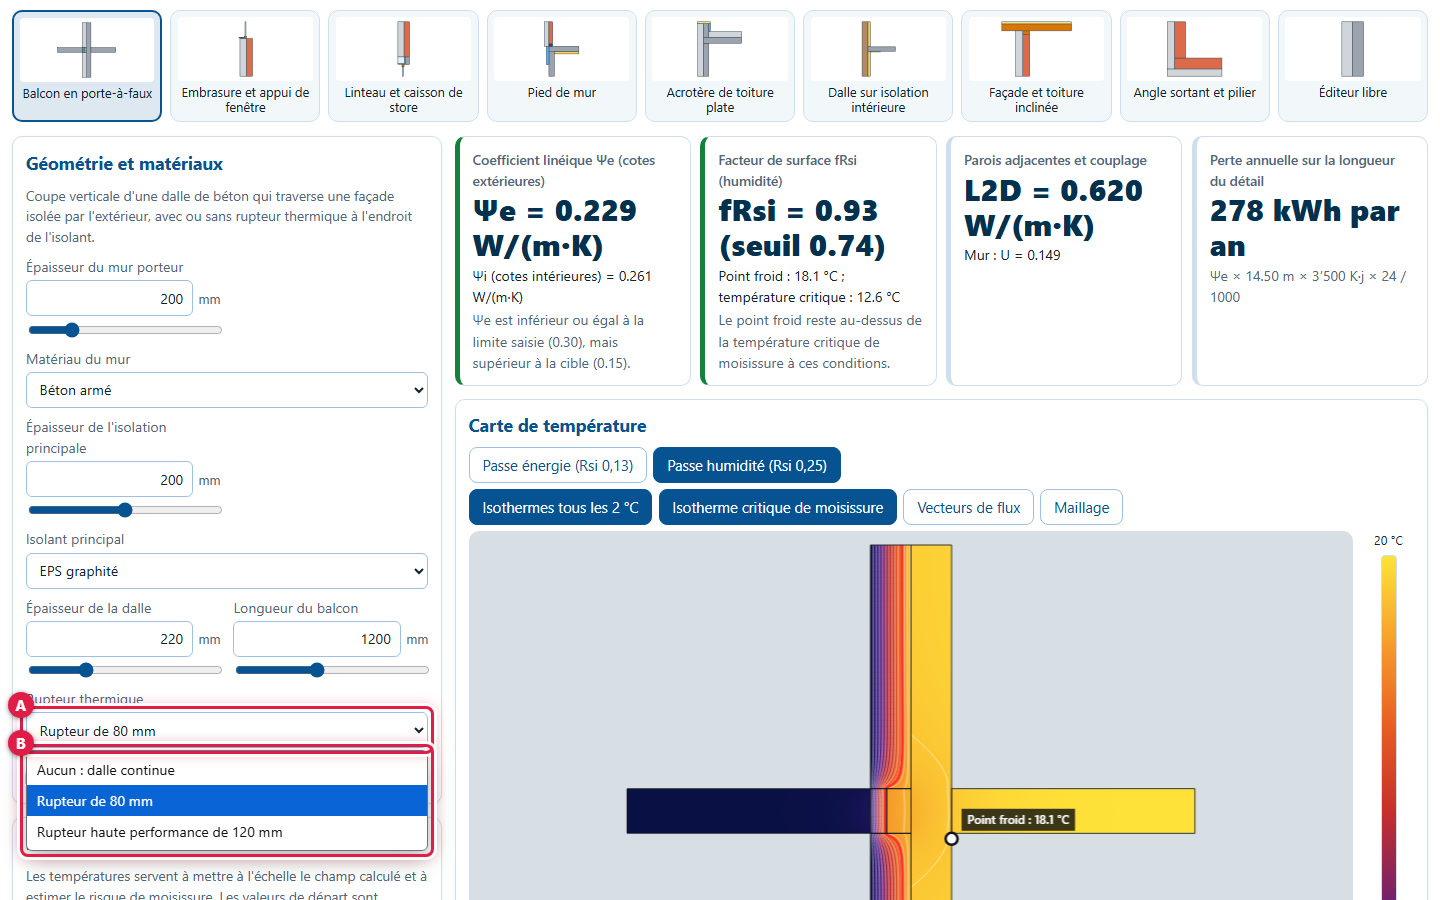
For the balcony, the "Thermal break" list (A) offers three choices (B): "None: continuous slab", "80 mm thermal break" and "120 mm high-performance thermal break". With a thermal break, the studio can bring the main insulation to the minimum value requested by this thermal break: a warning indicates this.
7Enter your own conductivities
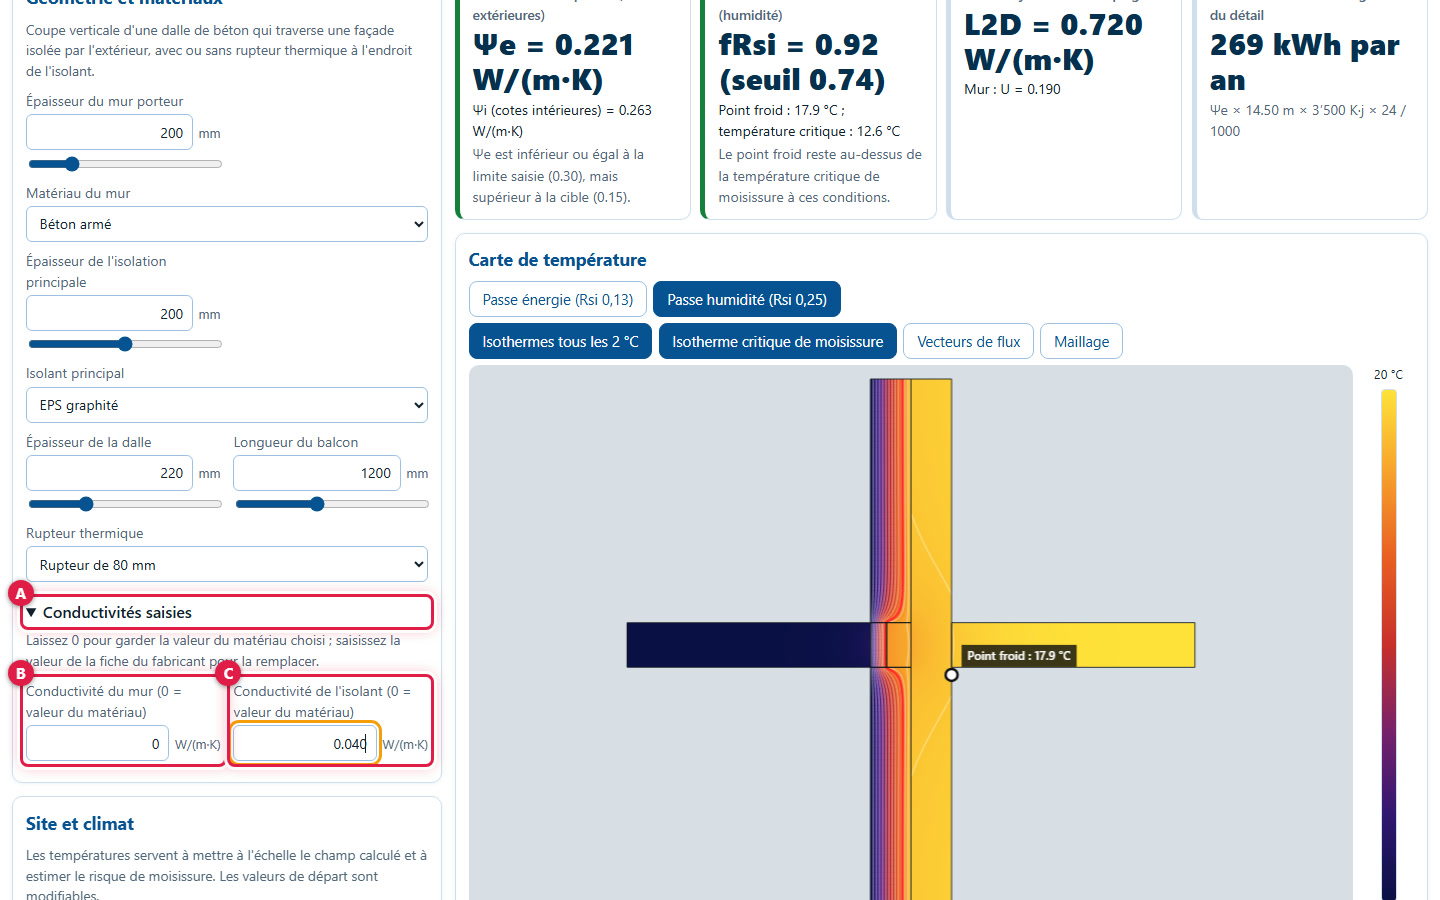
In « Entered conductivities » (A), leave 0 to keep the chosen material's value, or enter the manufacturer's datasheet conductivity for the wall (B) and for the insulation (C). Here, insulation λ = 0.040 W/(m·K), an example value: the wall U-value goes from 0.149 to 0.190 W/(m²·K).
8Set the site and climate
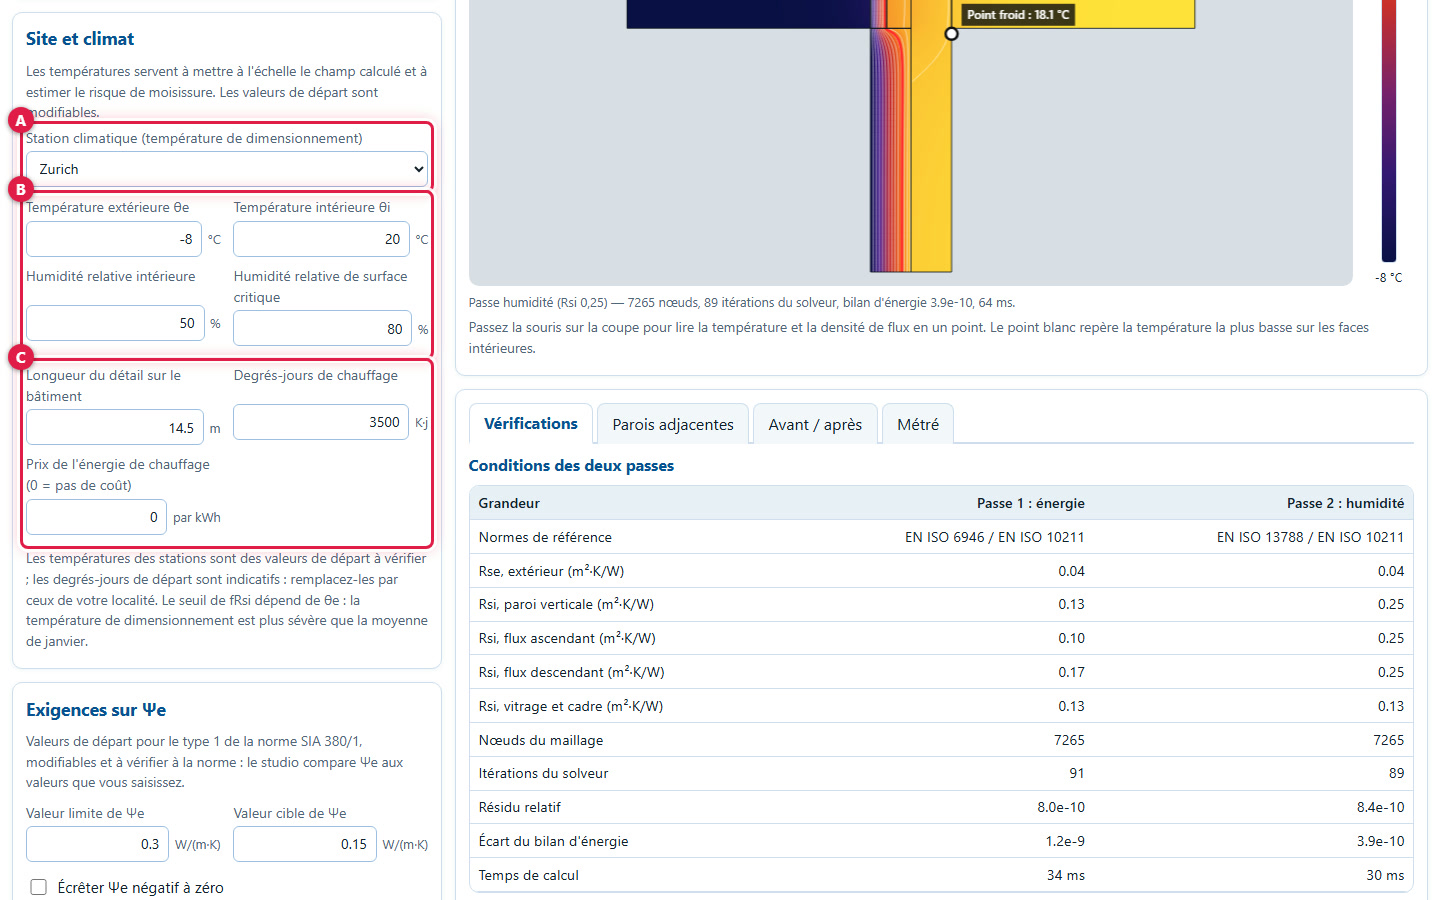
The « Site and climate » panel is used to scale the map and assess the risk of mould. (A) The station provides the outdoor design temperature. (B) Temperatures θe (-8 °C) and θi (20 °C), indoor relative humidity (50 %) and critical surface humidity (80 %). (C) The length of the detail on the building (14.5 m), heating degree-days (3500 K·j) and energy price (0 = no cost).
9Choose a weather station
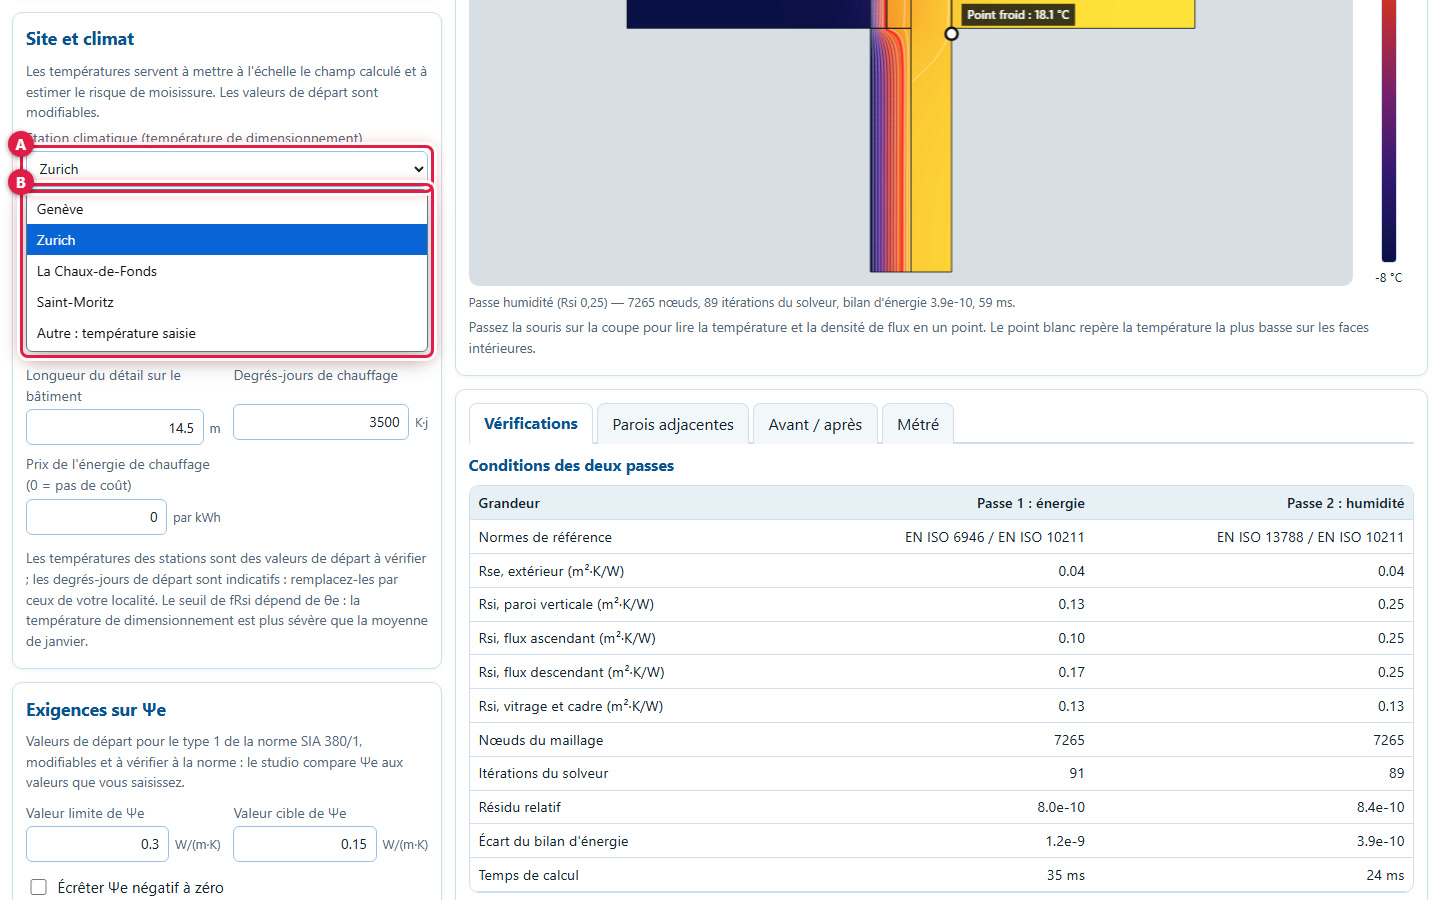
List (A) offers four stations and a free entry (B): « Geneva », « Zurich », « La Chaux-de-Fonds », « Saint Moritz » and « Other: entered temperature ». Choosing a station replaces θe. If you type θe yourself, the list switches to « Other: entered temperature ».
10Set the limit value and target value
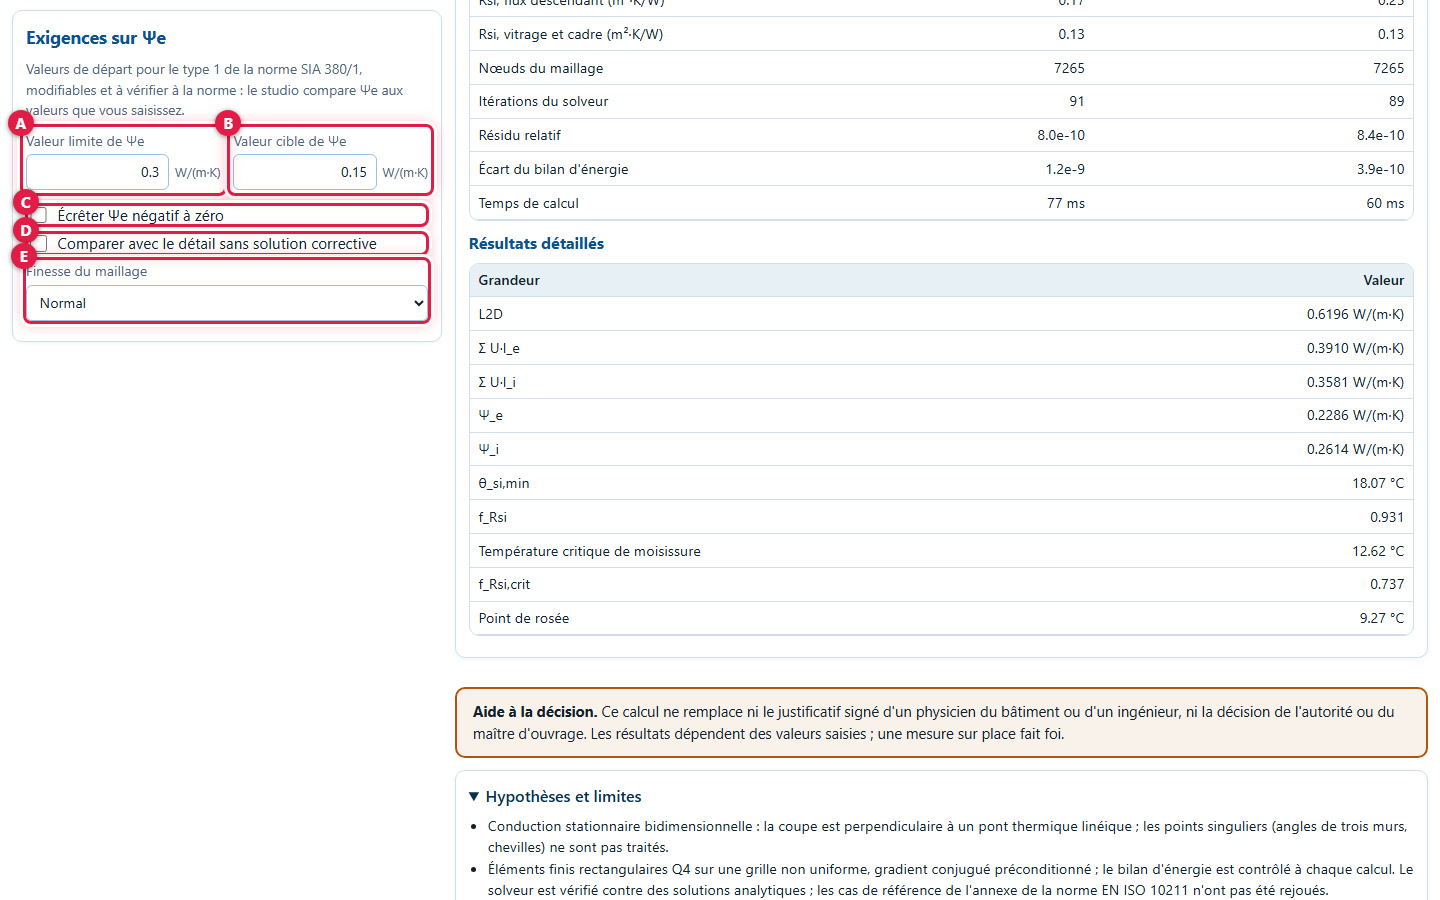
The « Requirements for Ψe » panel: (A) the limit value and (B) the target value of Ψe. The studio fills them with starting values for the junction, which you can change. (C) « Cap negative Ψe to zero »: a negative Ψe is only brought back to zero if you check this box. (D) « Compare with detail without remedial solution » displays the before-after tab. (E) Mesh fineness: « Fast », « Normal » or « Fine ».
11Understanding an invalid value message
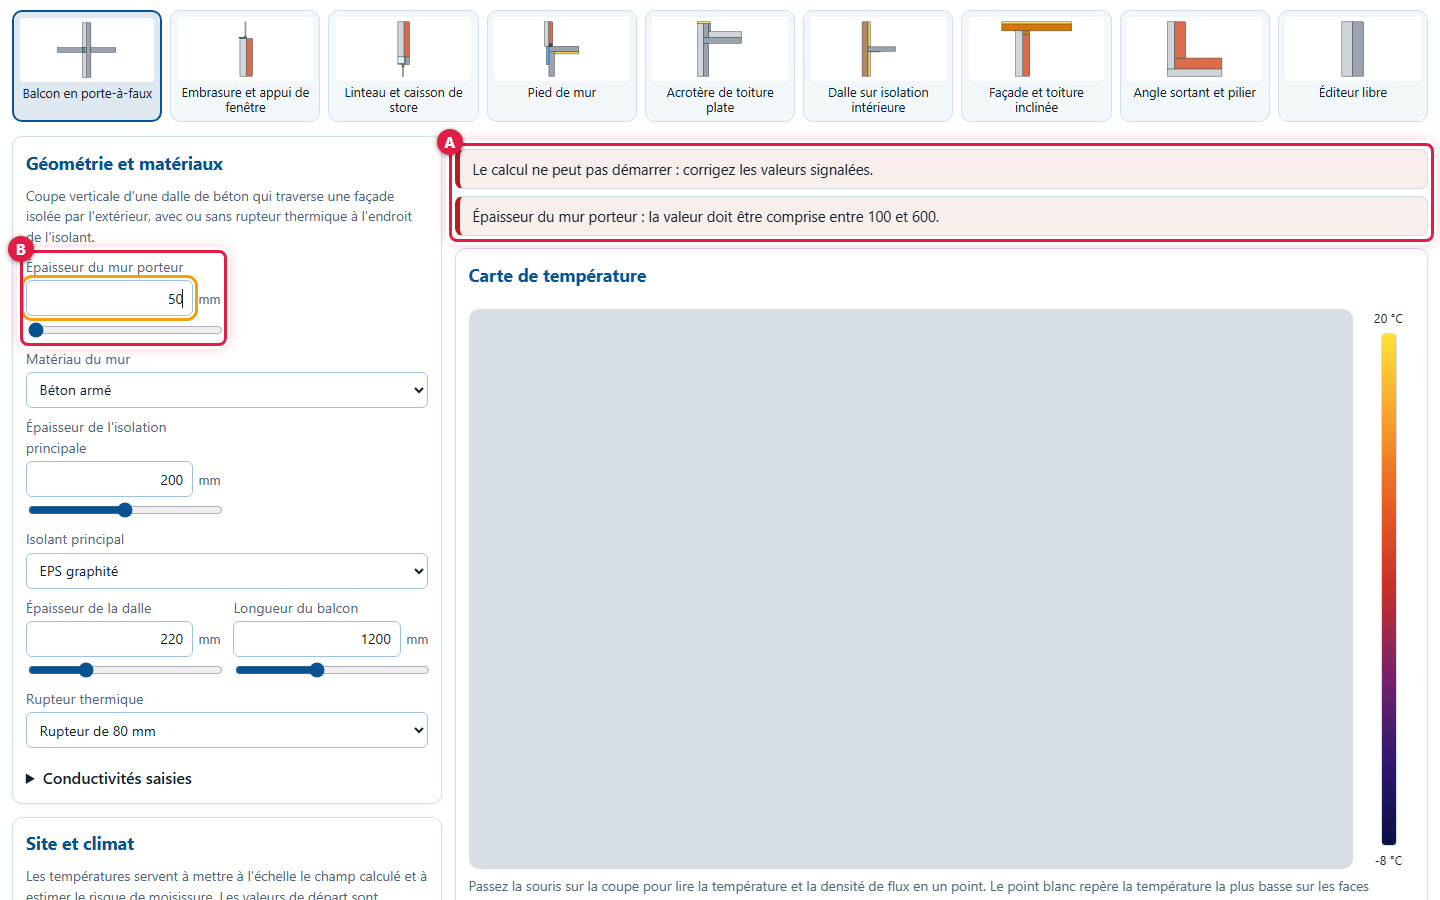
If a field is empty or out of bounds (B), the calculation stops and a message (A) states what needs to be corrected. Here, 50 mm for the load-bearing wall: the thickness must be between 100 and 600 mm. The studio never replaces an invalid value with zero.
3. Reading the temperature map
12Reading the color map
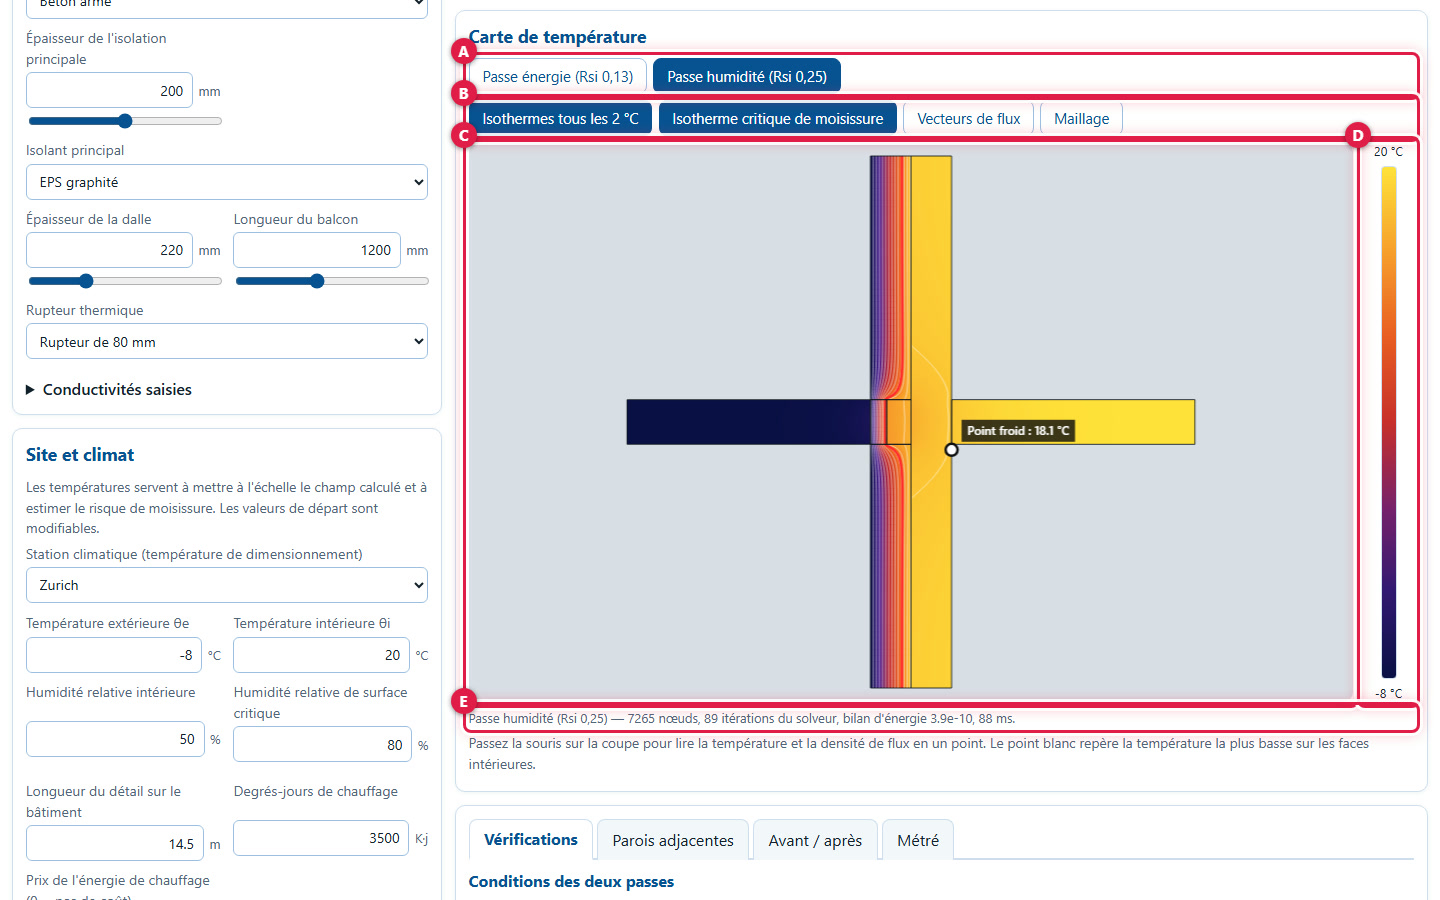
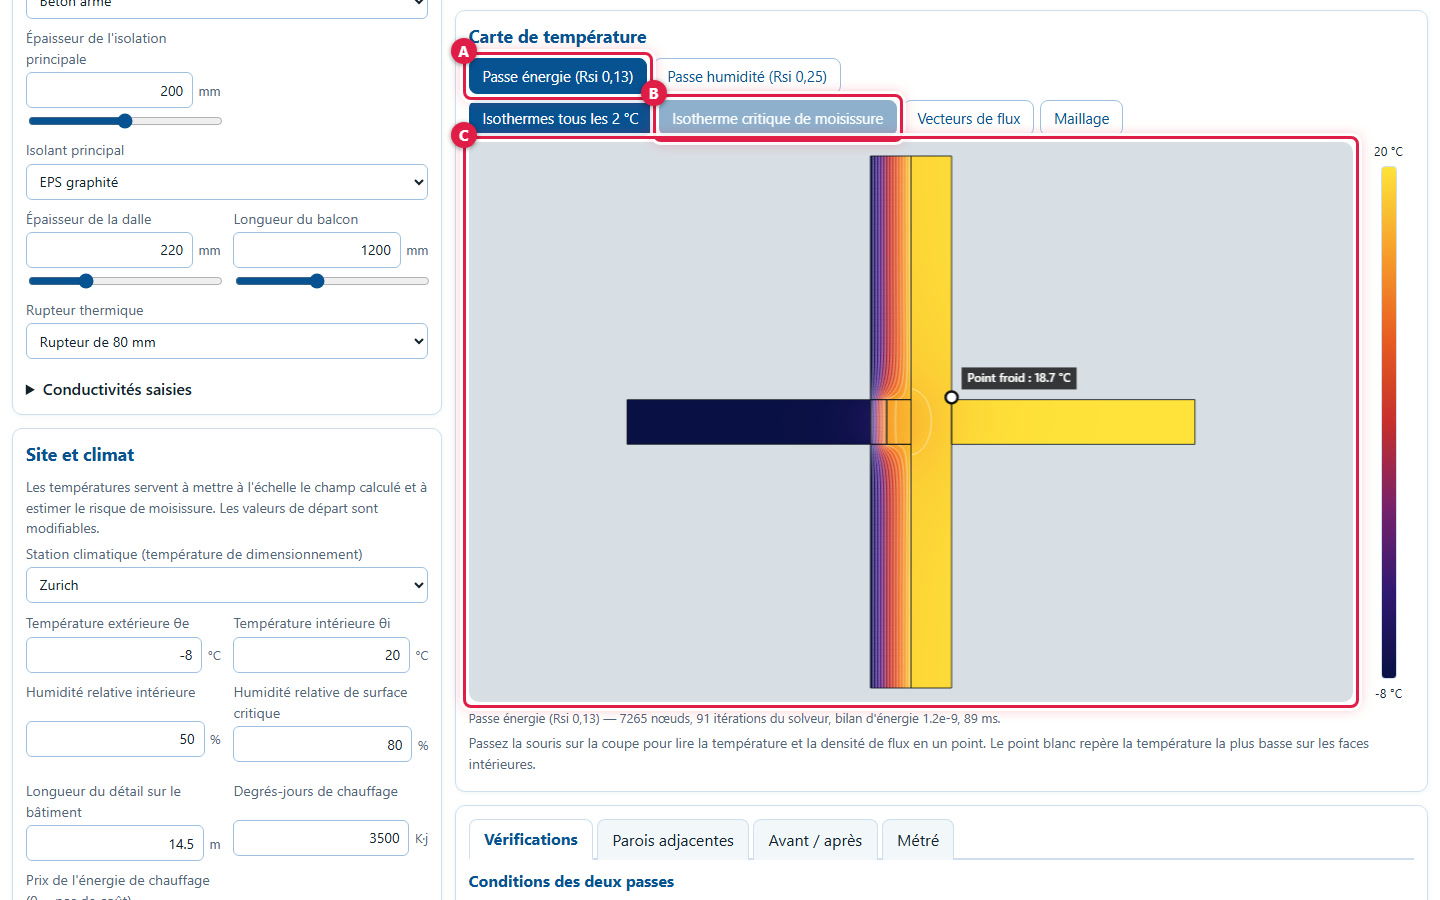
The map is drawn like an infrared camera image: (C) the color section, from hot to cold, with (D) a scale from θi (20 °C) to θe (-8 °C). (A) chooses the calculation pass, (B) the layers. Line (E) gives the number of nodes (7265 here), solver iterations and the energy balance deviation, checked at each calculation.
13Choosing the calculation pass
The studio calculates two passes on the same mesh. (A) « Energy pass (Rsi 0.13) » is used for Ψe and Ψi; « Moisture pass (Rsi 0.25) » is used for fRsi and the cold spot (18.1 °C on the result maps). The drawn map changes with the chosen pass: the cold spot label does not give the same temperature there, because the surface resistance Rsi is not the same. (B) The critical mould isotherm only exists on the humidity pass: its button is greyed out on the other.
14Displaying layers
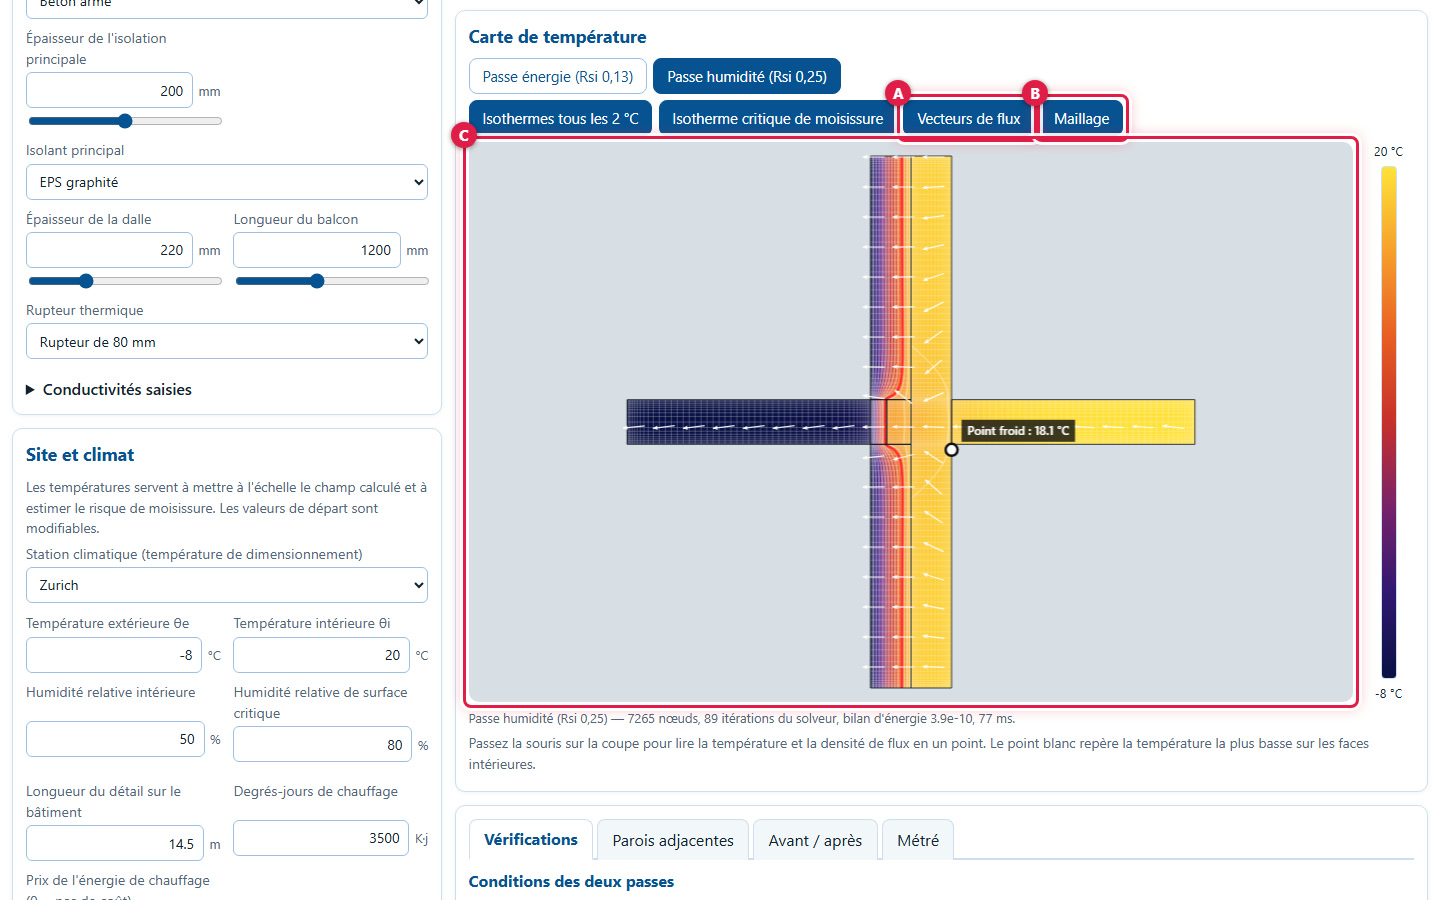
Four buttons add or remove layers: isotherms every 2 °C, the critical mould isotherm, (A) "Flux vectors" and (B) "Mesh". The mesh is displayed on the map (C): it is tightened towards material interfaces.
15Read a point with the probe
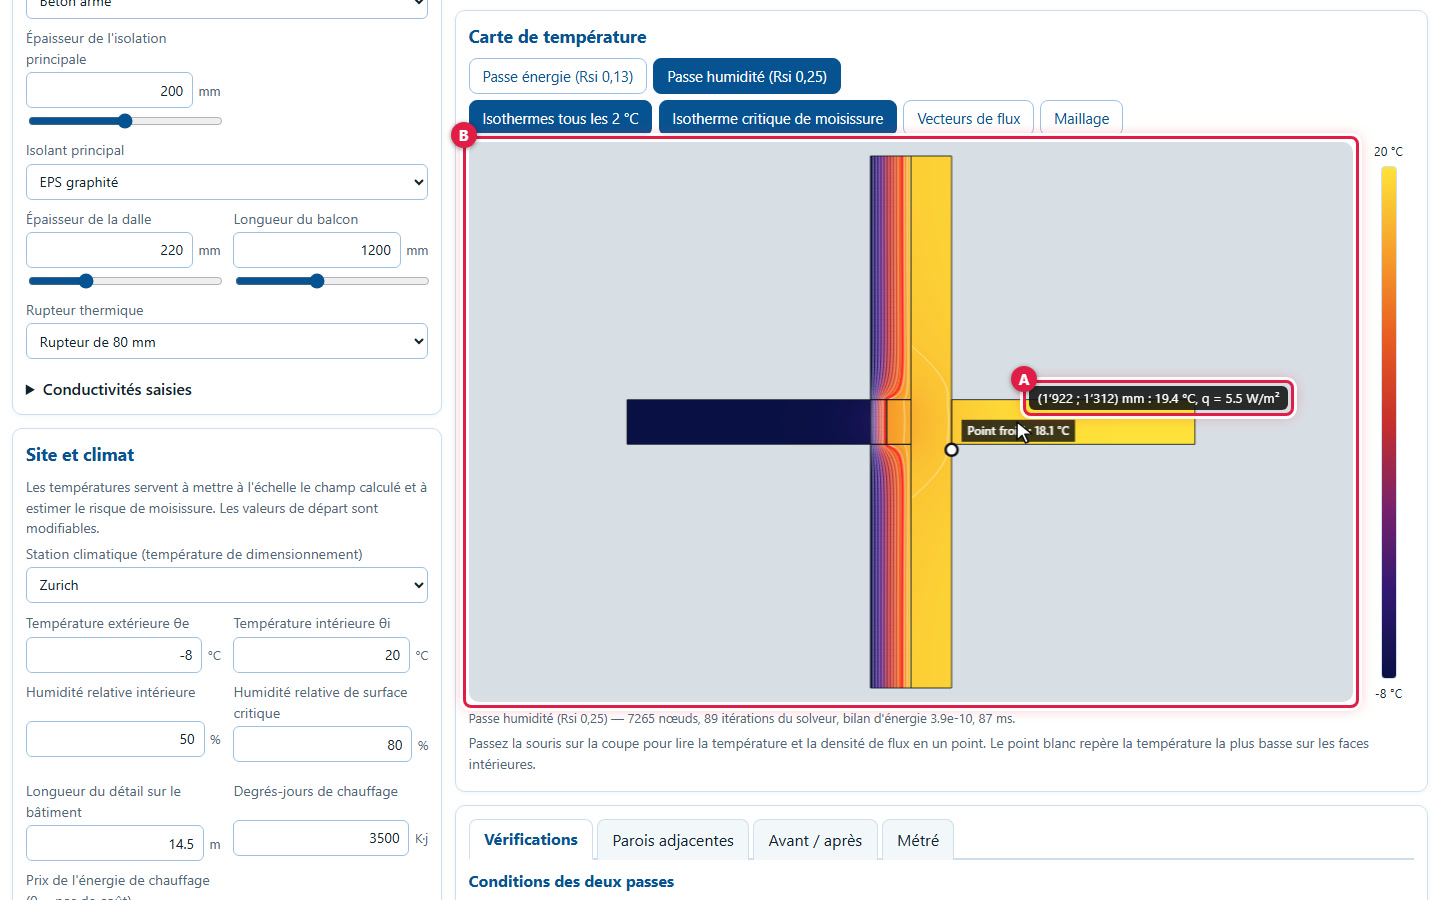
Move the mouse over the section (B): a tooltip (A) gives the position in mm, temperature and flux density. Here: 19.4 °C and 5.5 W/m². The white dot marks the cold spot, the lowest temperature on the interior surfaces.
4. The detail tabs
16Check the conditions of both passes
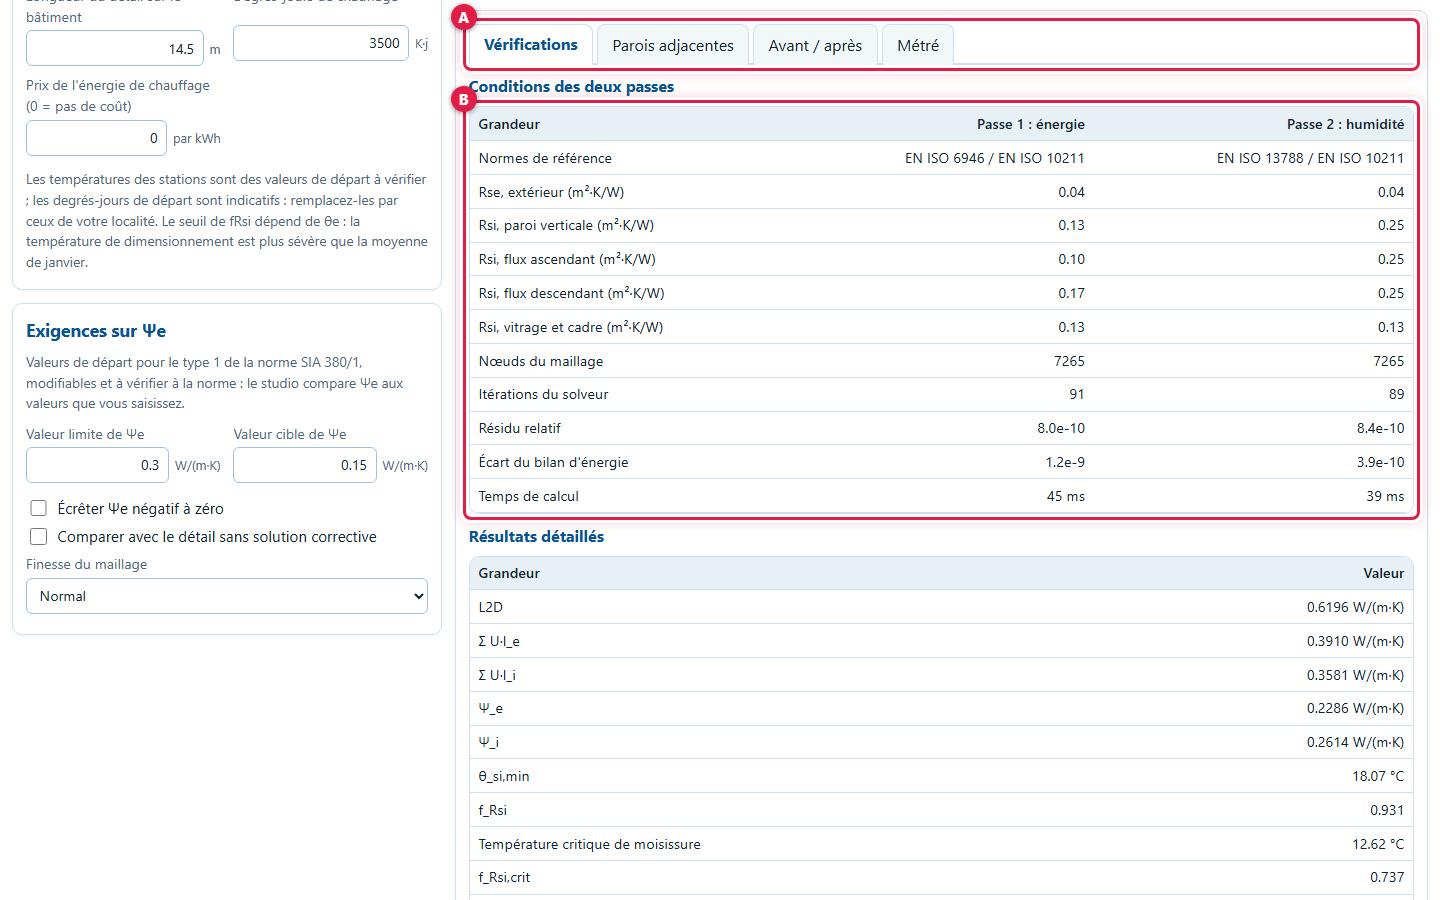
The tab "Checks" (A) first shows (B) the conditions of both passes: reference standards, surface resistances Rse and Rsi, number of mesh nodes (7265), solver iterations, relative residual, energy balance discrepancy and calculation time. This table allows you to check the calculation.
17Read the detailed results
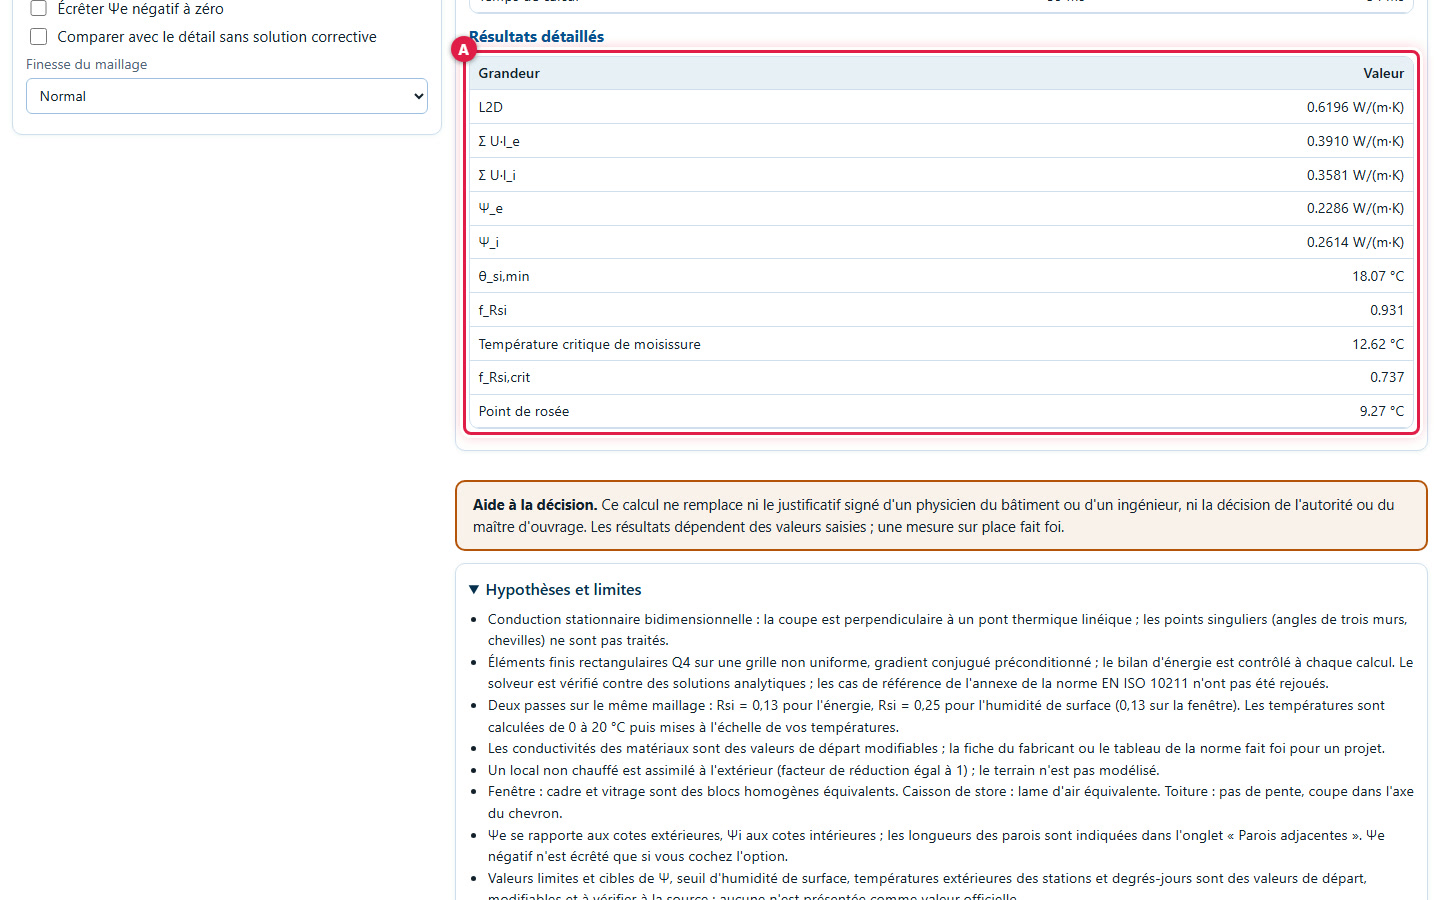
Further down, (A) the detailed results table: L2D, Σ U·l_e, Σ U·l_i, Ψe, Ψi, θsi,min, fRsi, critical mould temperature, fRsi,crit and dew point. If the energy balance exceeds the check tolerance, a warning indicates it: do not use this result without checking the geometry.
18Recalculate by hand
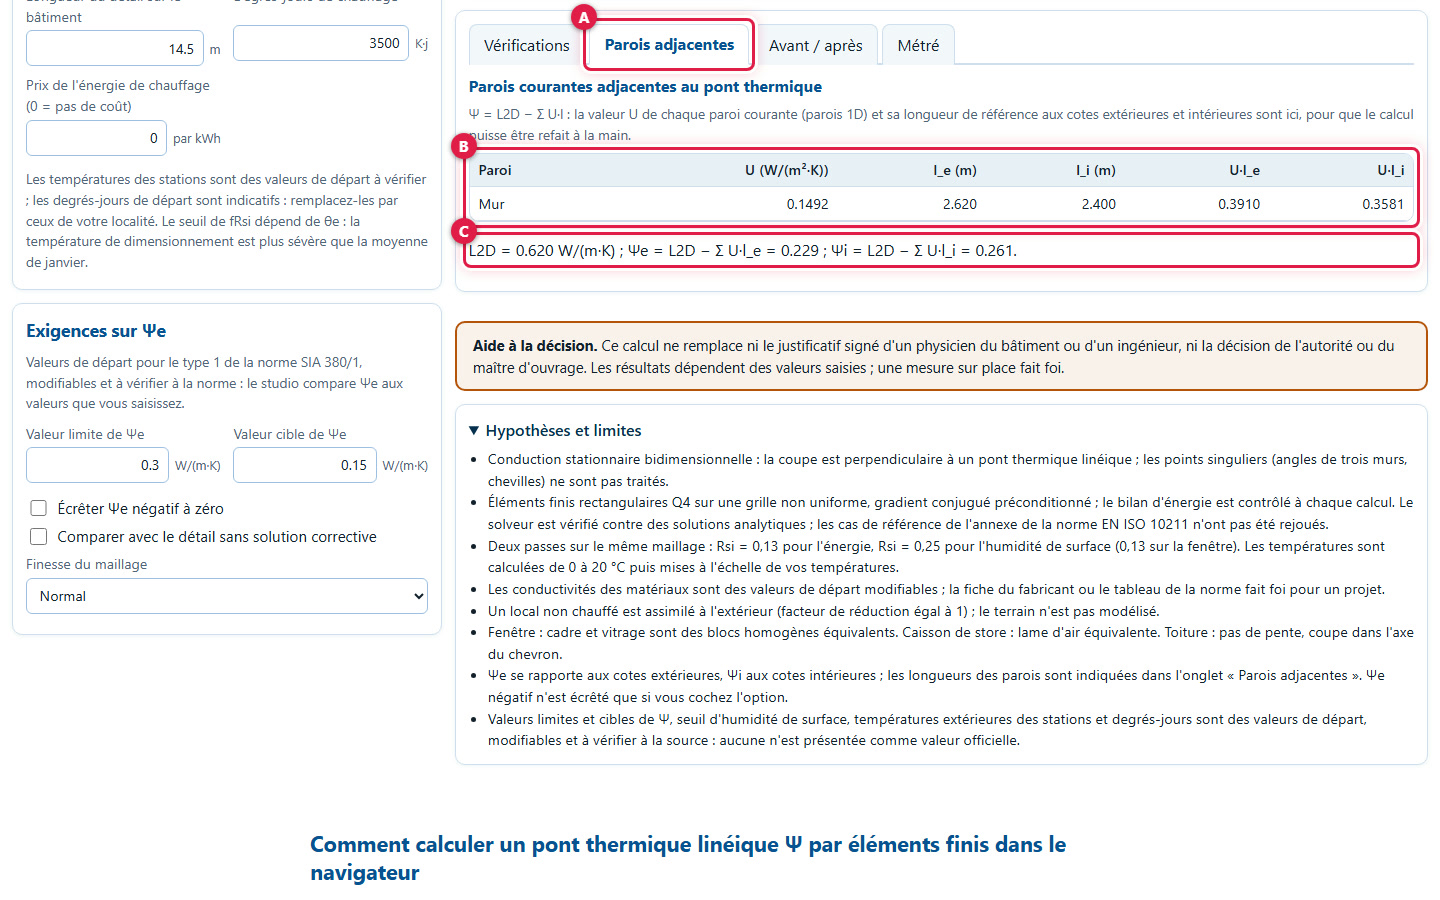
The "Adjacent walls" tab (A) gives (B) the U-value of each standard wall, its reference lengths l_e and l_i, and the U·l products. (C) The sentence at the bottom recalls the formula: Ψe = L2D − Σ U·l_e. Here, L2D = 0.620, Ψe = 0.229 and Ψi = 0.261 W/(m·K).
19Compare before and after
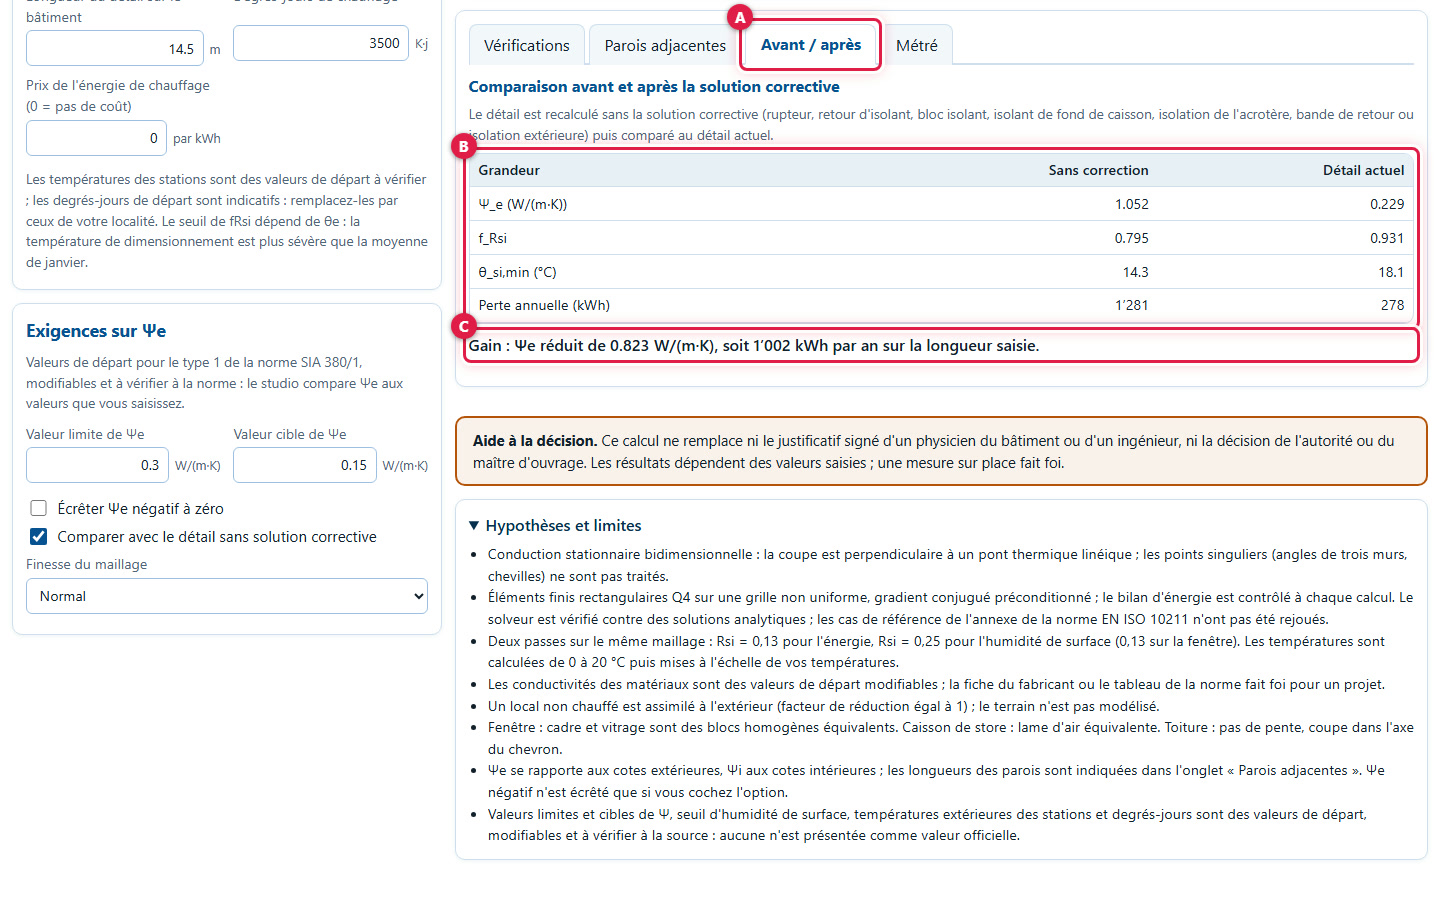
Tick "Compare with detail without remedial solution": the "Before / after" tab (A) recalculates the details without the corrective solution (thermal break, insulation return, insulating block, casing lining, parapet insulation, return strip...) and puts the two results side by side (B): Ψe 1.052 versus 0.229, fRsi 0.795 versus 0.931. (C) The sentence at the bottom gives the saving, here 1’002 kWh per year over the entered length.
20Read the quantities
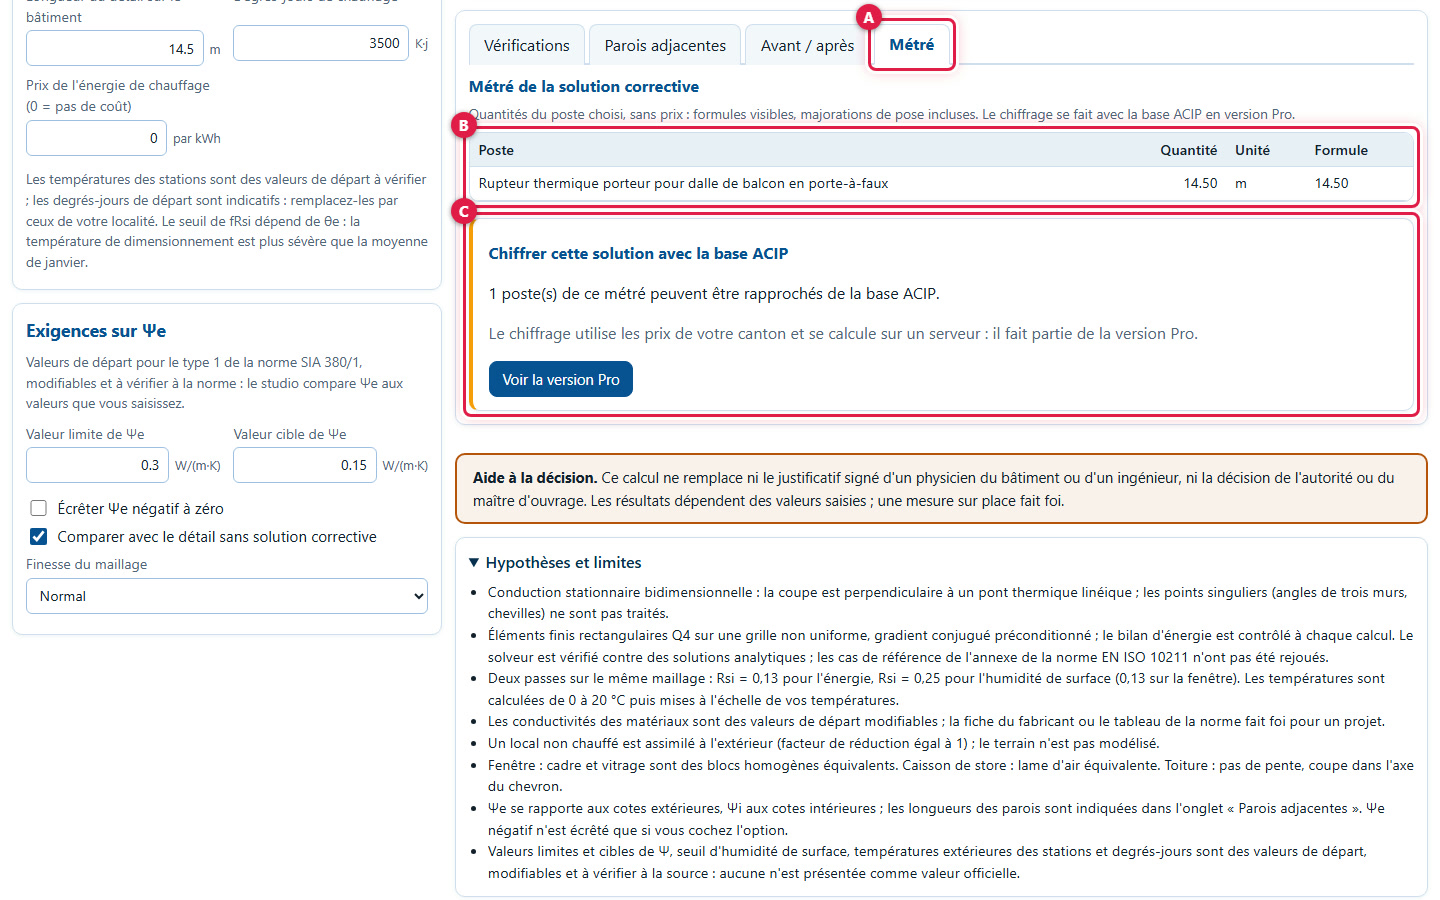
The "Bill of quantities" tab (A) gives (B) the quantities for the corrective solution, without prices: the item, the quantity, the unit and the formula, including installation allowances. Here, a thermal break over 14.5 m. (C) Below the table, the "Price this solution using the ACIP database" area.
21Locate the "ACIP pricing" area
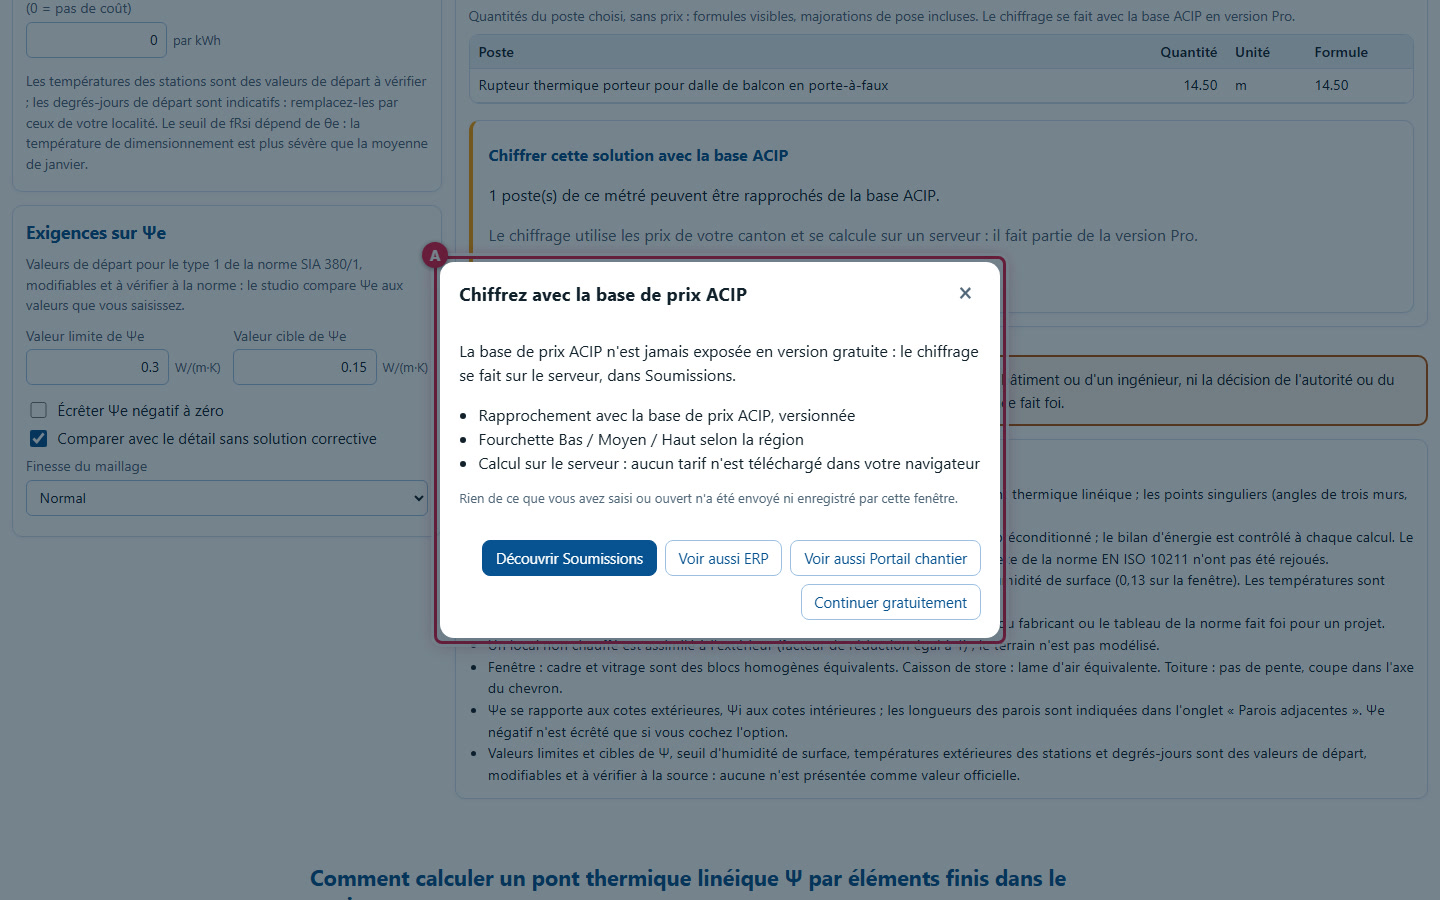
The "Price this solution using the ACIP database" area states how many items from the quantities can be matched with the ACIP database (1 here). The free studio provides neither prices nor ACIP codes: "View Pro version" opens an information window (A). "Continue for free" closes it and returns you to the studio.
5. The nine junctions
22Cantilevered balcony
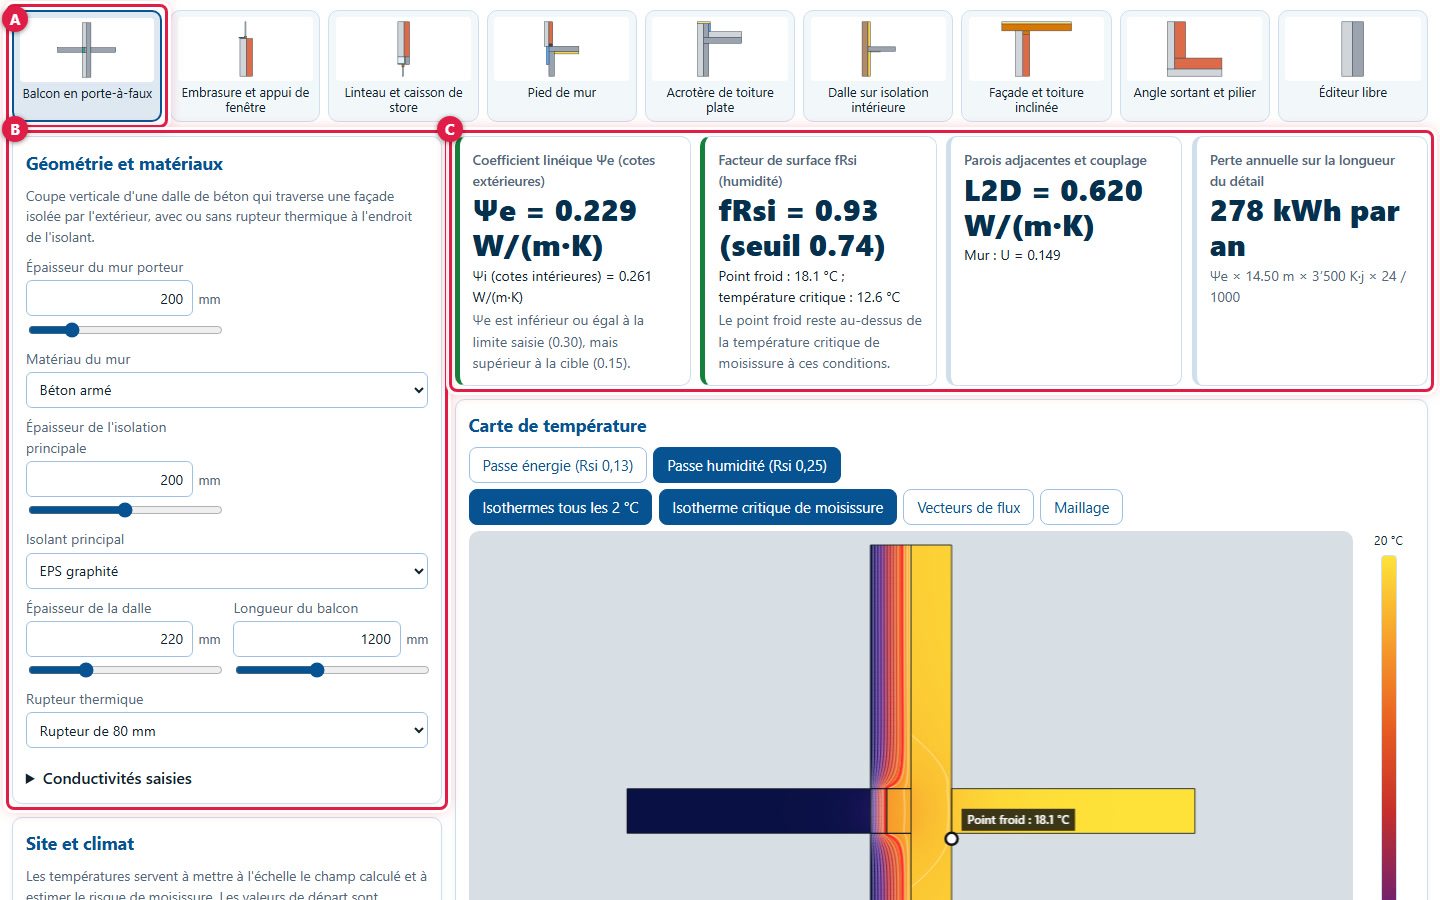
« Cantilevered balcony »: vertical section of a concrete slab passing through an externally insulated facade. (A) The chosen junction. (B) The fields: wall, insulation, slab, balcony length and thermal break. (C) With the 80 mm thermal break: Ψe = 0.229, fRsi = 0.93.
23Window reveal and sill
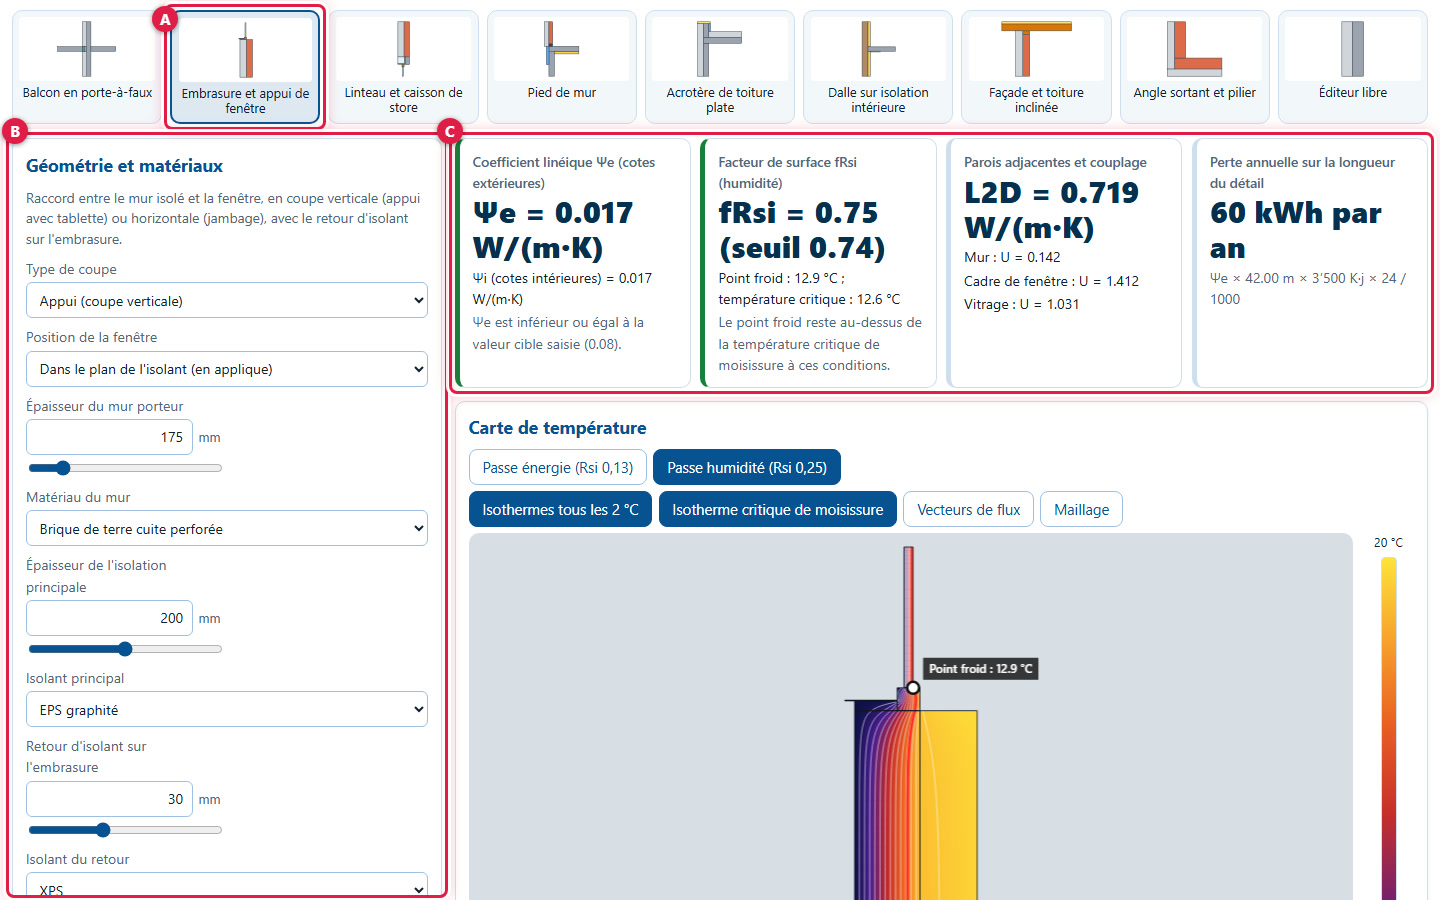
« Reveal and window sill »: connection between the insulated wall and the window. (B) Choose the section (« Sill (vertical section) » or « Jamb (horizontal section) ») and the window position (face-mounted, revealed or flush with the interior), the insulation return on the reveal, the aluminium sill (for the window sill) and the frame. (C) Here: Ψe = 0.017, fRsi = 0.75.
24Lintel and roller blind box
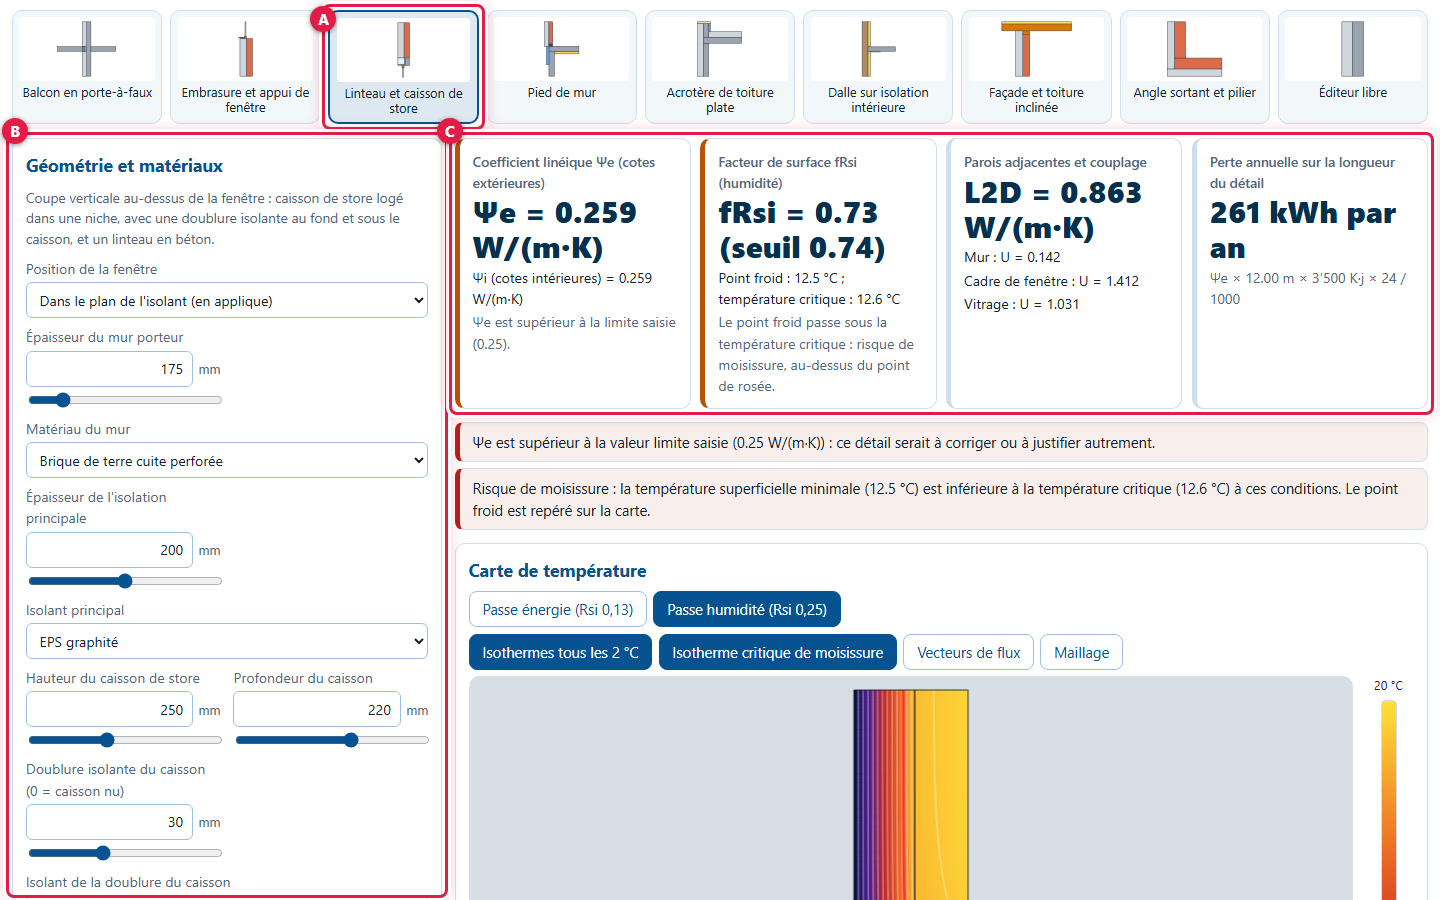
« Lintel and blind box »: vertical section above the window. The roller blind box is housed in a recess, with an insulating lining at the back and beneath the box. (B) Adjust the height and depth of the box and the lining. (C) Here, Ψe = 0.259 exceeds the entered limit, and fRsi = 0.73 falls below the threshold of 0.74: two warnings appear.
25Wall base
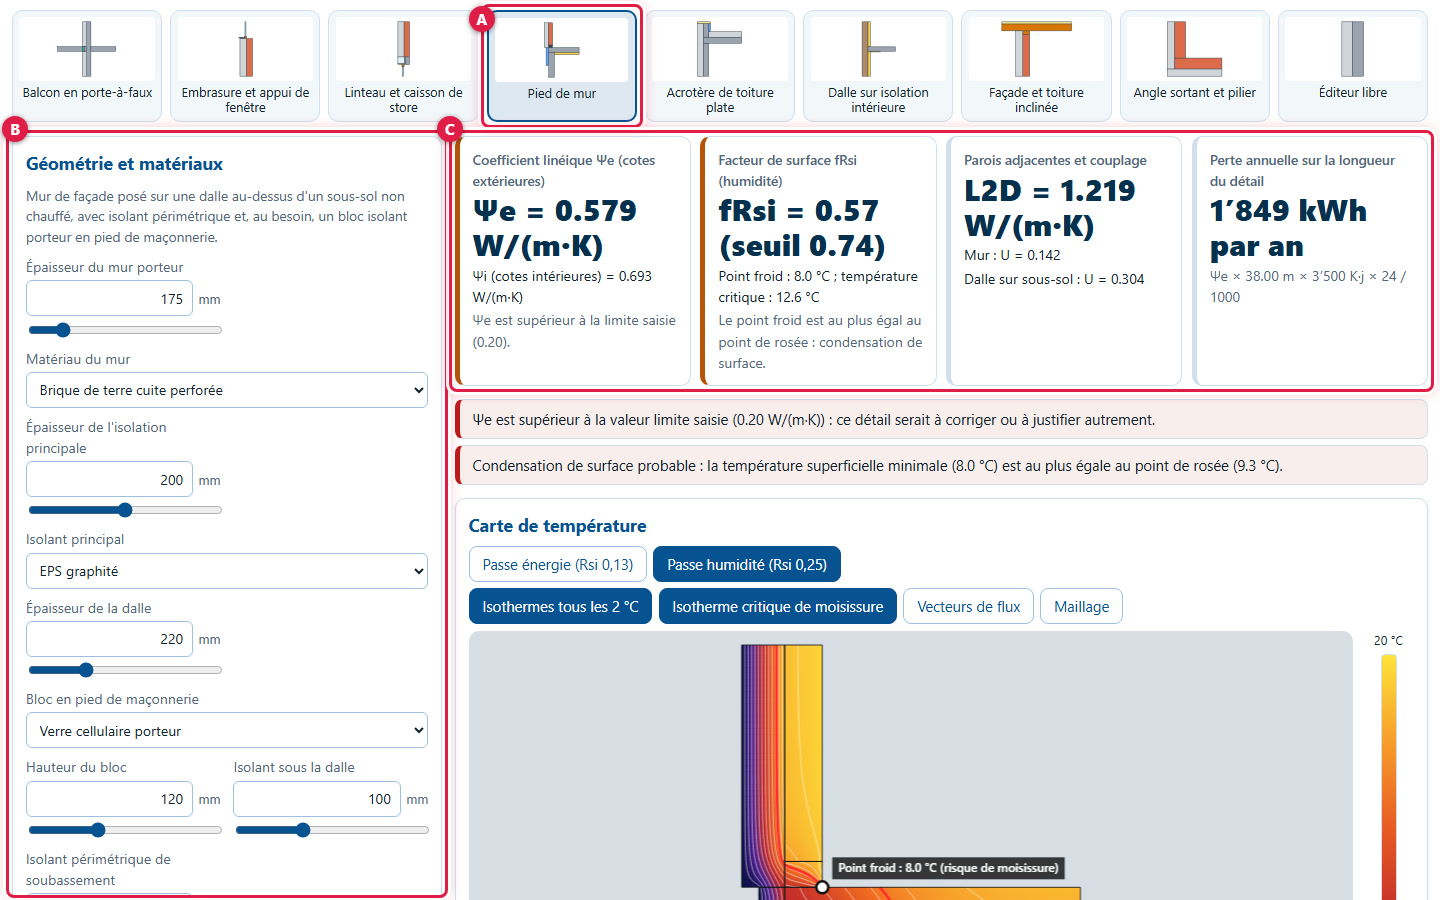
« Wall base »: facade wall resting on a slab above an unheated basement, with perimeter insulation and, if necessary, an insulating load-bearing block at the base of the masonry. (B) Here with a cellular glass block. (C) The unheated room is treated as the exterior: Ψe = 0.579, fRsi = 0.57, cold point at 8.0 °C, indicating potential surface condensation.
26Flat roof parapet
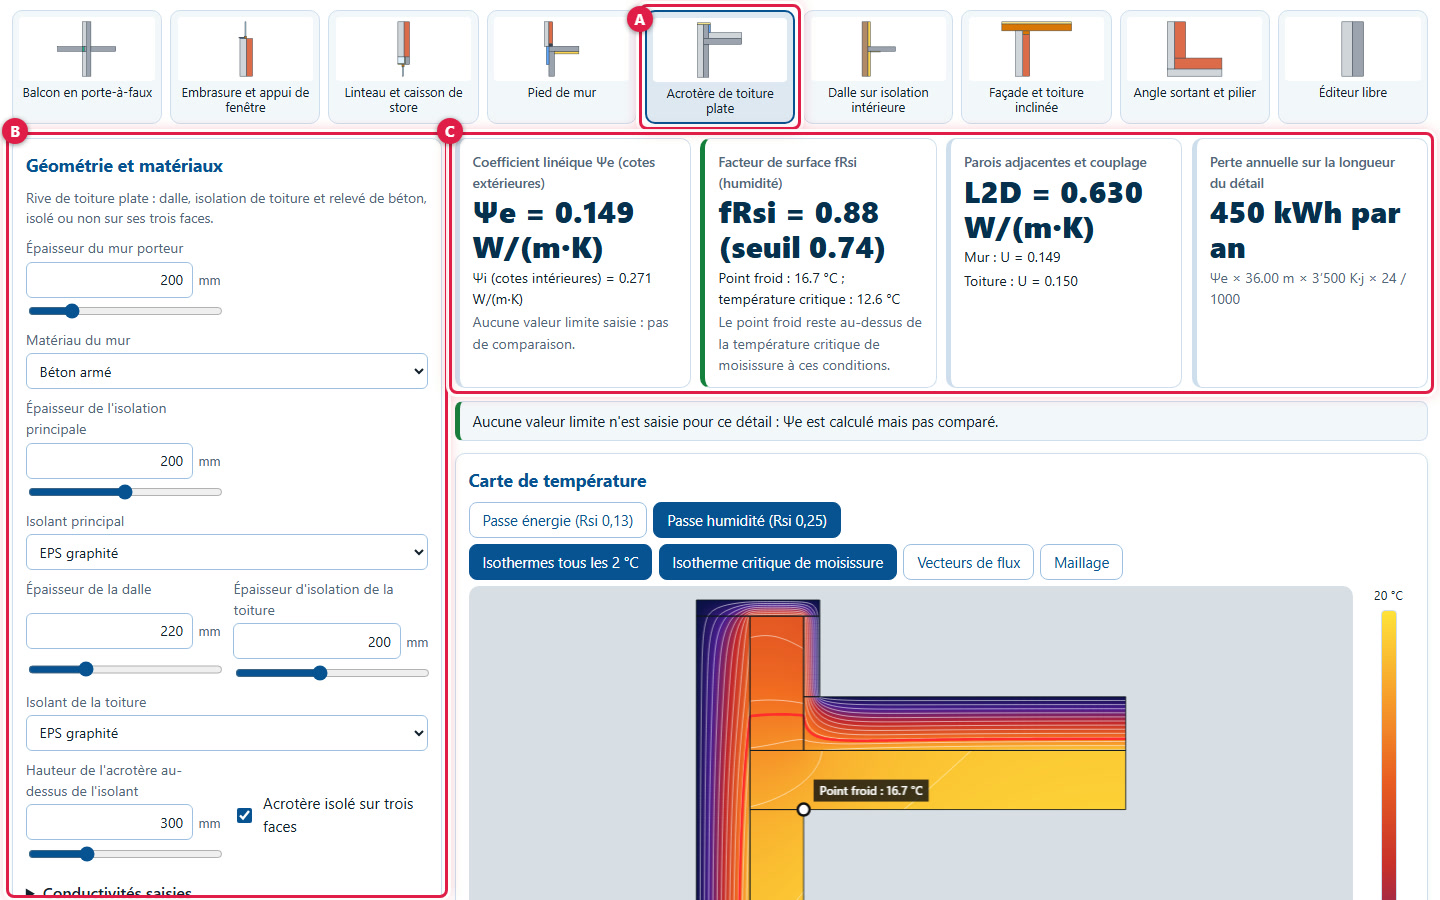
« Flat roof parapet »: flat roof edge, with the slab, roof insulation and concrete upstand, insulated or not on its three faces. (B) Here, the upstand is insulated. (C) No limit value is proposed for this detail: Ψe = 0.149 is calculated but not compared, and fRsi = 0.88.
27Slab on interior insulation
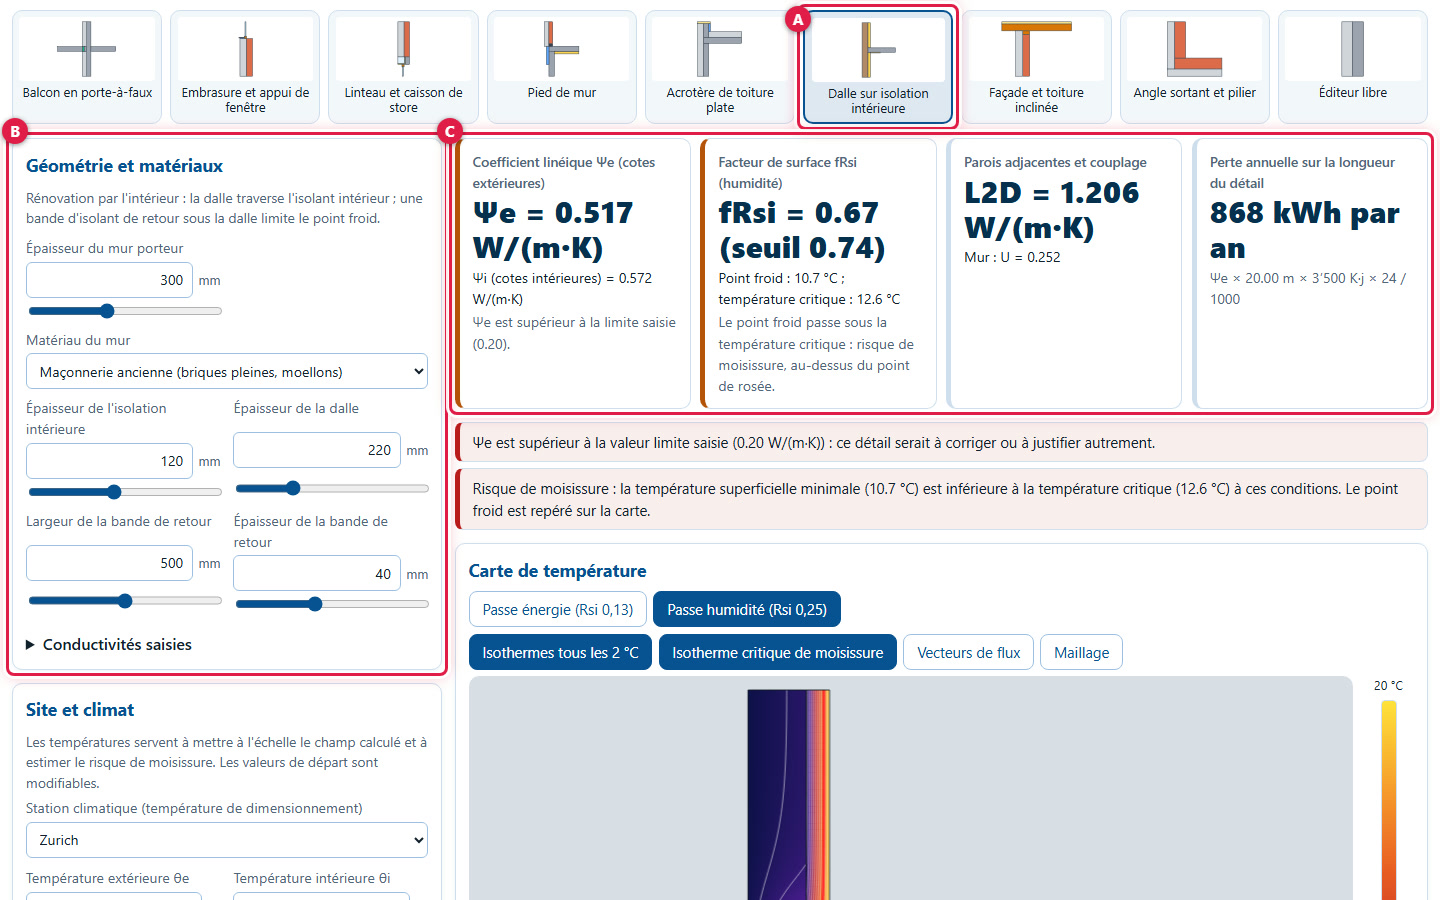
« Slab on internal insulation »: renovation from the inside. The slab passes through the interior insulation; a return insulation strip under the slab limits the cold spot. (B) Adjust the interior insulation, the width and thickness of the return strip. (C) Here: Ψe = 0.517, fRsi = 0.67, with a mould warning.
28Facade and pitched roof
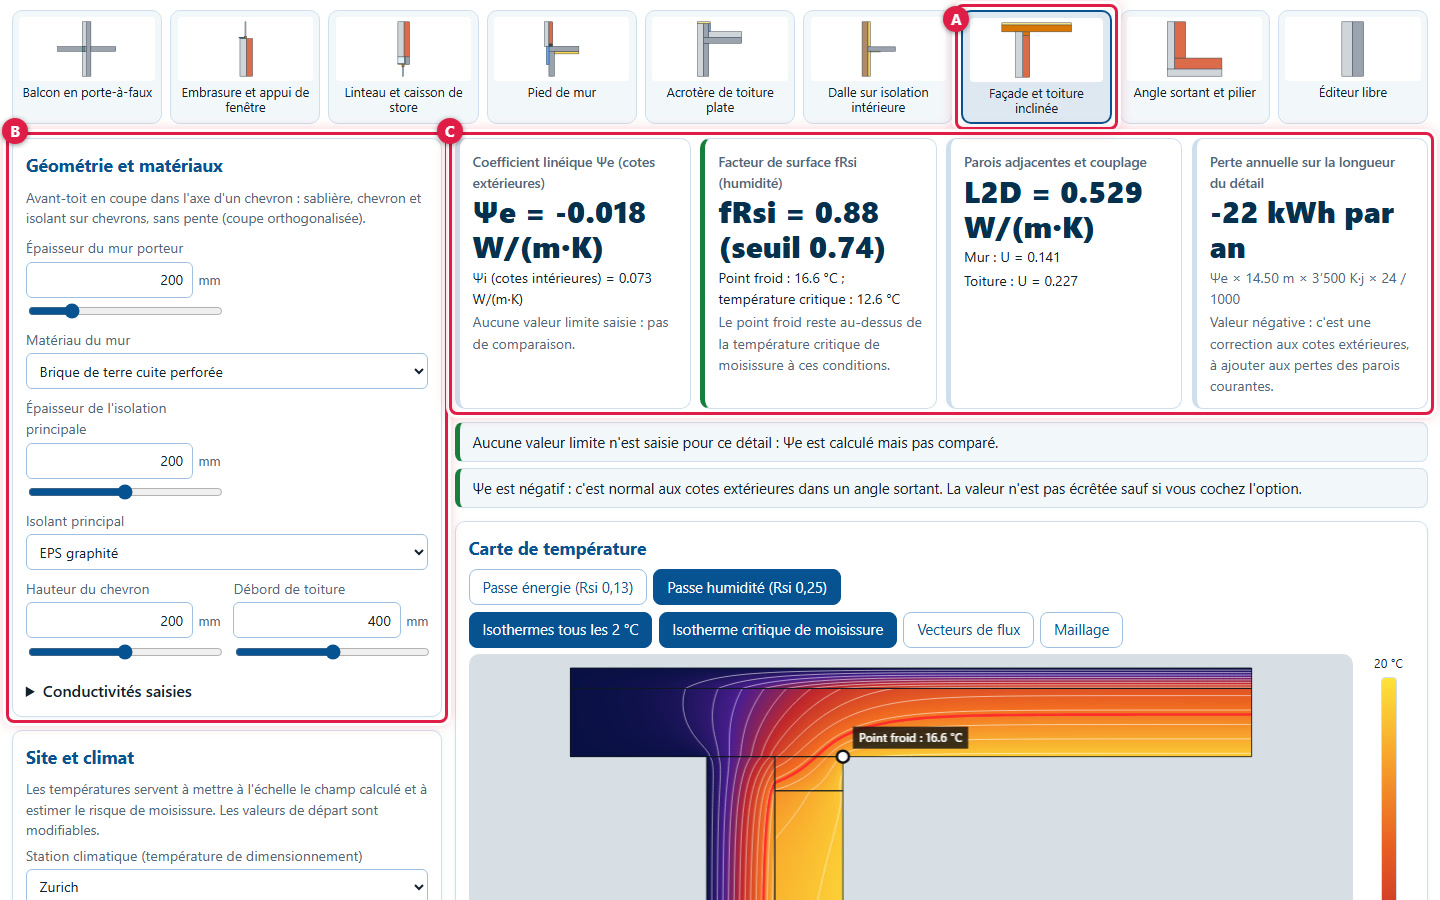
« Façade and pitched roof »: eaves section along the axis of a rafter, with the wall plate, rafter and over-rafter insulation, without slope. (B) Adjust the rafter height and roof overhang. (C) Here, Ψe = -0.018 is negative: this is possible at exterior dimensions, and the studio only brings it back to zero if you request it.
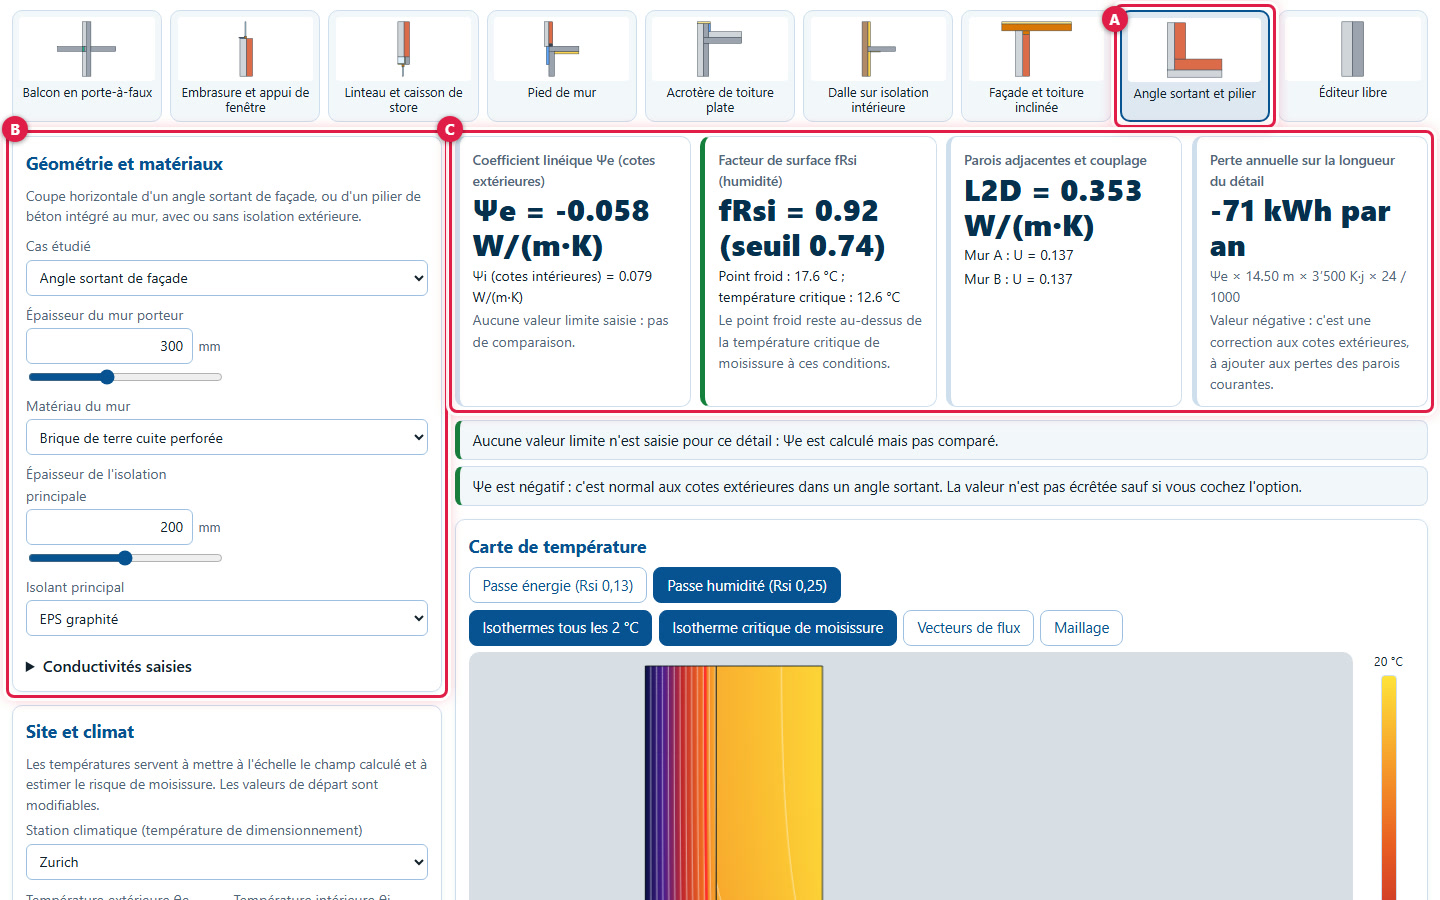
29External corner and pillar
« External corner and pillar »: horizontal section of an external facade corner or a concrete pillar integrated into the wall. (B) Choose the studied case: « External facade corner » or « Concrete pillar in the wall ». (C) Here, for an insulated corner: Ψe = -0.058 (negative, which is normal in an external corner) and fRsi = 0.92.
6. The free editor
30Draw your own detail
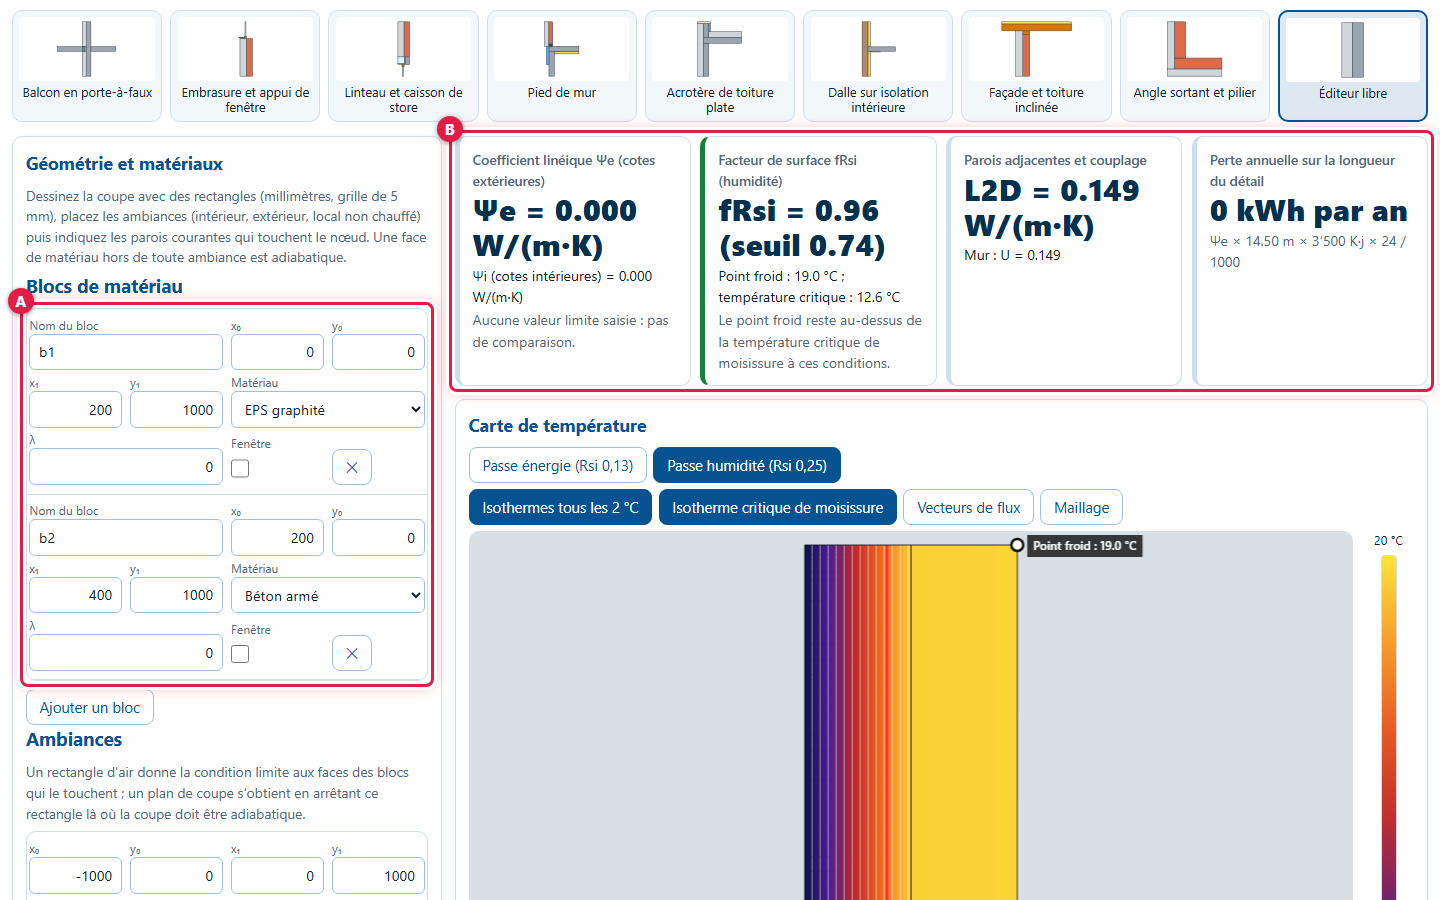
"Free editor" opens with a control case: a plane wall made of two blocks. (A) Each block has a name, corners x₀, y₀, x₁, y₁ in mm (5 mm grid), a material, a conductivity λ (0 = material value) and a "Window" checkbox. (B) A plane wall has no thermal bridge: Ψe = 0.000, this is the control.
31Placing environments and walls
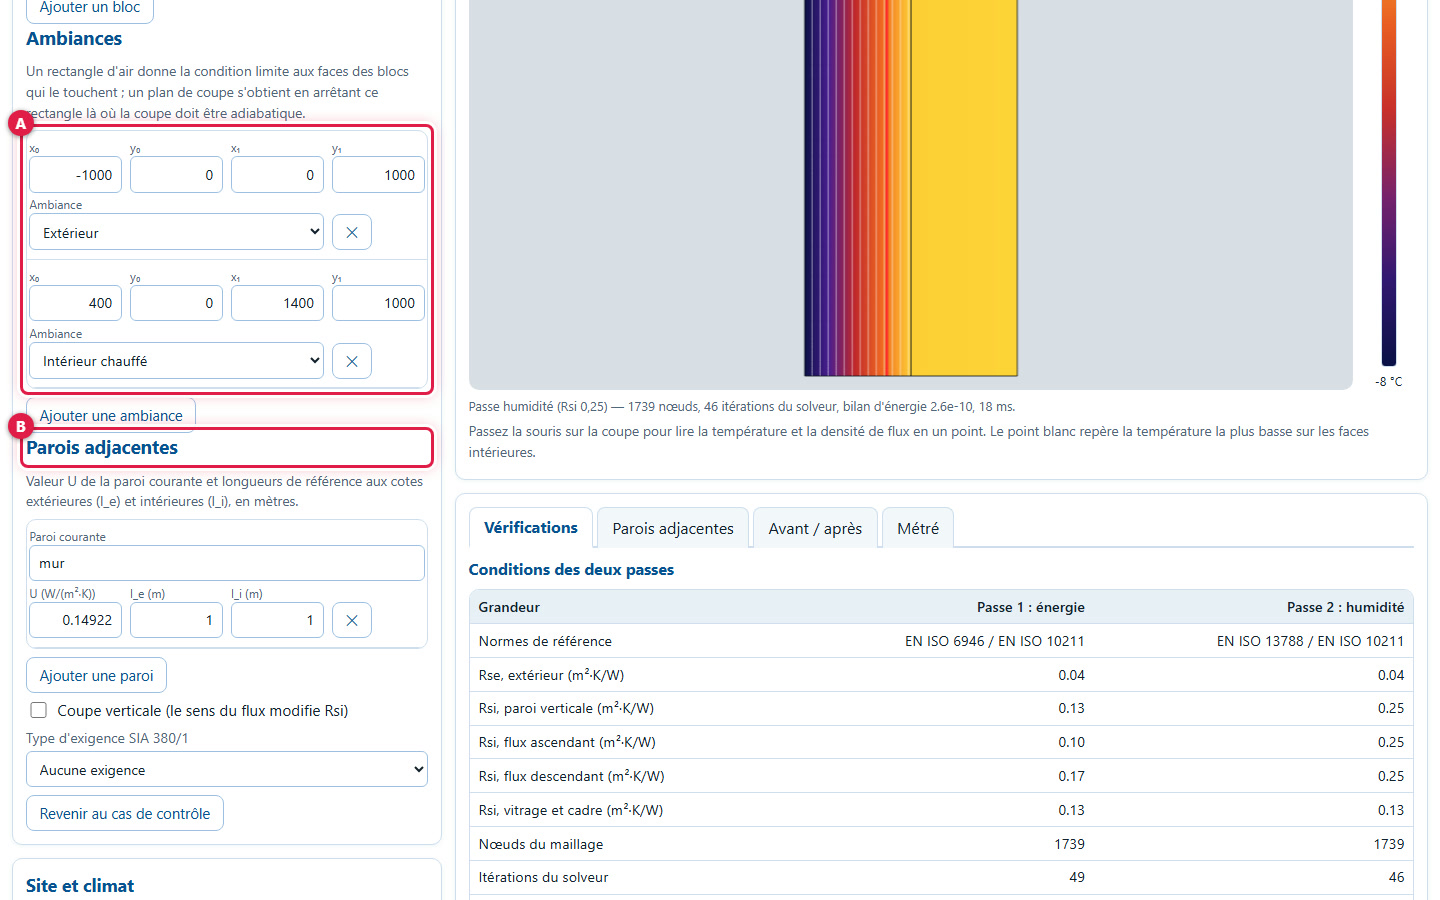
(A) An environment is an air rectangle: "Heated interior", "Exterior" or "Unheated space". It provides the boundary condition on the faces of the blocks that touch it; a material face outside of any environment is adiabatic, which acts as a cutting plane. (B) Adjacent walls: the U-value of the current wall and its lengths l_e and l_i in metres.
32Add a block
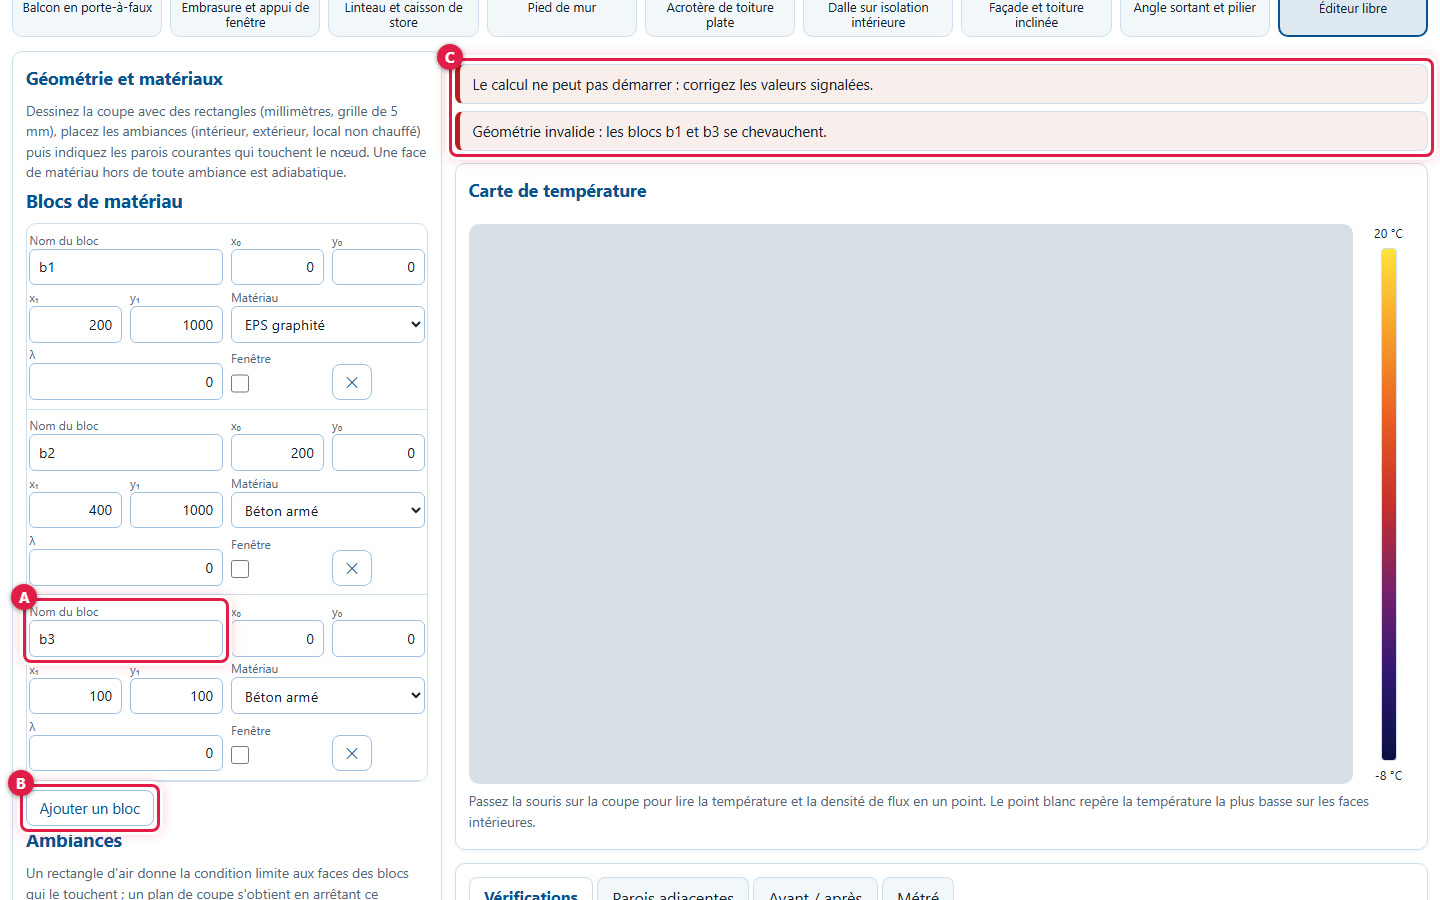
"Add a block" (B) adds a block sheet (A): a 100 mm square at corner 0, 0, in reinforced concrete. It overlaps the blocks already there: the calculation stops and a message (C) names the two overlapping blocks. Change the corners until the blocks touch without overlapping.
33Change a material
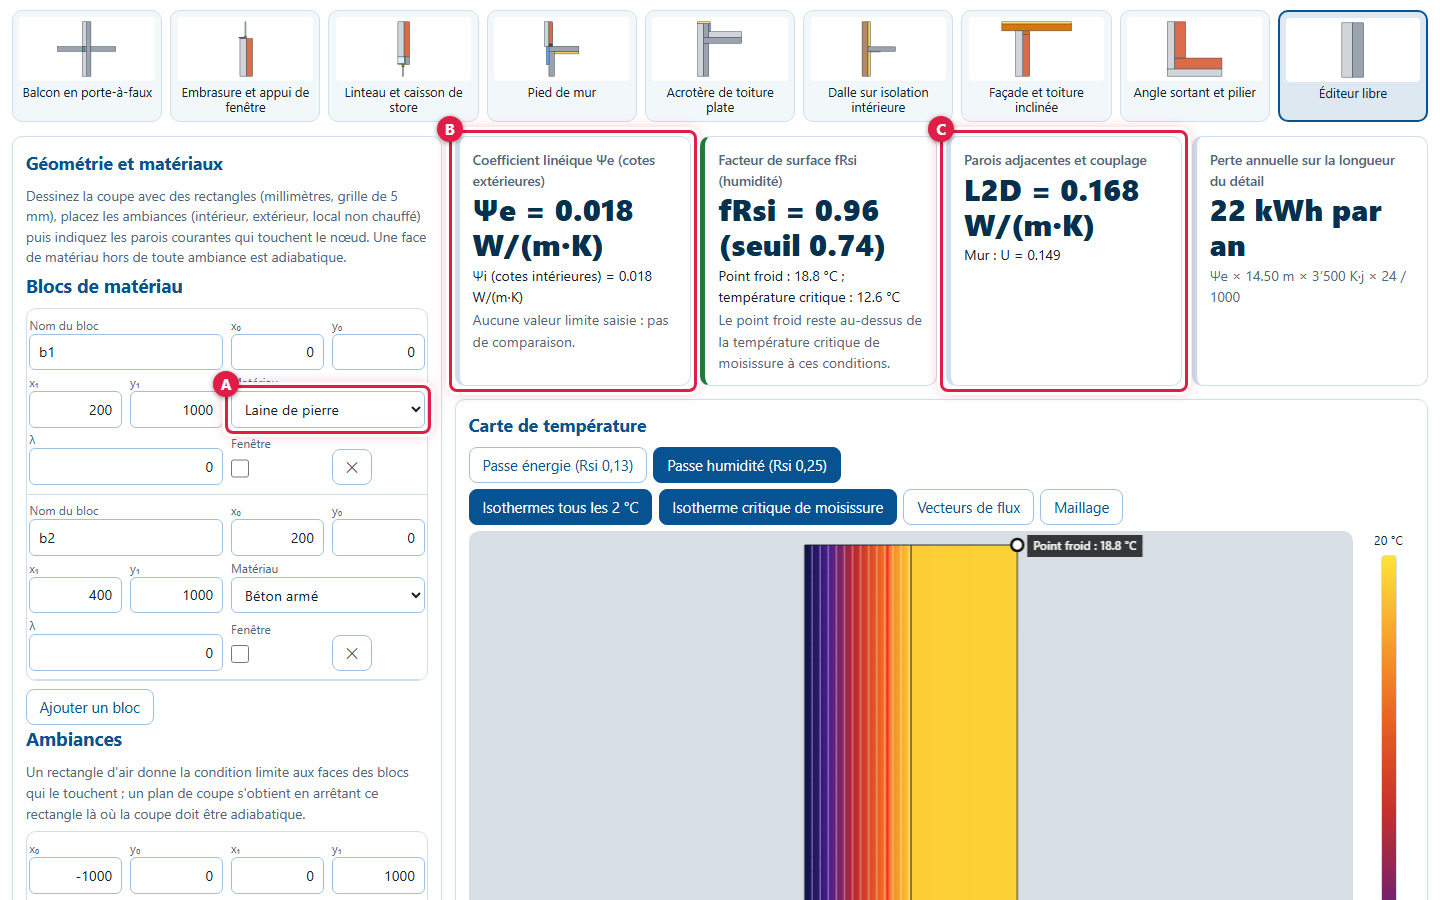
Choose another material for the first block (A), here "Mineral wool": Ψe goes from 0.000 to 0.018 (B) and L2D to 0.168 (C). Ψe is no longer zero because the U-value of the current wall is not recalculated by the editor: update it in the adjacent walls.
7. The risk of mould
34Read the moisture verdict
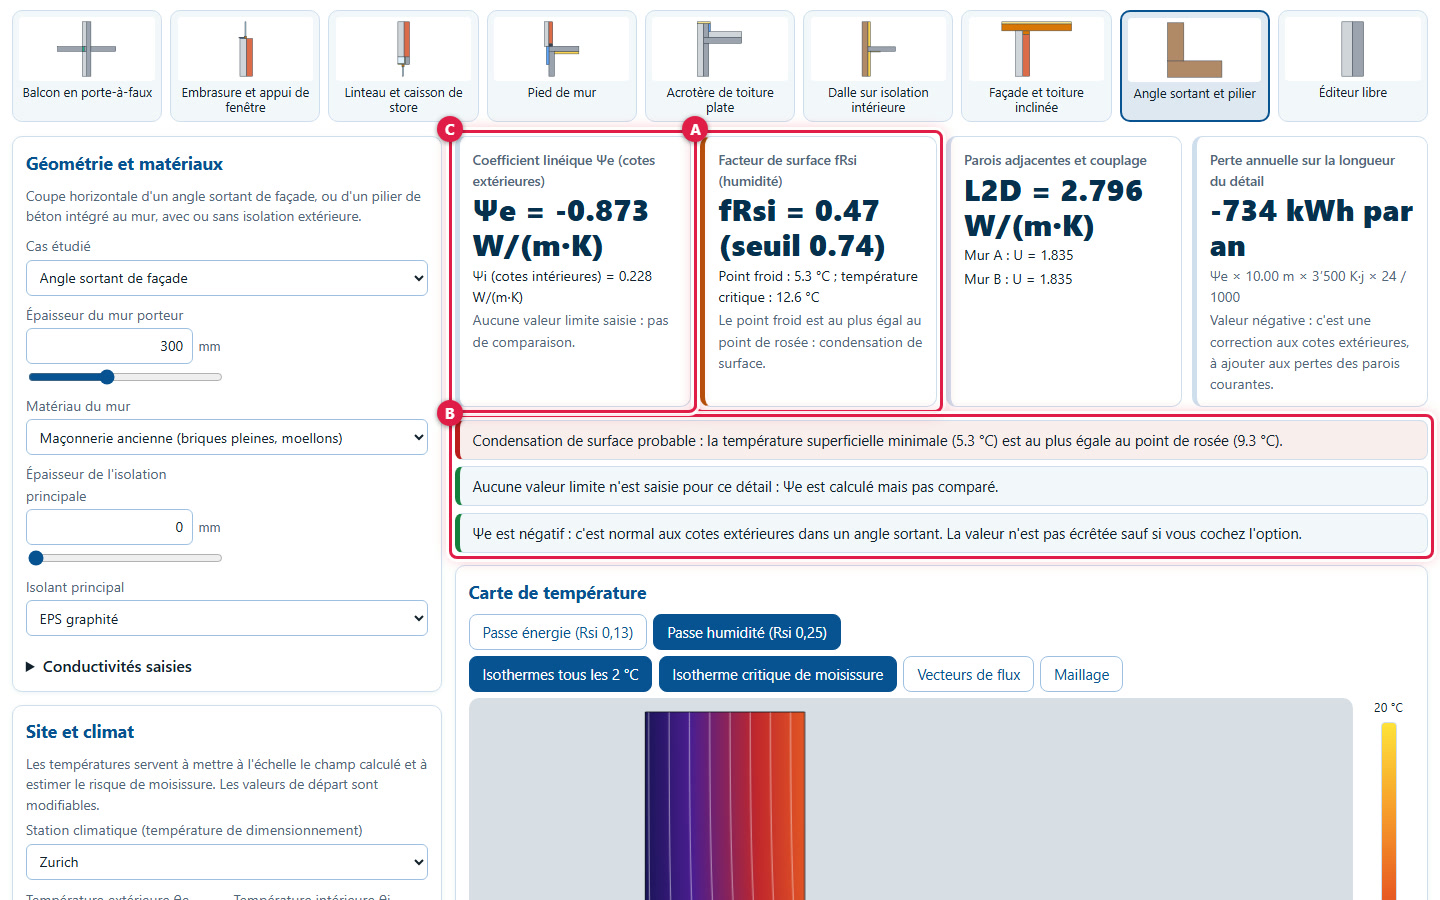
"Old uninsulated wall corner: cold spot and mould": an old masonry wall, without insulation. (A) fRsi = 0.47, well below the threshold of 0.74; the cold spot is at 5.3 °C for a critical temperature of 12.6 °C. (B) It is at most equal to the dew point (9.3 °C): the studio announces surface condensation. (C) Ψe is negative (-0.873): this is normal at the outer dimensions in an external corner.
35Locate the cold spot
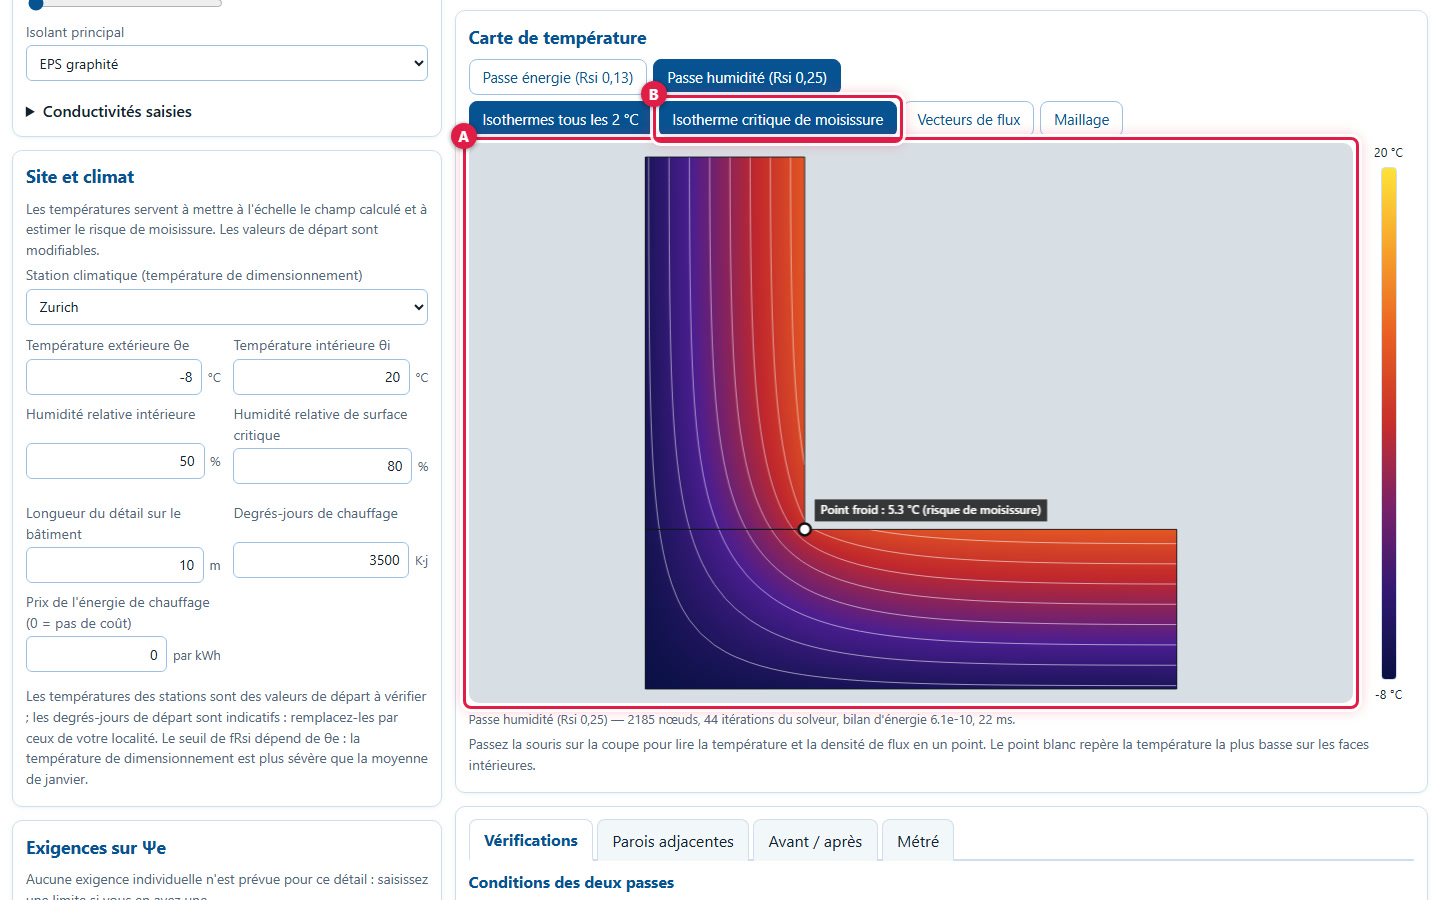
On map (A), the white dot is the cold spot, in the inner corner. Its label adds "mould risk" as soon as the cold spot drops below the critical temperature. (B) The "Critical mould isotherm" layer plots the line whose temperature is equal to the critical mould temperature.
36Correct with external insulation
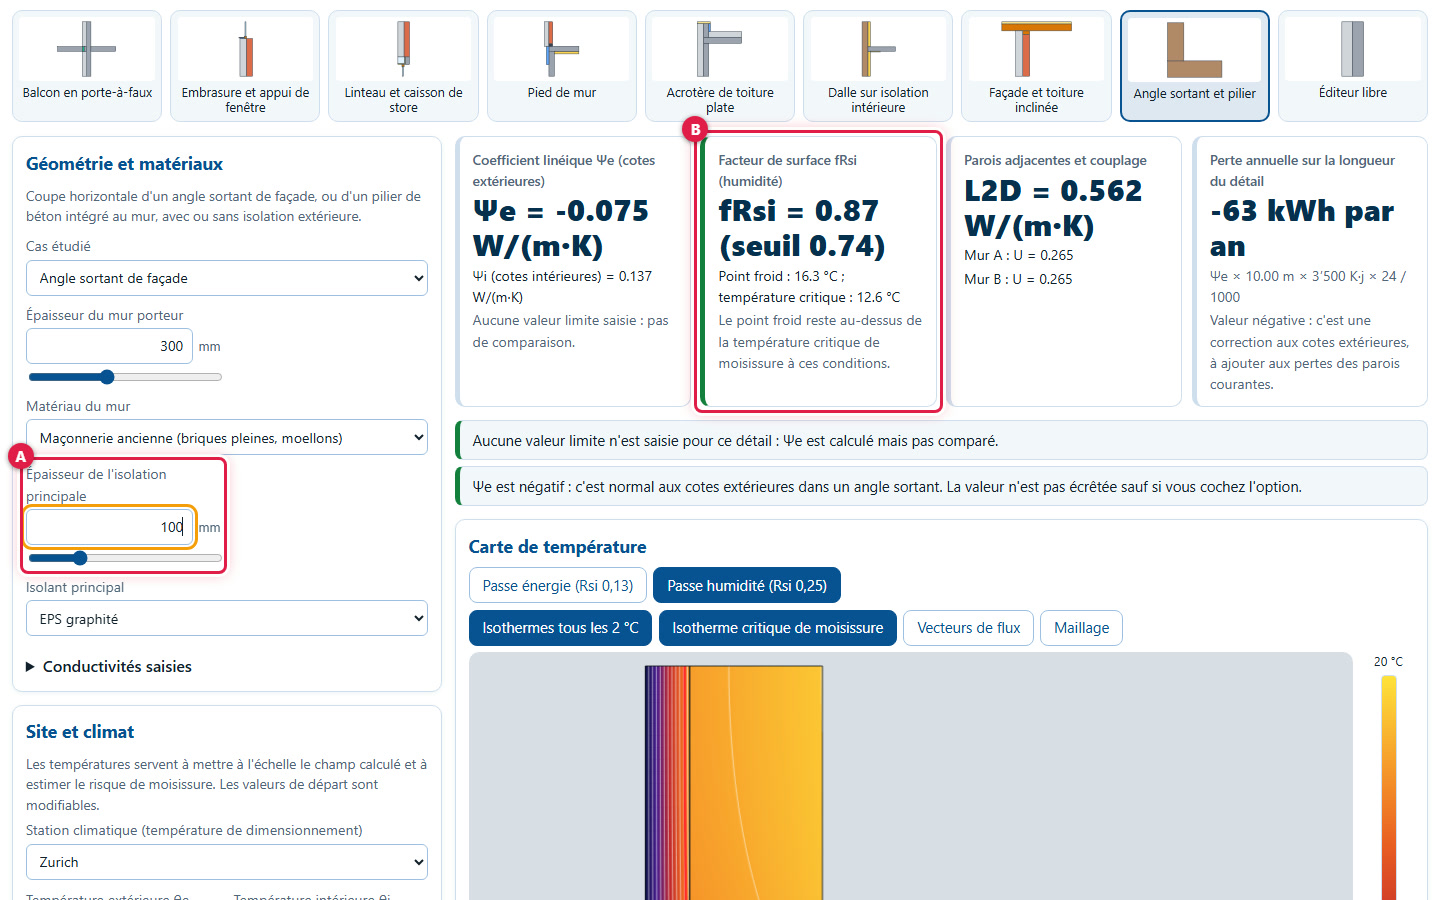
Add 100 mm of external insulation (A): fRsi rises to 0.87 (B) and the cold spot to 16.3 °C. This figure is a calculation example: it is not a recommended thickness for your building.
8. Print and export
37Print or export to CSV
The top bar contains (A) "Print sheet" and (B) "Export as CSV". Printing uses your browser's print function: you can choose "Save as PDF". The CSV button downloads a semicolon-separated column file: the example, the junction, the date, the conditions, the results, the reference walls, the quantities and the decision support reservation. (C) The Pro buttons open an information window.
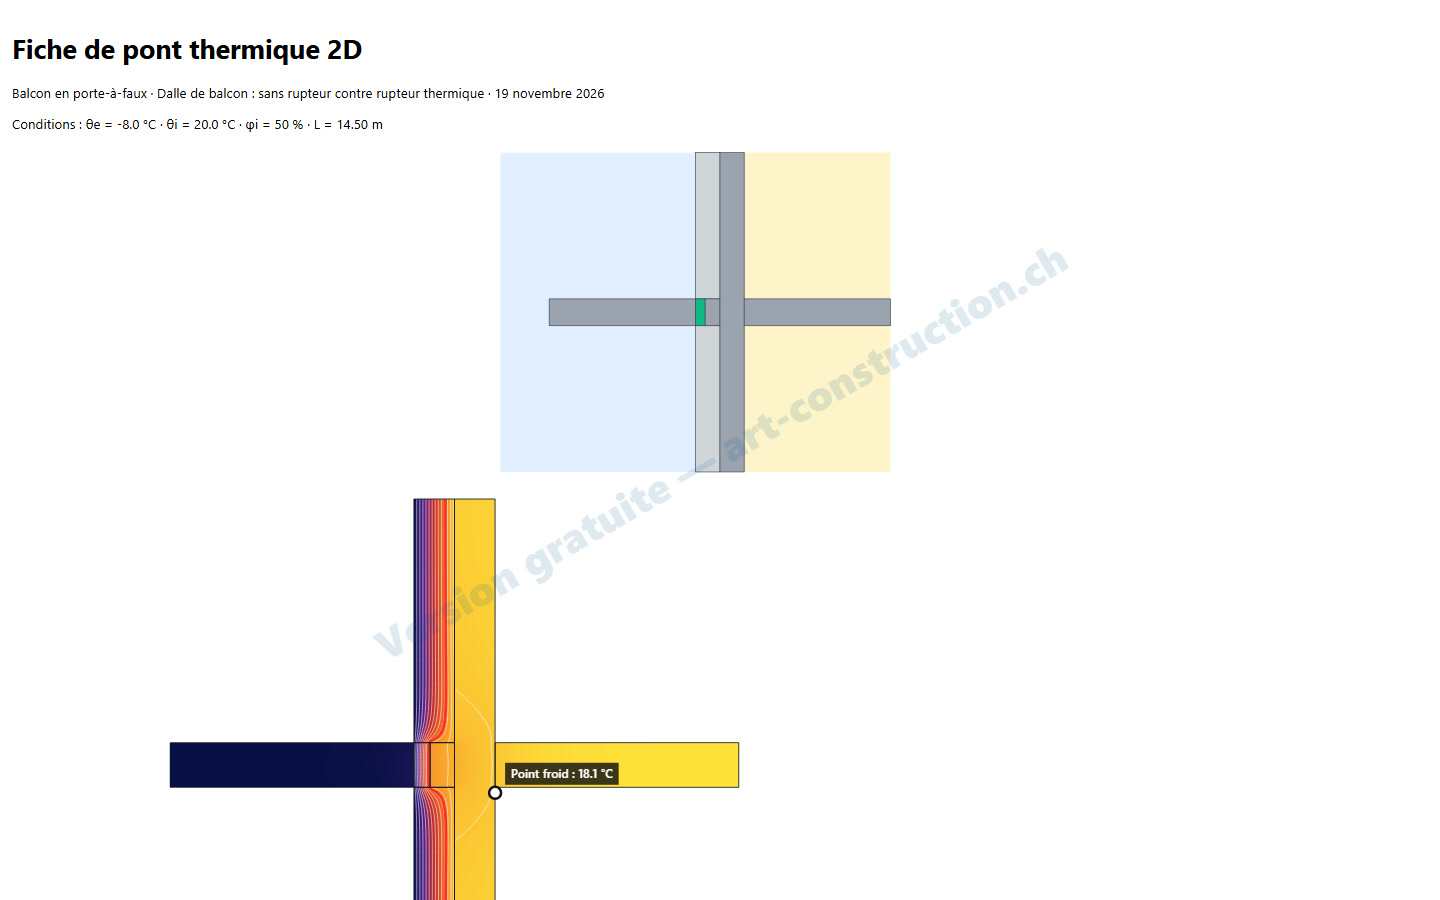
38View the printed sheet
The sheet includes the title, example and date, conditions, the section of the junction, the temperature map, the results and warnings. In the free version, it bears the watermark « Free version — art-construction.ch ».
9. Free version and Pro version
39What the free version does not keep
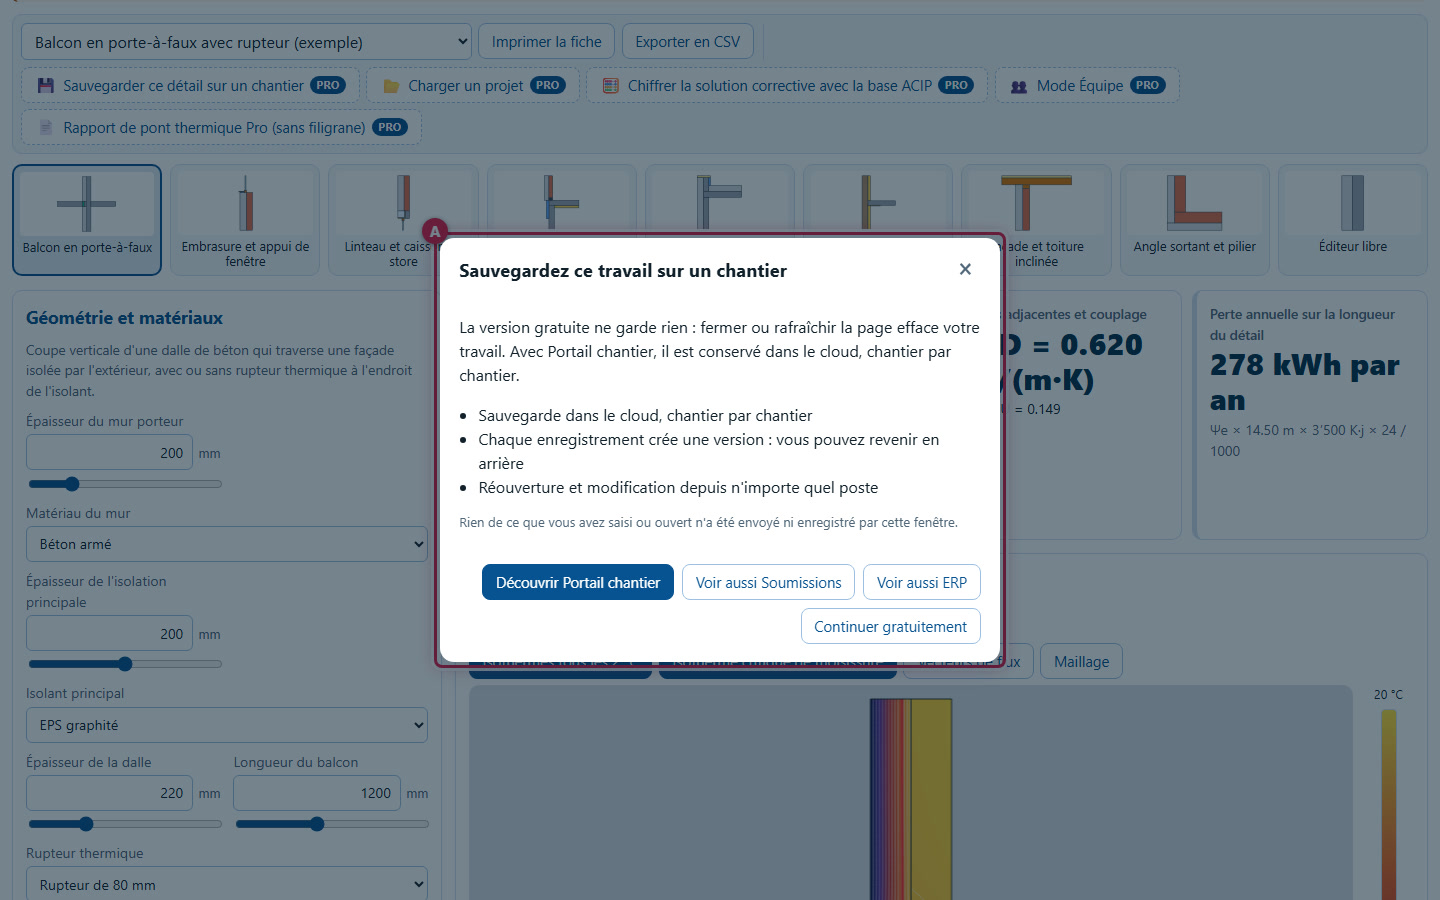
The free version keeps nothing: no saving, no project to reopen, no prices. The five buttons marked « Pro » (« Save this detail to a construction site », « Load a project », « Cost the corrective solution with the ACIP database », « Team Mode » and « Pro thermal bridge report (watermark-free) ») open an information window (A), without sending anything.
10. What this software does not do
- It does not replace the assessment of a building physicist or an engineer, nor a test, nor the decision of the authority or the client, and it does not provide any legal advice.
- It calculates in steady-state and two dimensions: the section is perpendicular to a linear thermal bridge. Singular points (three-wall corner, dowels) and three-dimensional thermal bridges are not treated. The ground is not modelled and an unheated room is treated as the exterior.
- The solver is verified against analytical solutions and an independent solver. The reference cases of the EN ISO 10211 standard have not been replayed: the studio is not validated by these cases.
- The result of "80 mm thermal break" (0.229 W/(m·K)) depends on the equivalent conductivity that the studio uses for this option (0.115 W/(m·K)). A second independent solver returns the same L2D coupling to within 0.05%: this is not a calculation error, but it is not necessarily the value of your product. Compare with the manufacturer's datasheet.
- The starting limit and target values (SIA 380/1 standard types) are those proposed by the studio and have not been checked against the standard. They can be modified. There are none for the parapet, roof and corner.
- The climate is limited to four stations (Geneva, Zurich, La Chaux-de-Fonds, Saint-Moritz) and an entered temperature. The initial degree-days are indicative. There is no choice by postal code.
- The studio offers 18 materials with initial generic conductivities, modifiable block by block: it does not use an official conductivity table.
- The frame and glazing of a window are equivalent homogeneous blocks, the roller blind box is an equivalent air layer and the roof is calculated without a slope.
- The annual loss only displays a cost if you enter an energy price; this cost has no currency symbol on screen. The take-off gives neither price nor ACIP code.
- The free version does not save any projects. The Pro version and ACIP costing are not connected at present.
- Tests were carried out on a computer. Firefox, Safari, touch screen, screen reader and paper printing have not been tested.
A question? Send a request to support.