Guide: Swiss work permits and CFC diplomas (construction)
This guide teaches you how to use the tool step by step: answer a few questions to see which permit or notification is likely, what sequence to follow, who submits what, and which documents to gather. It is designed for both job applicants and employers in construction.
1. Getting started
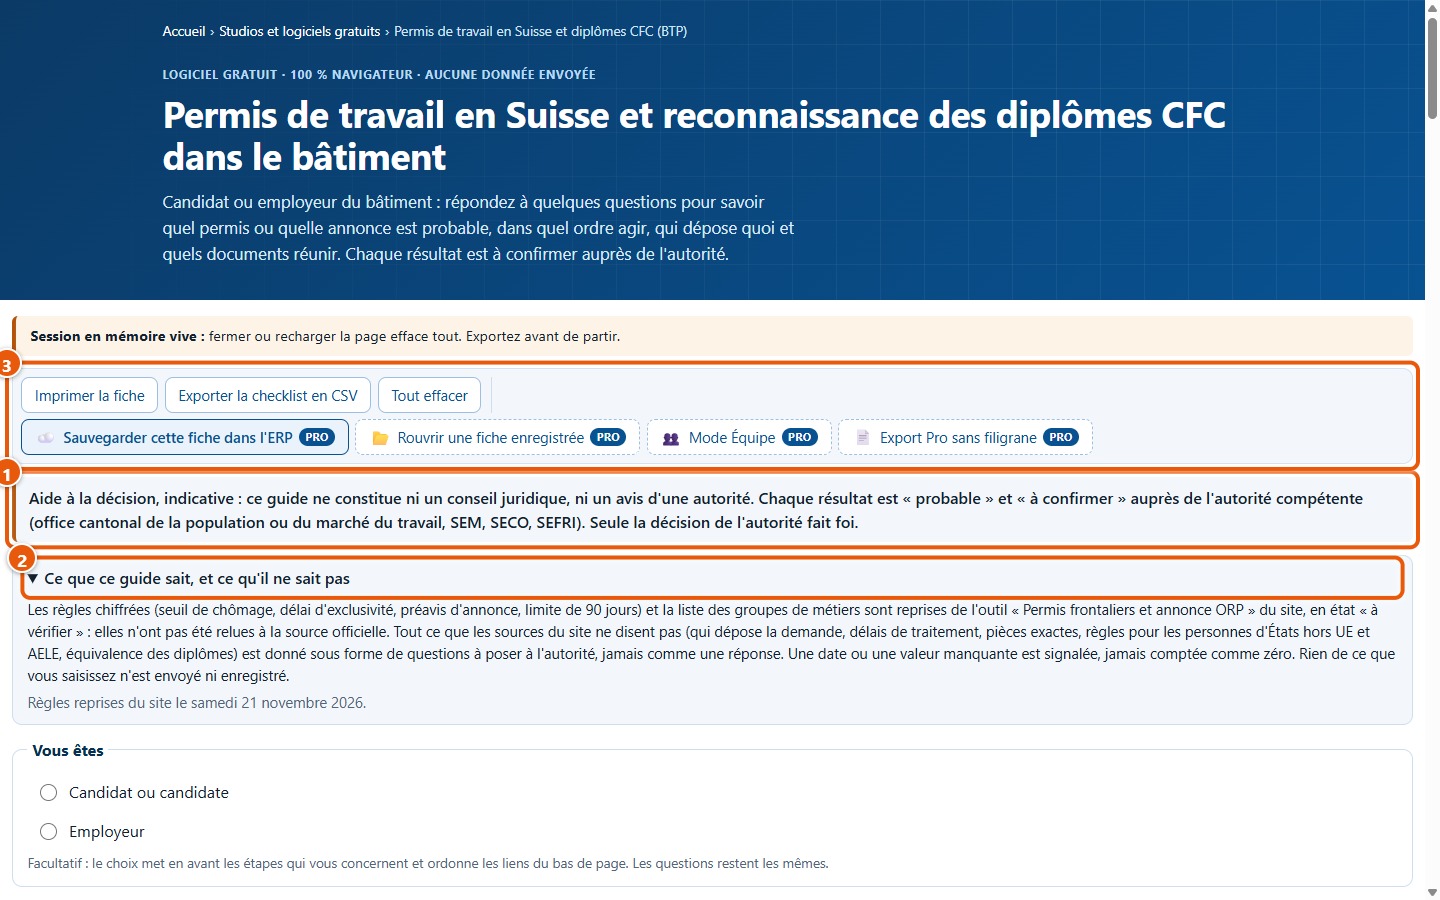
1Open the software and read the disclaimer
At the top of the page, a disclaimer (1) points out that the software is a decision-making aid, not legal advice or an authority's official decision. The Ce que ce guide sait, et ce qu'il ne sait pas box (2) explains where the figures come from and what the software cannot determine. The toolbar (3) lets you print, export to CSV, or click Tout effacer.
2State whether you are an applicant or an employer
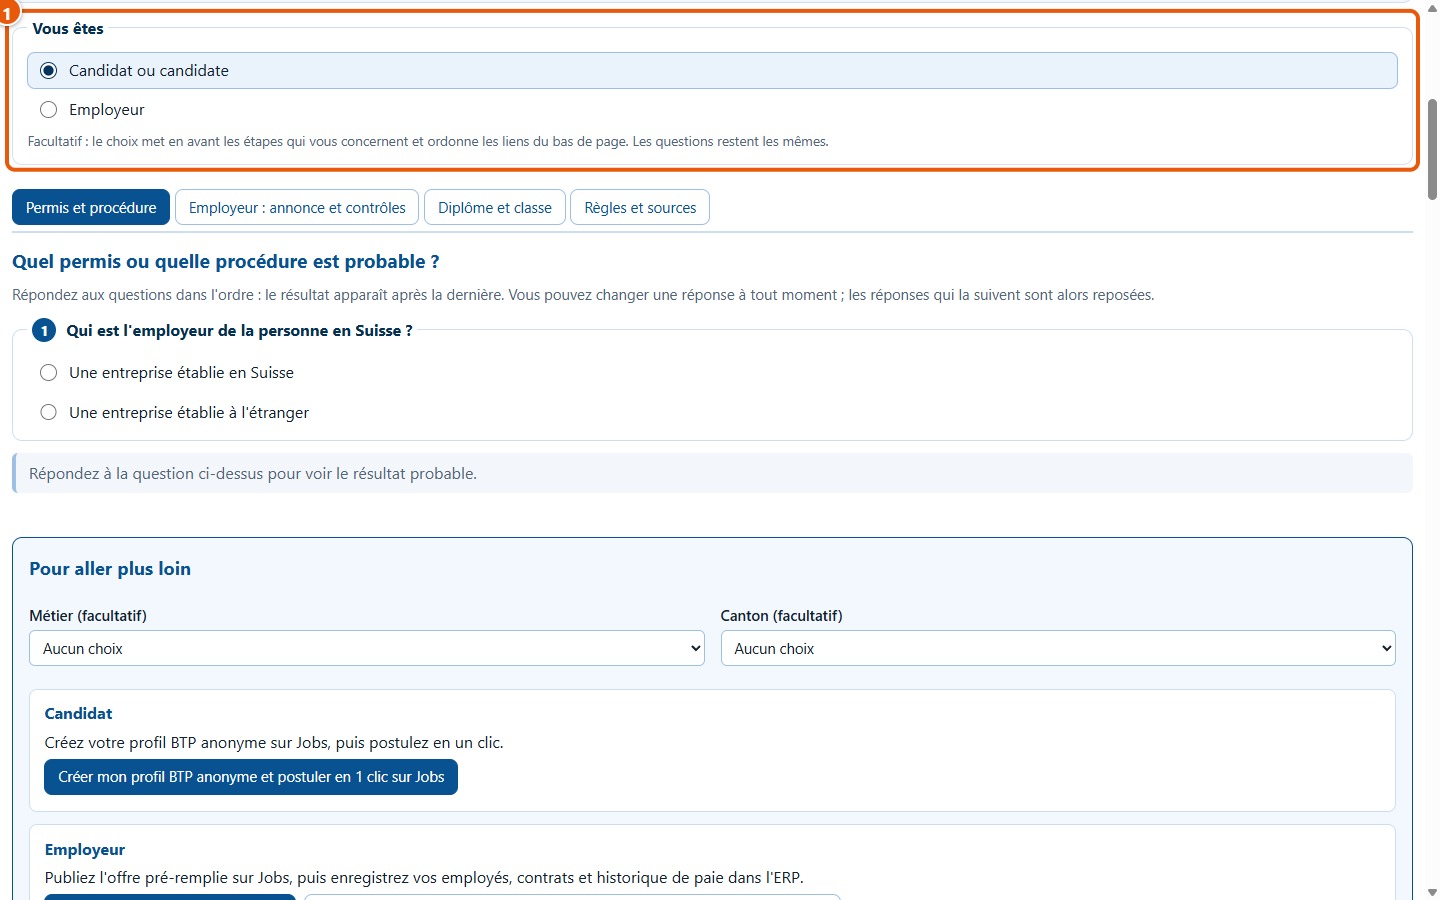
Under Vous êtes, choose Candidat ou candidate or Employeur (1). This choice is optional: it marks the steps that concern you with a « Pour vous » tag and moves the links at the bottom of the page to the top. The questions remain identical.
3Select a workflow
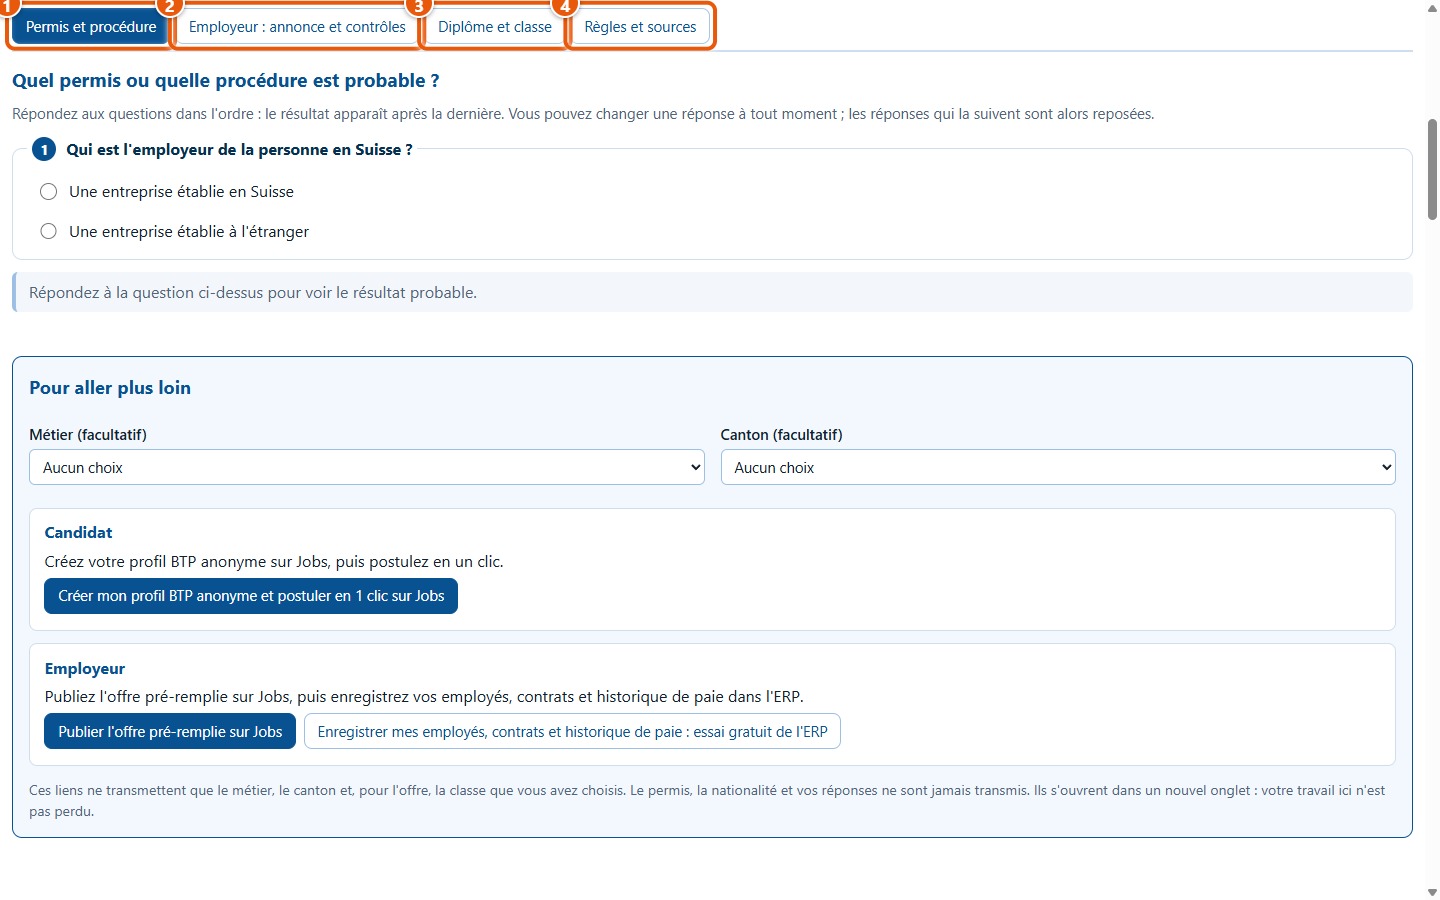
Four tabs: Permis et procédure (1), Employeur : annonce et contrôles (2), Diplôme et classe (3), and Règles et sources (4). Click on a tab. Using the keyboard, the ← and → arrow keys switch between tabs, while Home and End go to the first and last.
2. Finding the likely permit or procedure
4Answer the questions, one by one
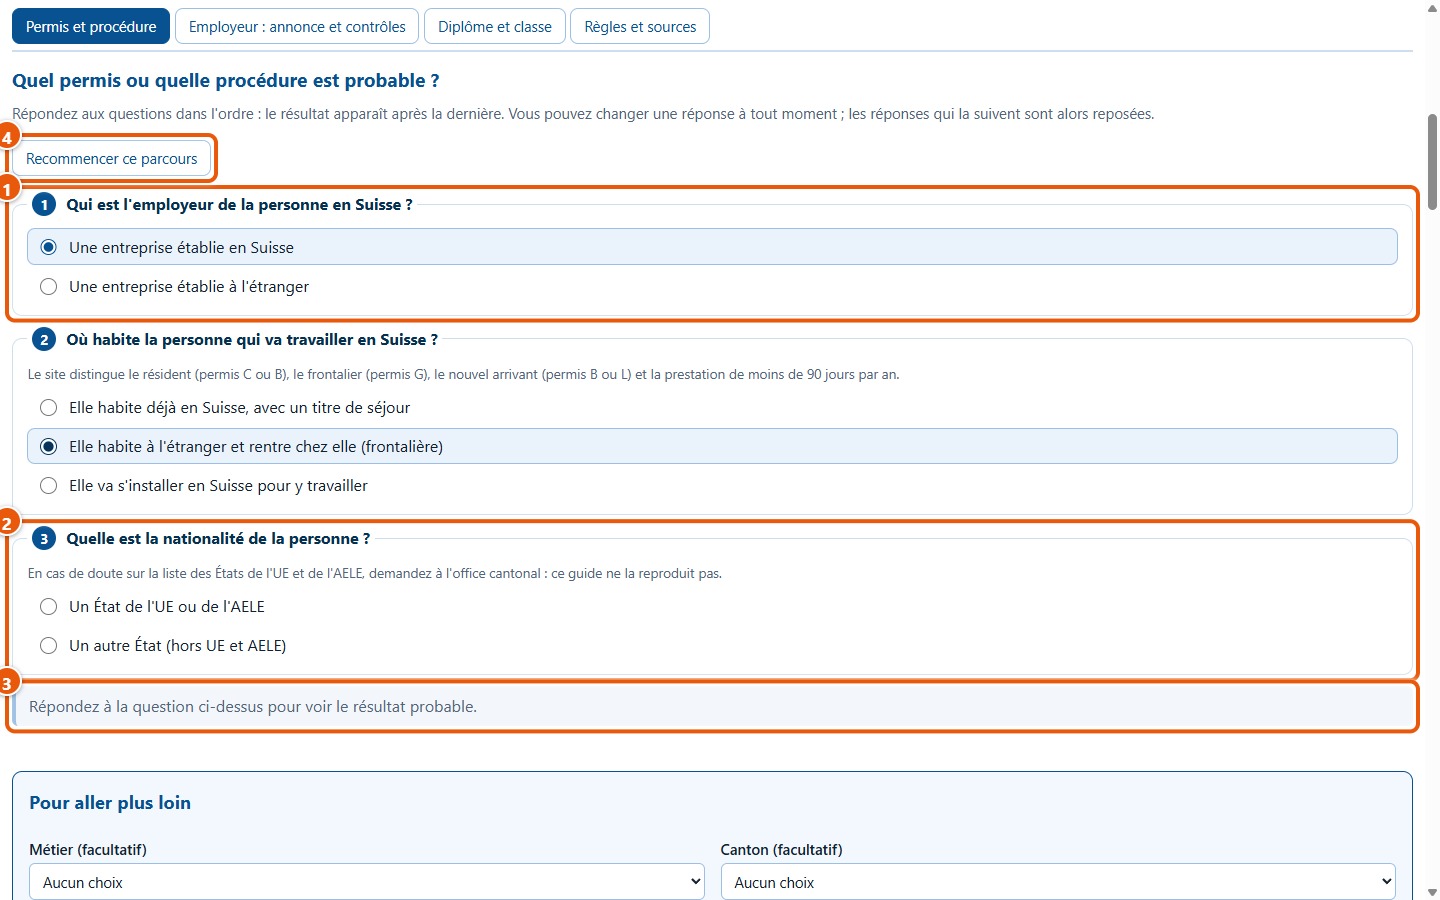
In the Permis et procédure tab, click the relevant answer (1): the next question appears (2). As long as the final question is unanswered, the software indicates this (3) and displays no result. To start over, click Recommencer ce parcours (4). In this example, the employer is a Swiss company, and the person lives abroad and commutes back home.
5Read the "probable" result
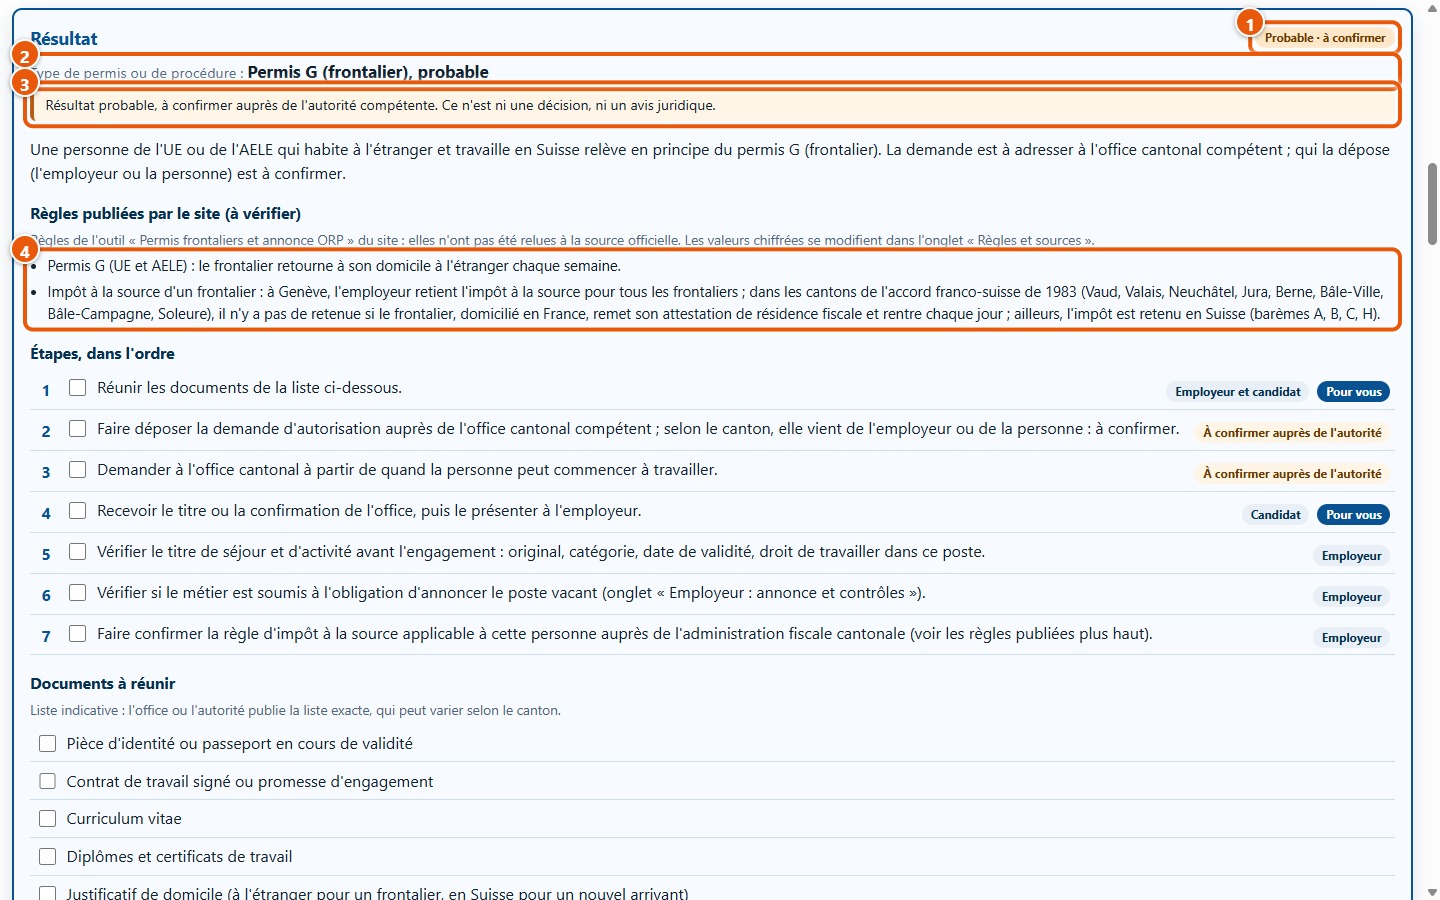
After the last answer, a Result block appears. The badge "Probable · à confirmer" (1) reminds you that this is neither a decision nor legal advice. The type of permit or procedure is written in bold (2), above the cautionary note (3). Further down, "Règles publiées par le site (à vérifier)" (4) lists the site rules, marked "à vérifier".
6Follow the steps and check them off
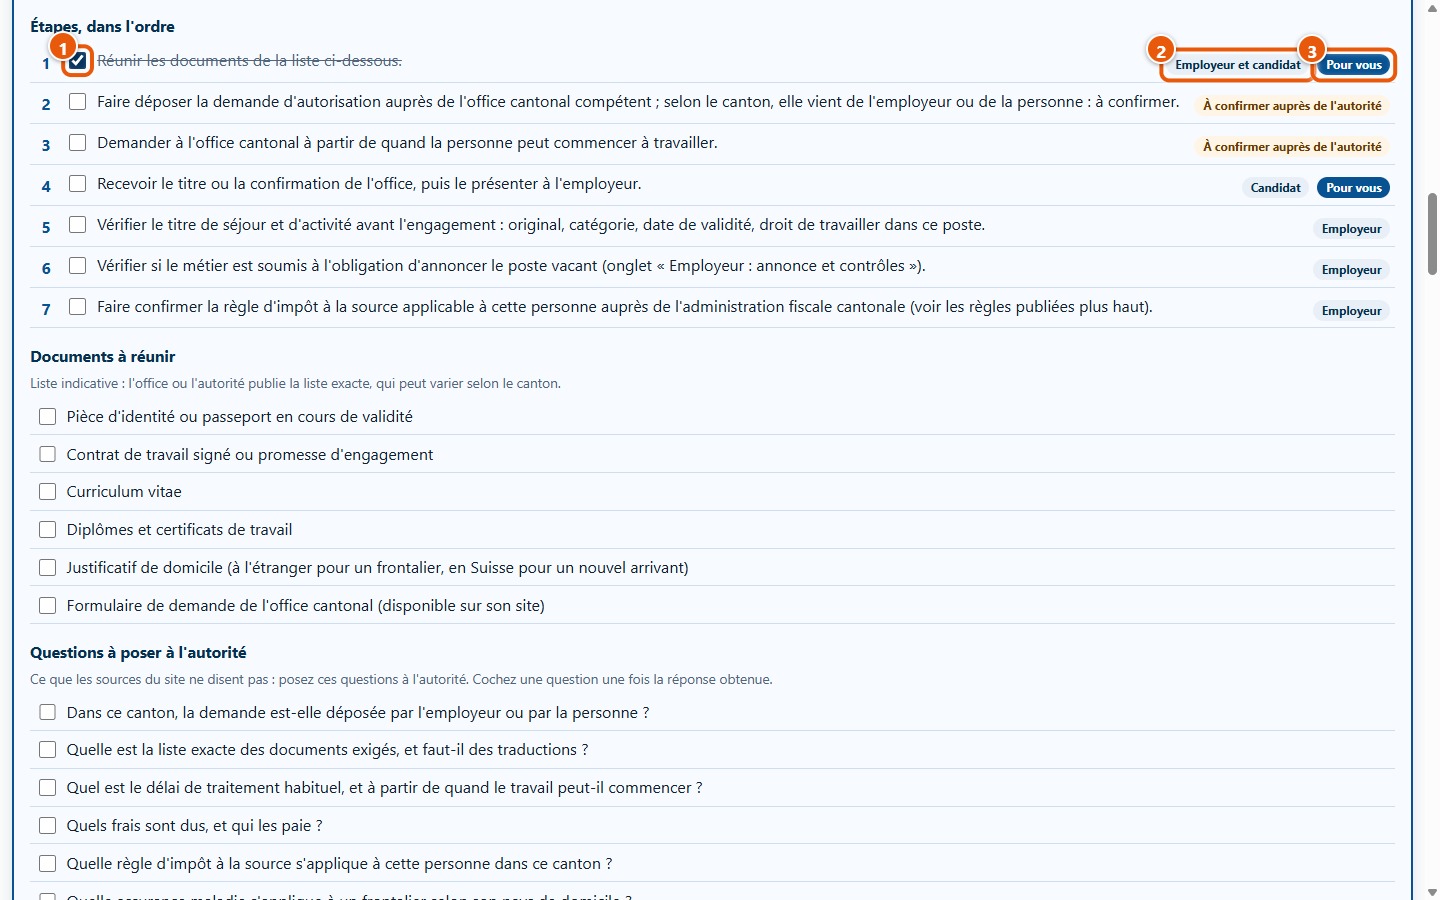
« Étapes, dans l'ordre » tells you what to do and in what order. Tick a box once the step is complete (1): the line is struck through. Each step indicates who takes action (2): the employer, the applicant, the sending company, or « À confirmer auprès de l'autorité ». If you selected your role, the « Pour vous » badge (3) highlights your steps.
7Gather the documents and ask the questions
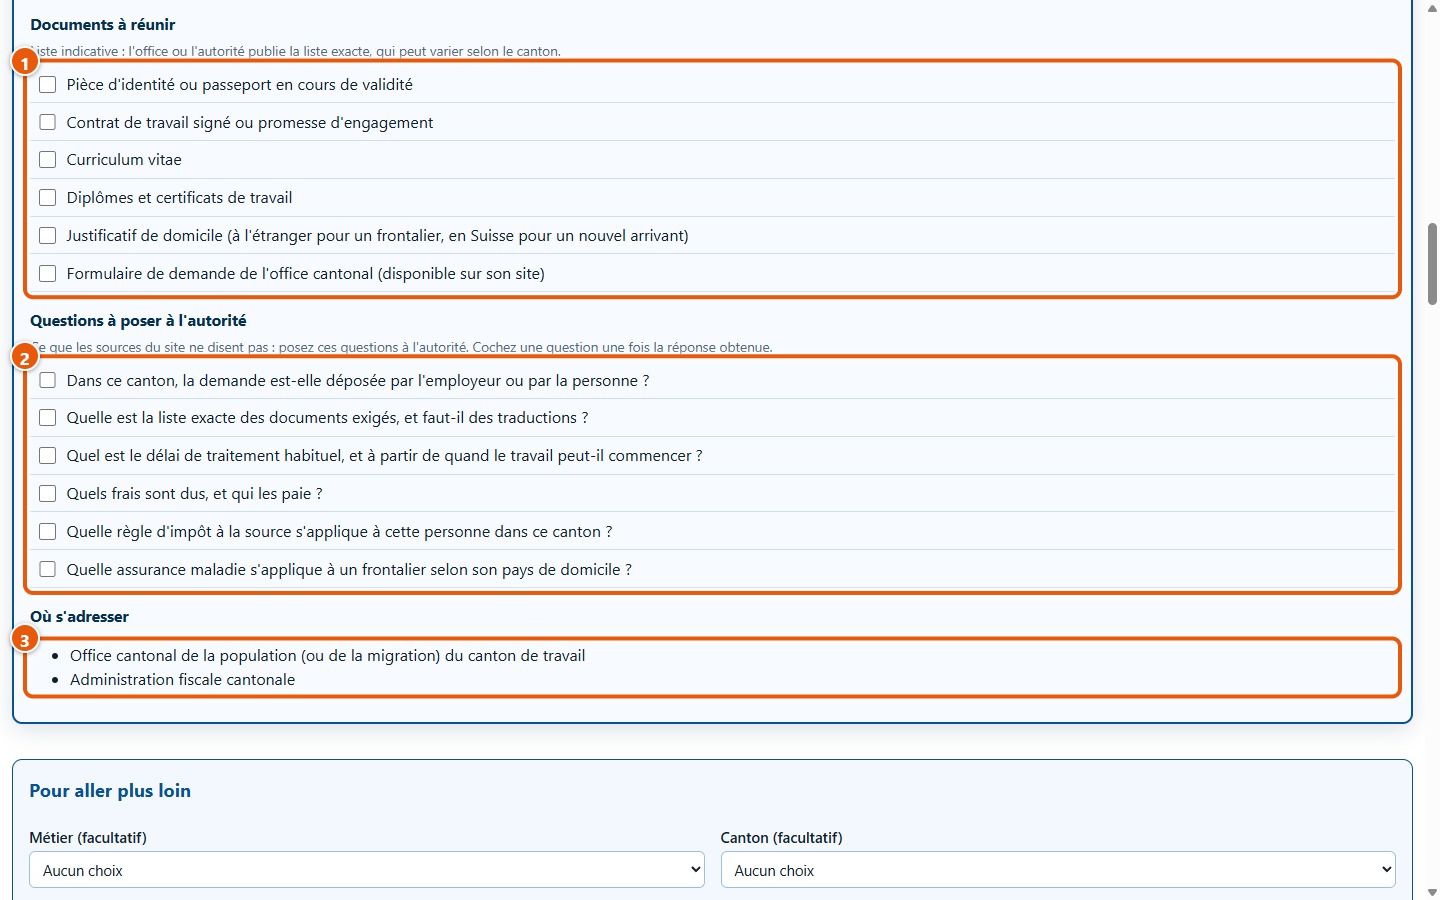
Under « Documents à réunir » (1), an indicative list: the authority provides the exact list, which may differ by canton. Under « Questions à poser à l'autorité » (2), points not covered by the website's sources: put these questions to the authority and tick them off once answered. « Où s'adresser » (3) indicates whom to contact.
8Notification of service provision: enter the start date
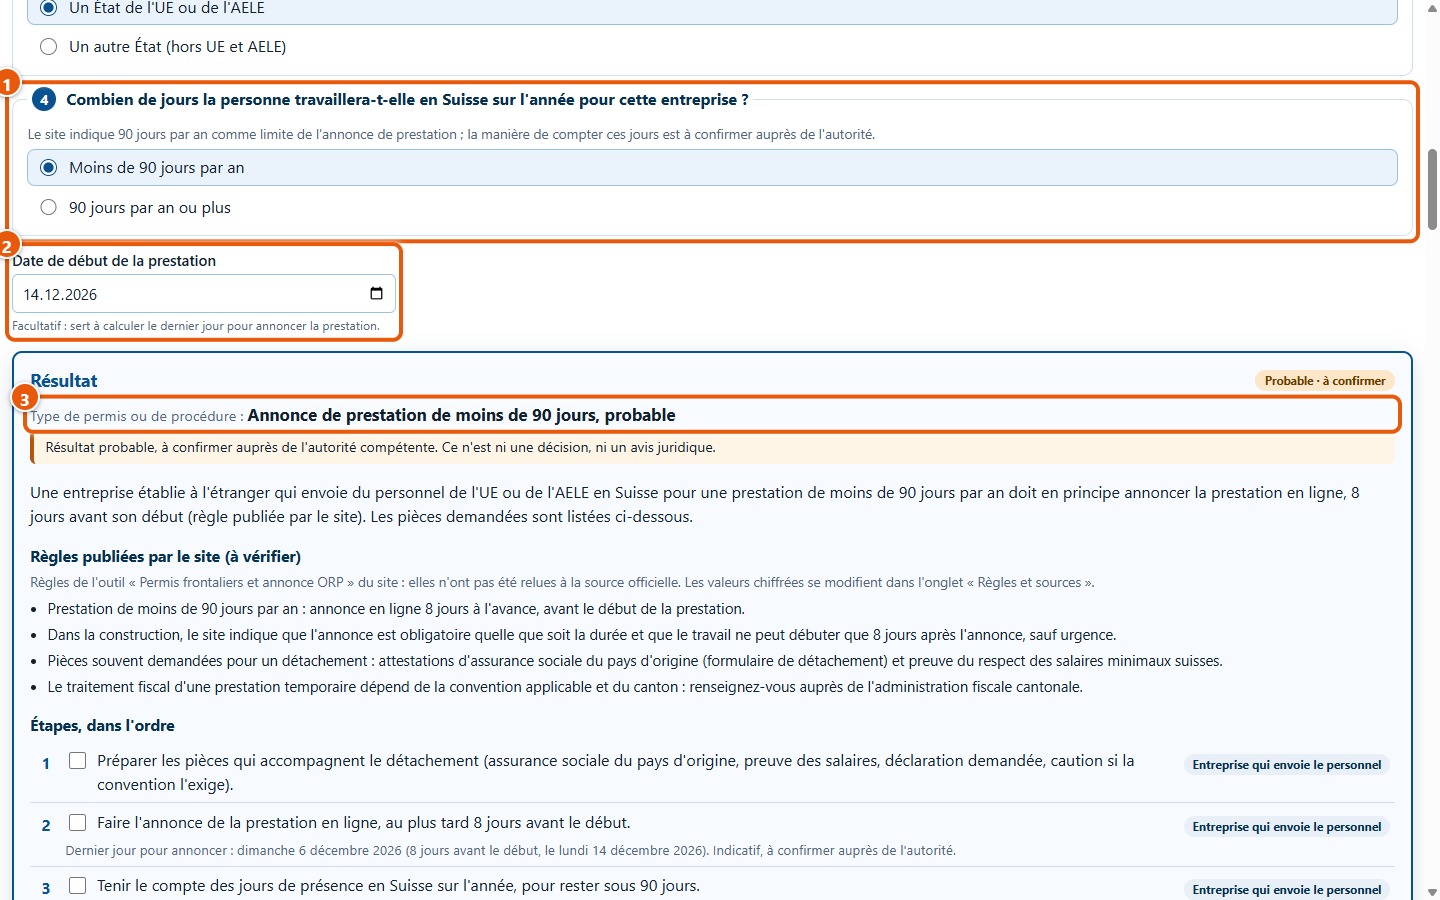
If the company is established abroad and posts staff from the EU or EFTA for fewer than 90 days per year (last question, at (1)), a "Date de début de la prestation" field (2) appears. Enter the date: here 14.12.2026, an invented date for this example. The result (3) is "Annonce de prestation de moins de 90 jours, probable".
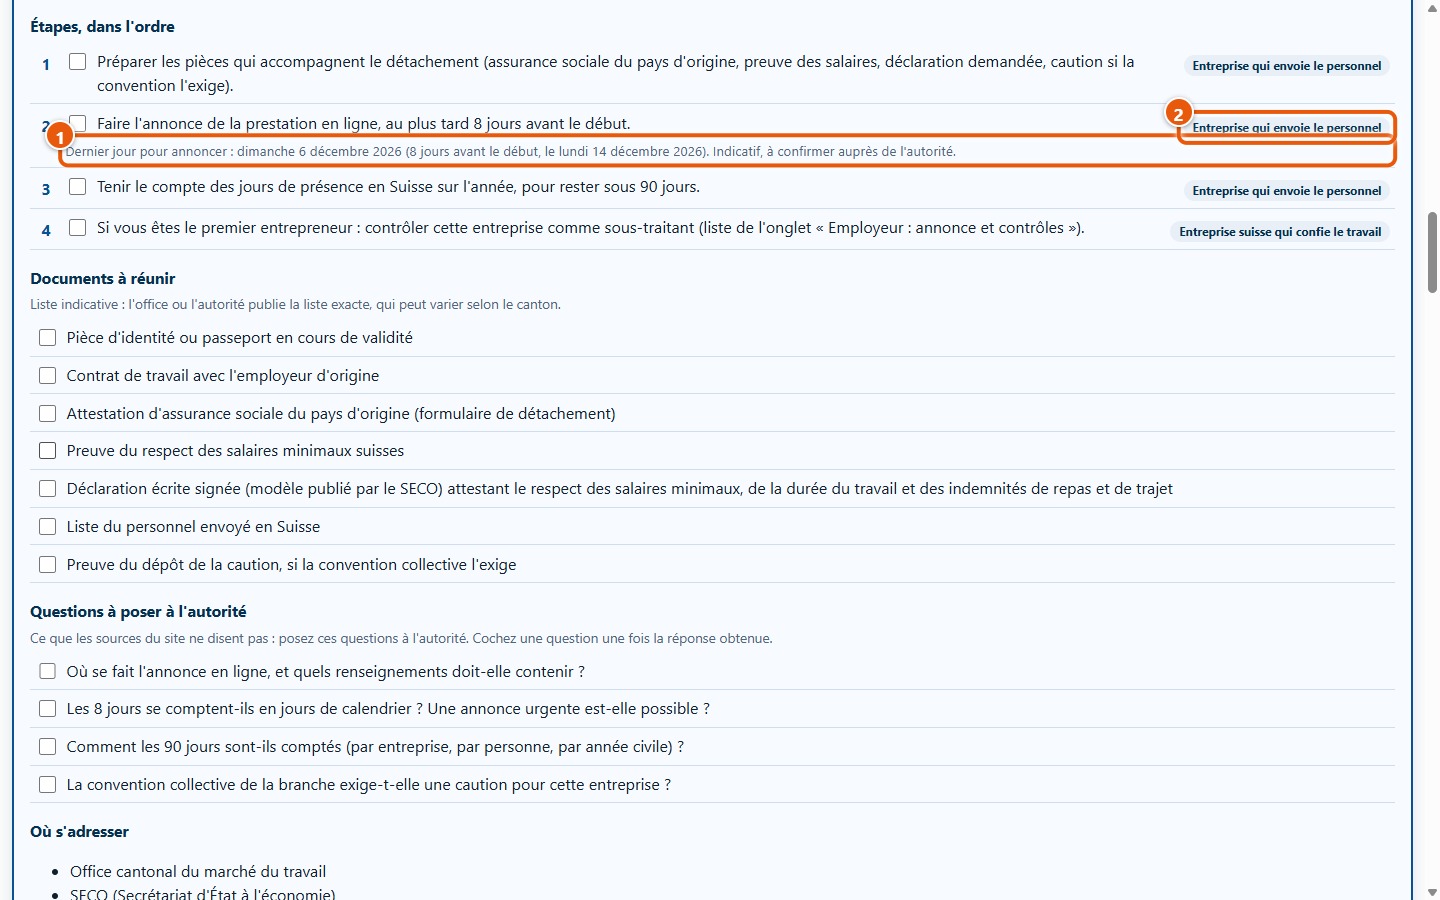
9Check the final deadline for notification
Under the second step, a line (1) gives the last day to declare the service: here Sunday 6 December 2026, which is 8 days before the start. This step is the responsibility of the company sending the staff (2). The 8-day deadline is a site rule, to be checked: you can change it in the Règles et sources tab. Without a date, the software invents nothing: it asks for the date.
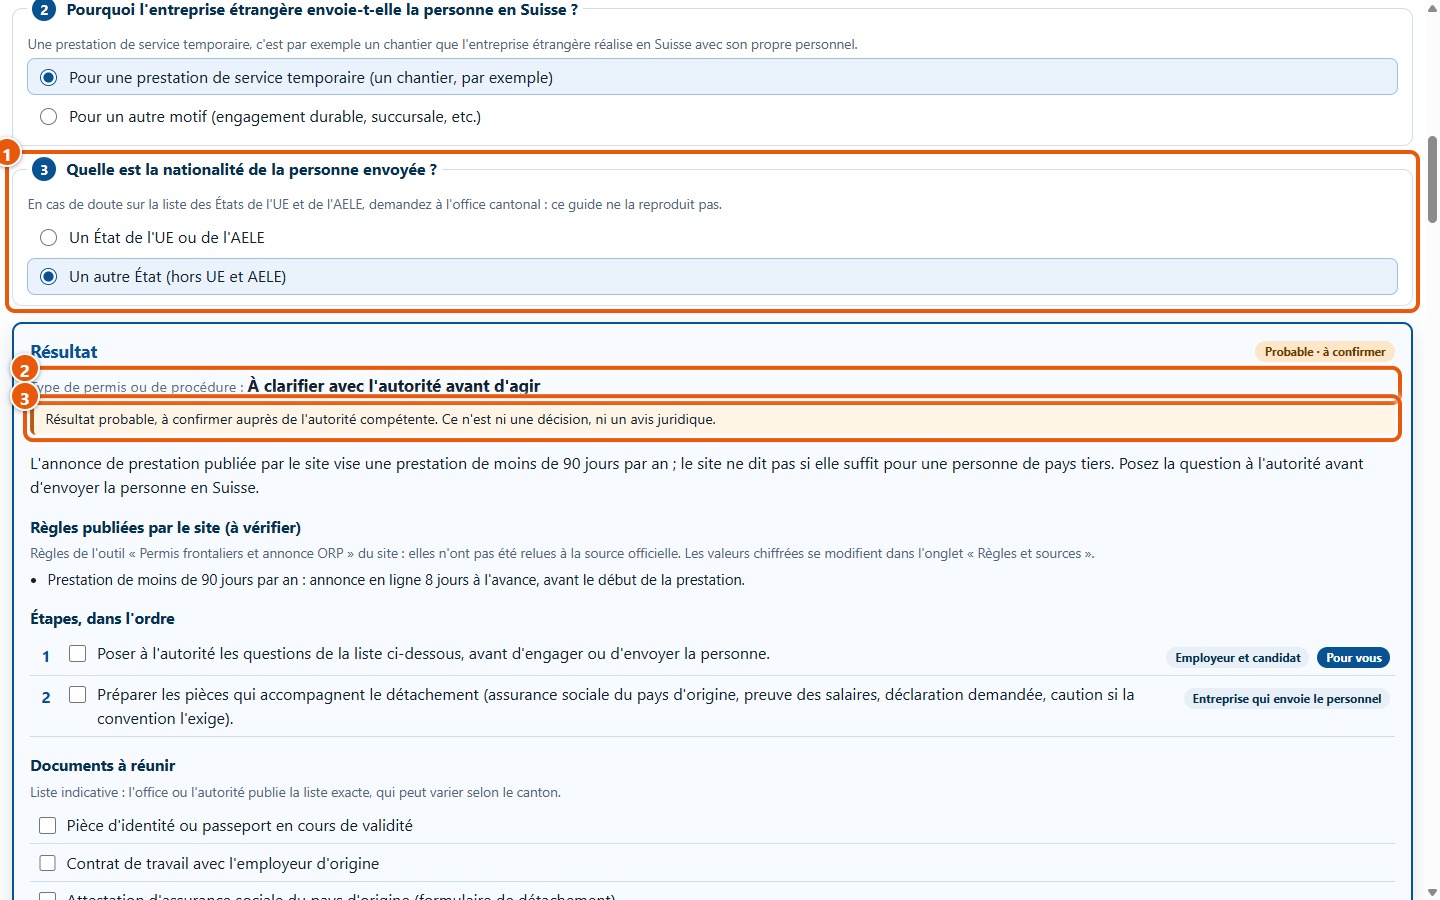
10Change an answer
You can change an answer at any time (1): the answers following it are then asked again. Here, nationality changes to « Un autre État (hors UE et AELE) »: the result becomes « À clarifier avec l'autorité avant d'agir » (2). The software guesses nothing for third-country nationals: it suggests asking the authority, and the cautionary sentence (3) remains displayed.
3. Employer: job registration and checks
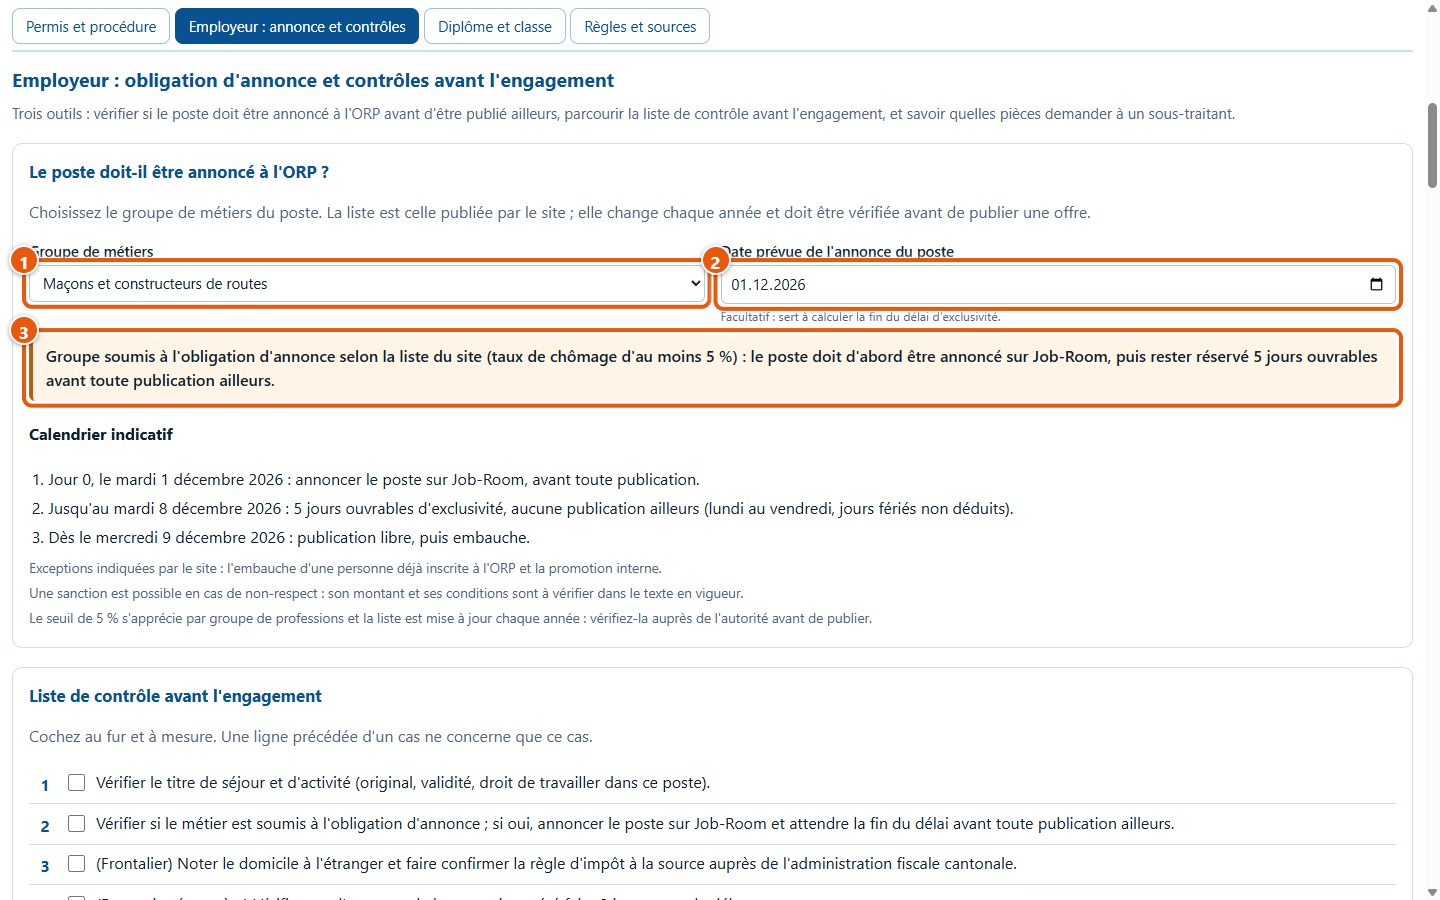
11Must the vacancy be registered with the RAV?
Open the Employeur : annonce et contrôles tab. Choose the occupational group of the post (1) and, if you wish, the planned registration date (2). The software indicates whether the group is subject to the job registration requirement (3), based on the site's list. Here, « Maçons et constructeurs de routes » is subject. The list changes every year: check it before advertising.
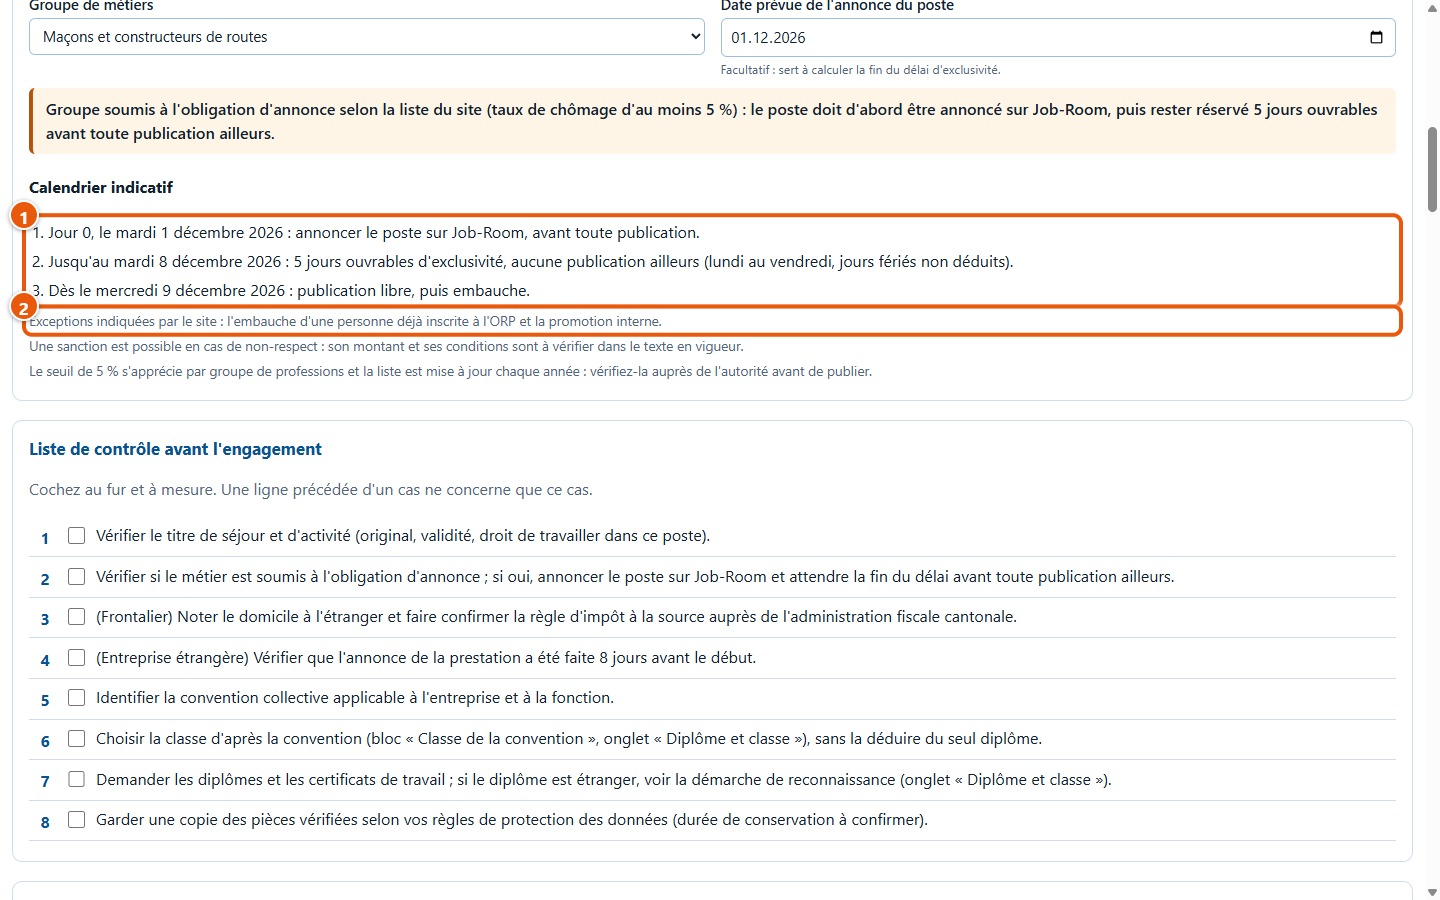
12Read the schedule
With a date, the indicative schedule (1) gives the day to register the job on Job-Room, the end of the exclusivity period, and the first day when public advertising is unrestricted. Here: registered on 1 December 2026, exclusivity until 8 December, unrestricted publication from 9 December. Working days run from Monday to Friday, public holidays not deducted. The notes (2) reiterate the exceptions.
13Run through the pre-hiring checklist
Eight points to tick before hiring (1). A line preceded by a specific case, such as « (Frontalier) » (2), concerns only that case. On the screenshot, two points are ticked.
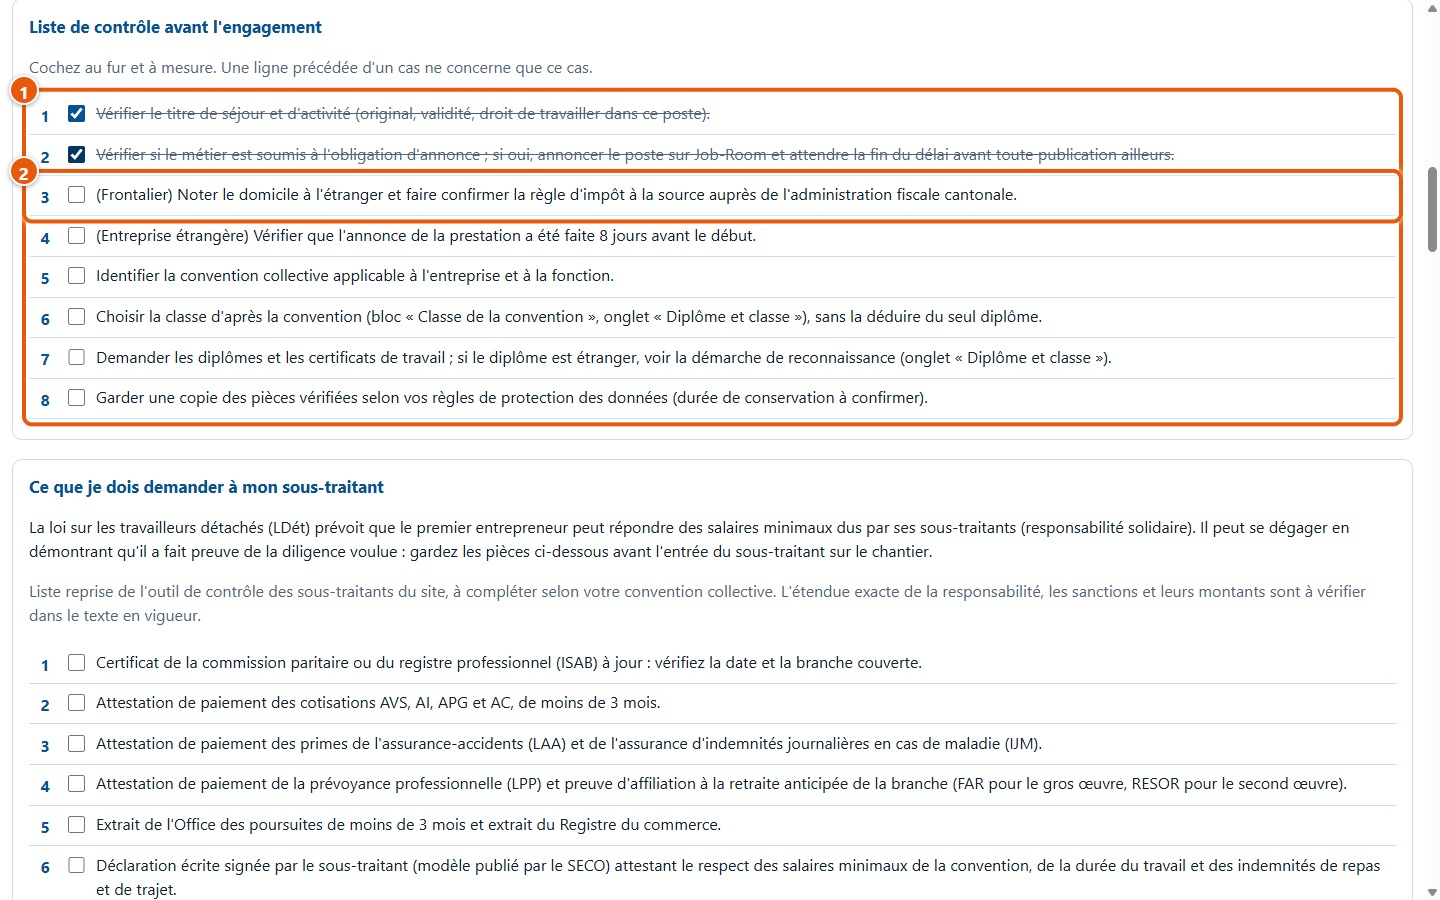
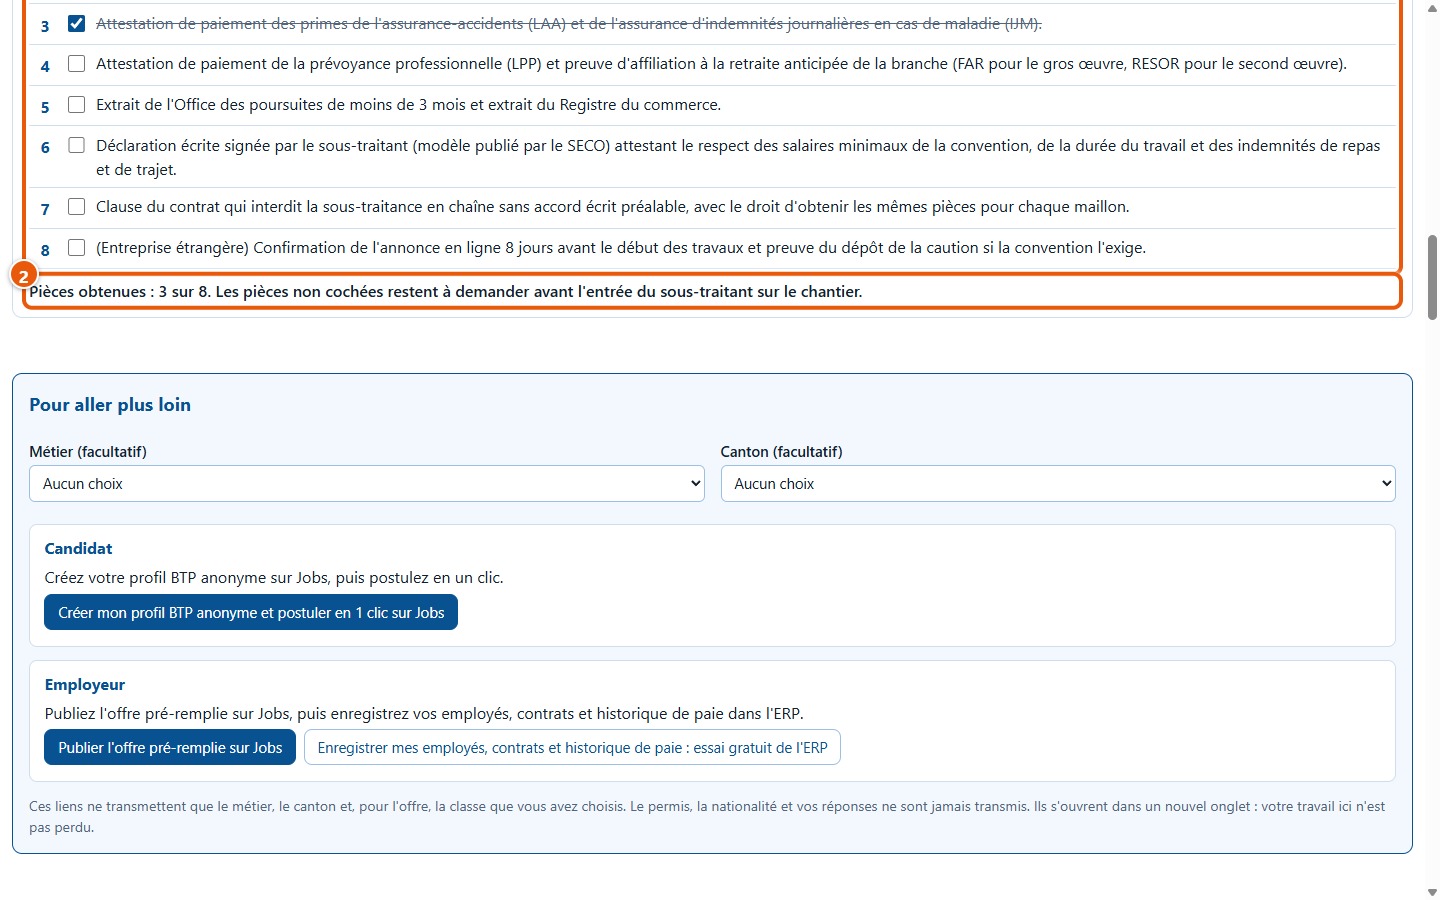
14Request the correct documents from a subcontractor
The software reiterates that the Posted Workers Act provides that the main contractor may be liable for minimum wages owed by its subcontractors. The list (1) gives the documents to request before the subcontractor enters the construction site. Tick the ones you have received: the counter (2) here indicates « Pièces obtenues : 3 sur 8 ».
4. Qualification and collective agreement category
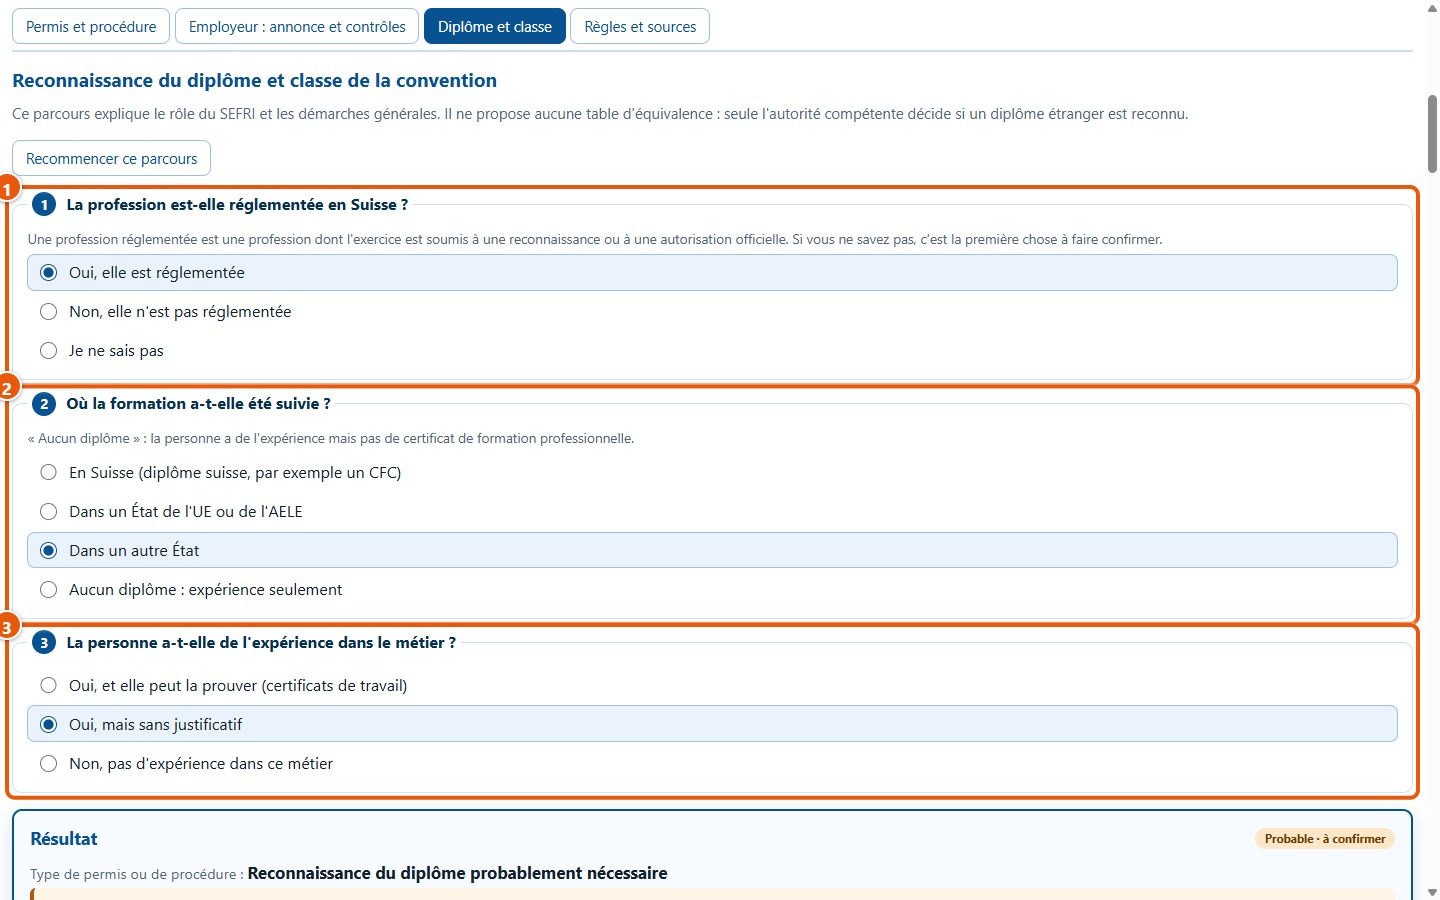
15Answer the three qualification questions
Open the Diplôme et classe tab. Three questions: is the profession regulated in Switzerland (1)? Where was the training completed (2)? Does the person have experience in the trade (3)? If you do not know whether the profession is regulated, answer « Je ne sais pas »: the software indicates that this is the first thing to have confirmed.
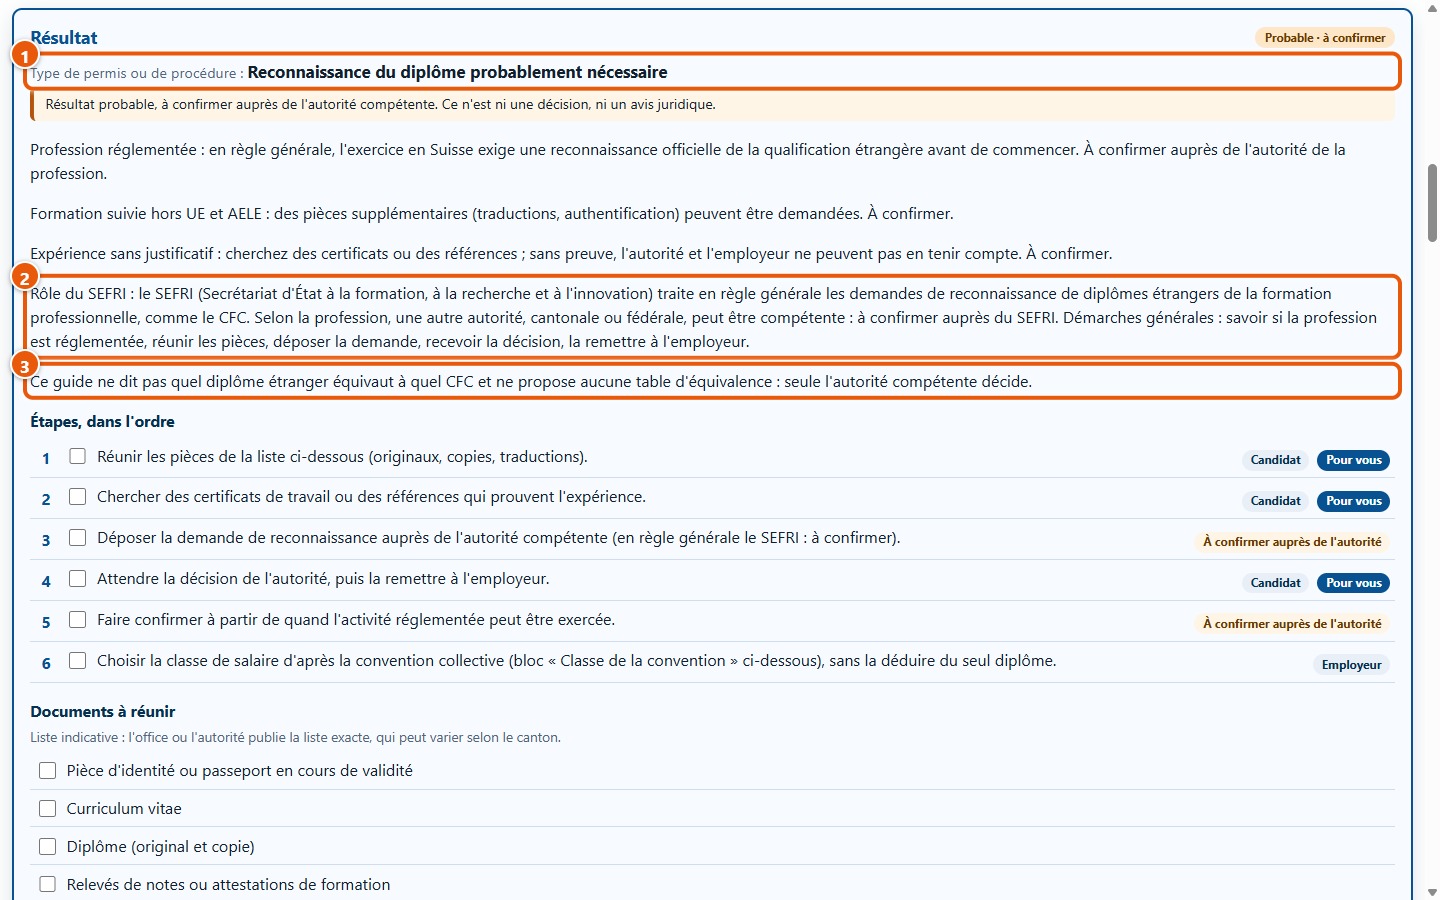
16Read the qualification outcome
The outcome (1) indicates whether recognition of the qualification is probably required, not required in principle, or to be clarified. The software explains the role of SERI and the general steps (2). It never states which foreign qualification corresponds to which CFC (3): only the competent authority decides.
17Choose the category based on your collective agreement
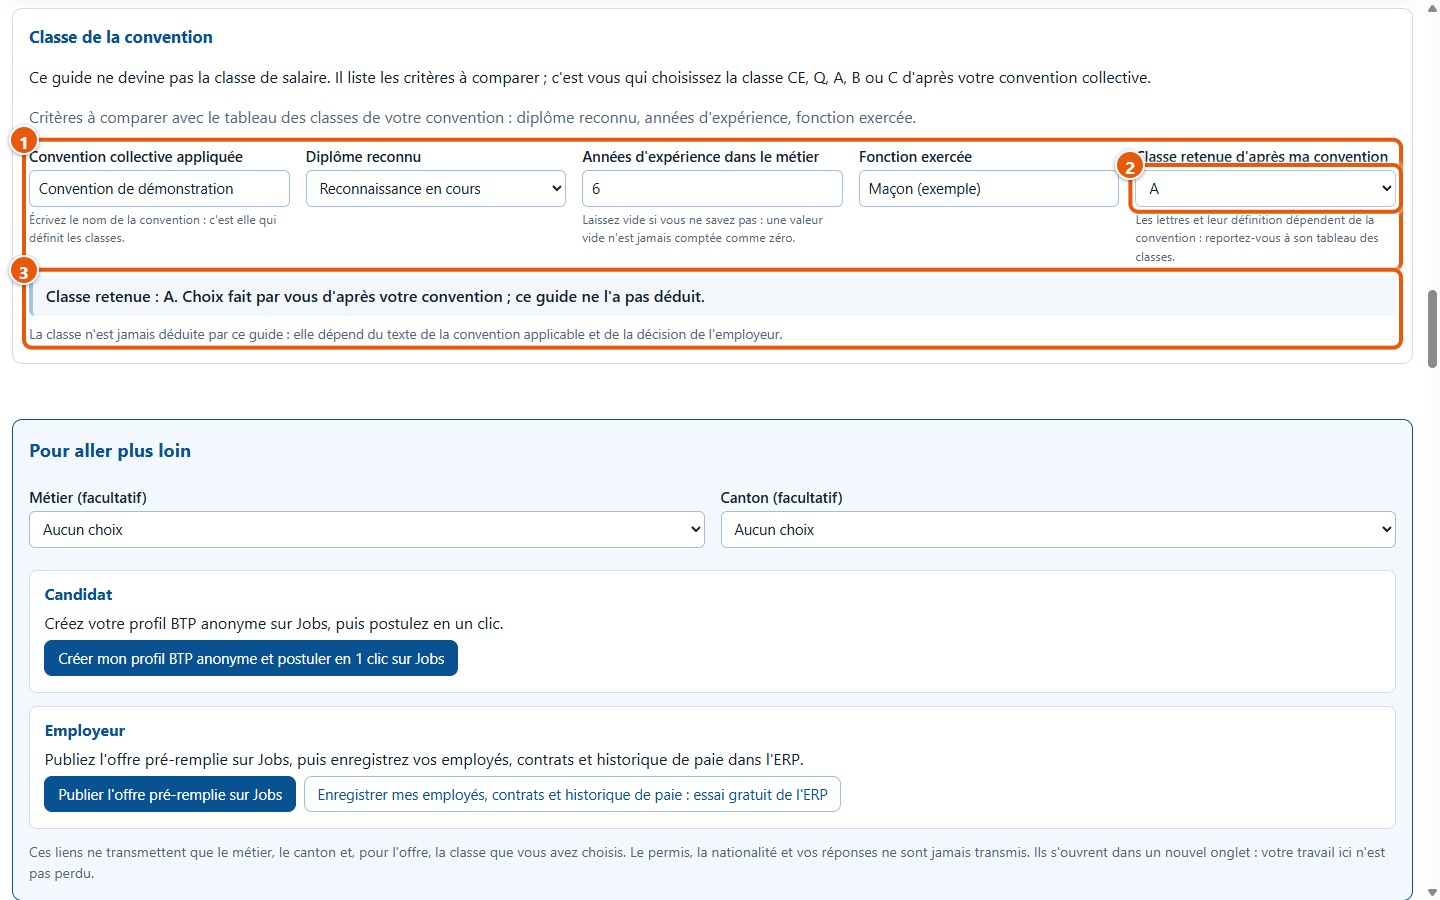
Under « Classe de la convention », enter the name of your collective agreement, select the qualification status, the years of experience, and the job title (1). Leave the years empty if you do not know: an empty value is never counted as zero. Then choose the CE, Q, A, B or C category yourself based on your collective agreement scale (2). The software never deduces it; it repeats your choice (3).
5. Rules and sources
18View the rules used
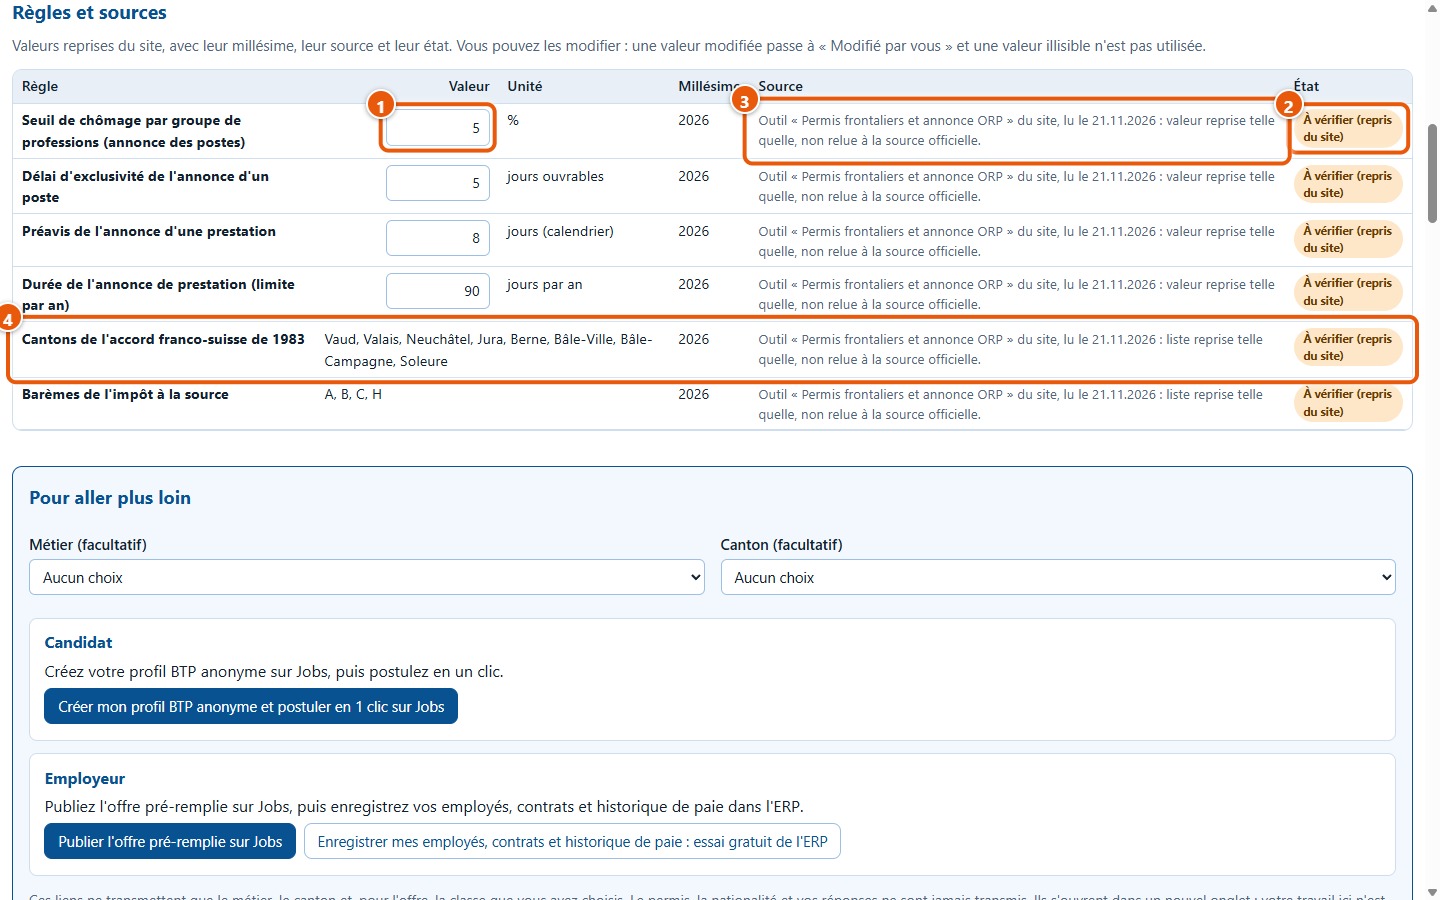
The Règles et sources tab lists the four numerical values taken from the site: the unemployment threshold, the exclusivity period, the notification period for declaring a service, and the annual limit (1). Each has its unit and reference year, a status (2) « À vérifier (repris du site) », as they have not been re-checked against the official source, and its source (3). Two read-only lists (4) complete the table: the cantons under the 1983 French-Swiss agreement and the withholding tax scales.
19Modify a value, then reset it
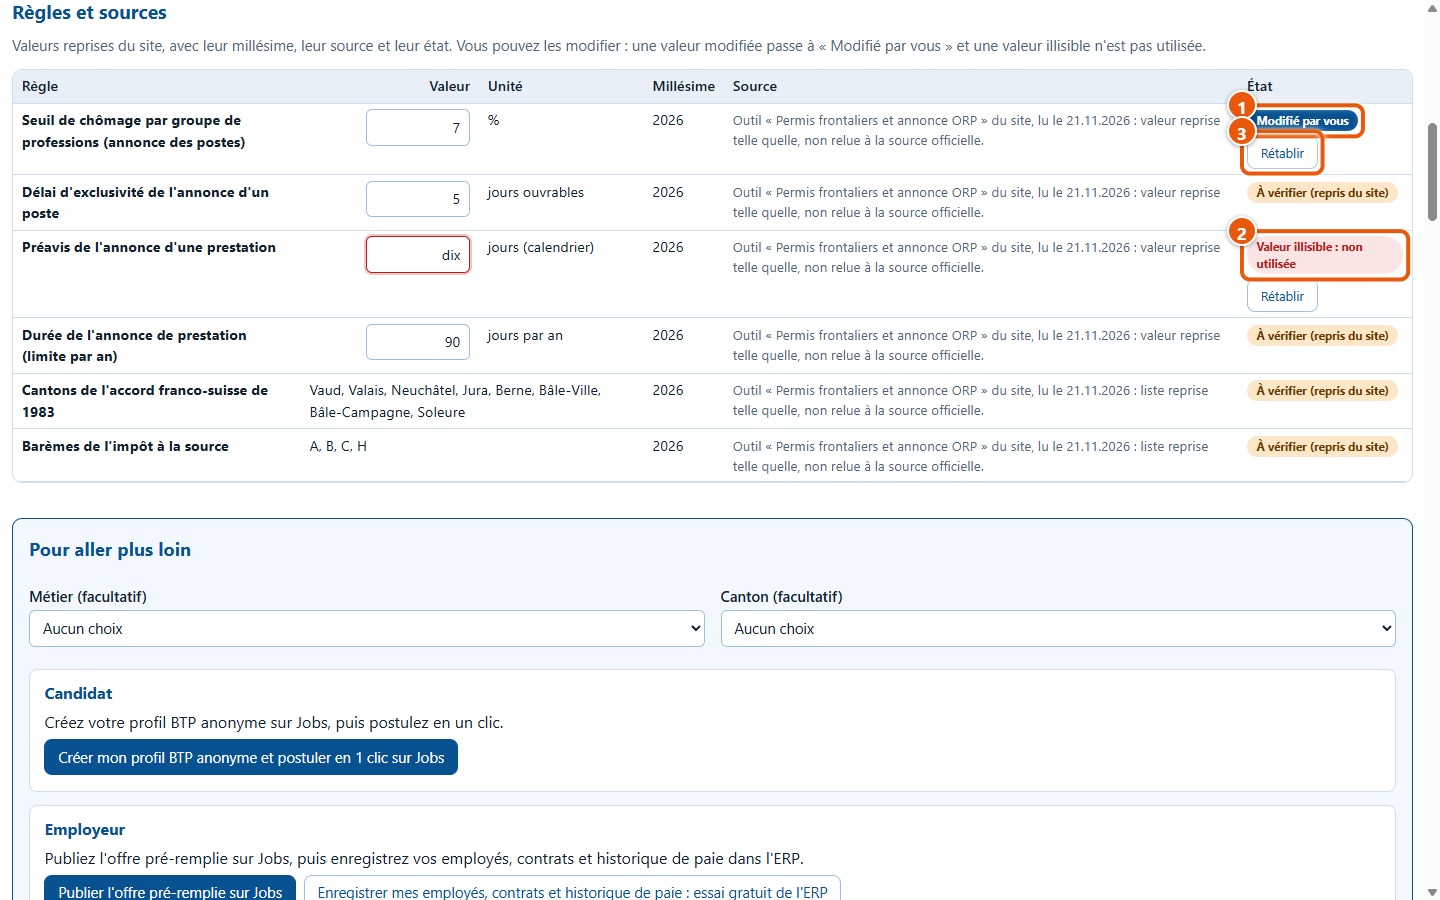
You can change a value: its status changes to « Modifié par vous » (1) and the calculations use it. An unreadable value, such as « dix » (2), is not used: the status becomes « Valeur illisible : non utilisée » and the software does not calculate the date. The button Rétablir (3) restores the value taken from the site.
6. Print, export and clear
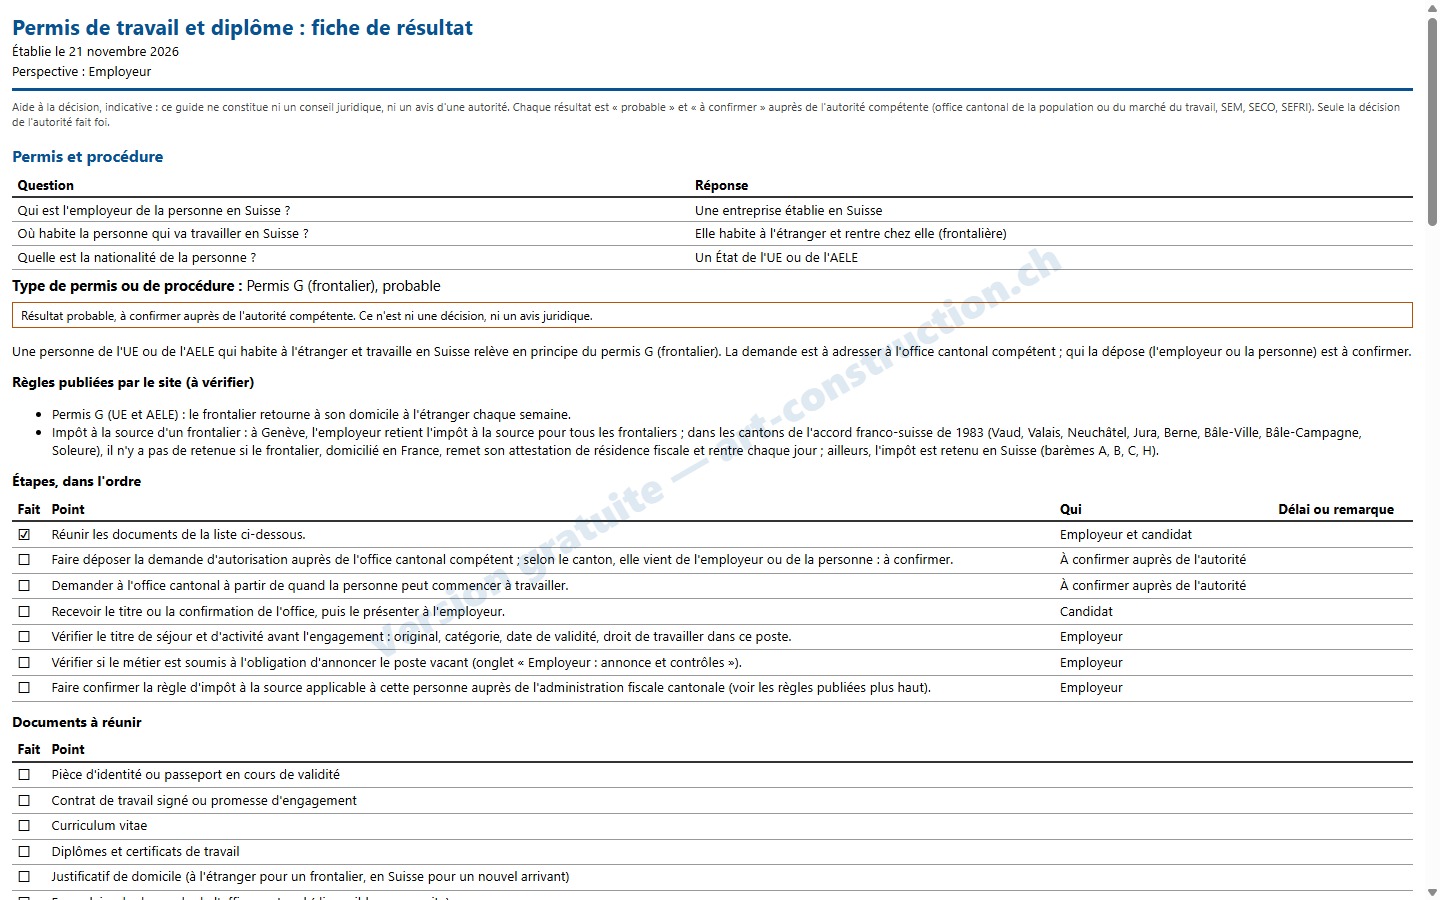
20Print the summary sheet
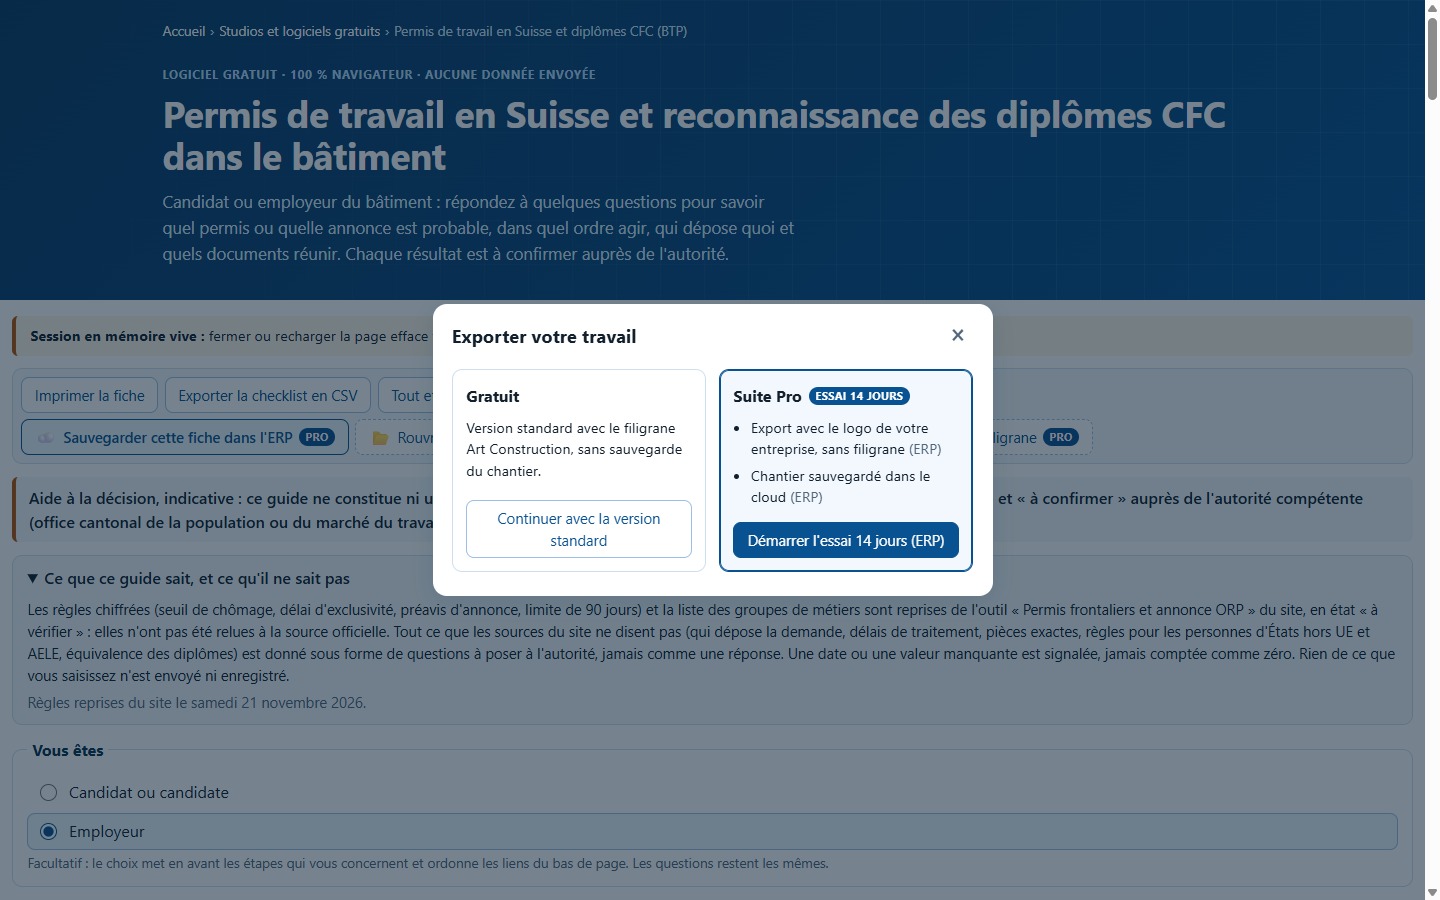
Click on Imprimer la fiche. On the first export of your visit, a « Exporter votre travail » window lets you choose: Continuer avec la version standard, or the Suite Pro, whose 14-day ERP trial opens in a new tab (your work here is not lost). With the standard version, the software then requests printing from the browser.
21View the printable sheet
The sheet includes your answers, the result, the steps (ticked or unticked), the documents, the questions, and the rules used. An Art Construction watermark runs diagonally across it. If you have not entered any answers, it indicates: « Aucune réponse saisie ». The browser then displays its own print window.
22Export the checklist to CSV
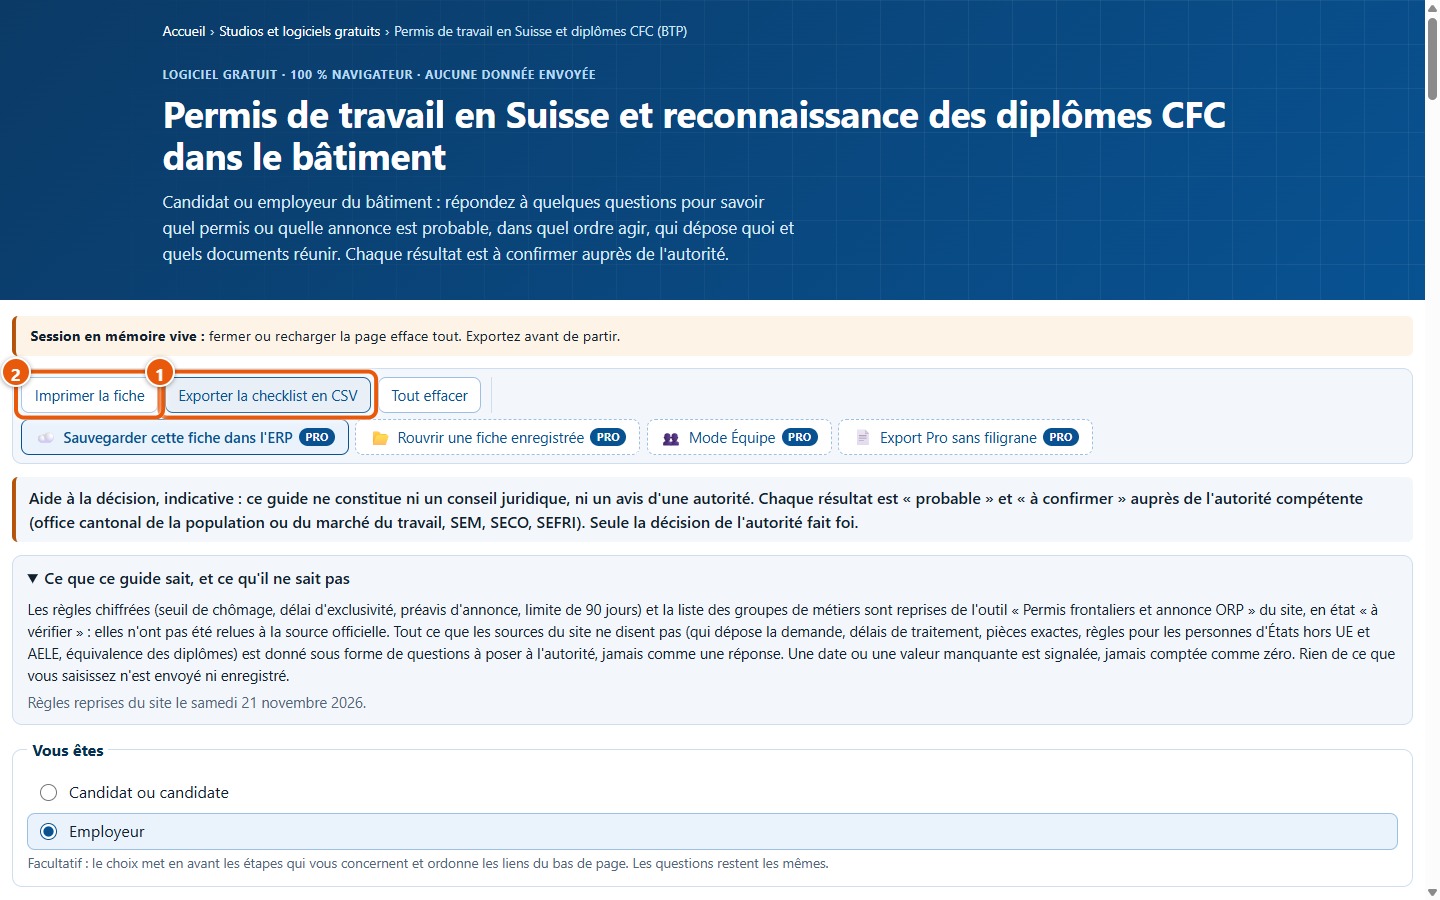
Click on Exporter la checklist en CSV (1). The browser downloads the file « permis-travail-checklist.csv »: a first line with Art Construction details, your answers, then the checklist with the columns pathway, type, label, who, note, and done (yes or no). The columns are separated by semicolons: open the file in a spreadsheet. The neighbouring button, Imprimer la fiche (2), launches the printing of the summary sheet.
23Clear everything
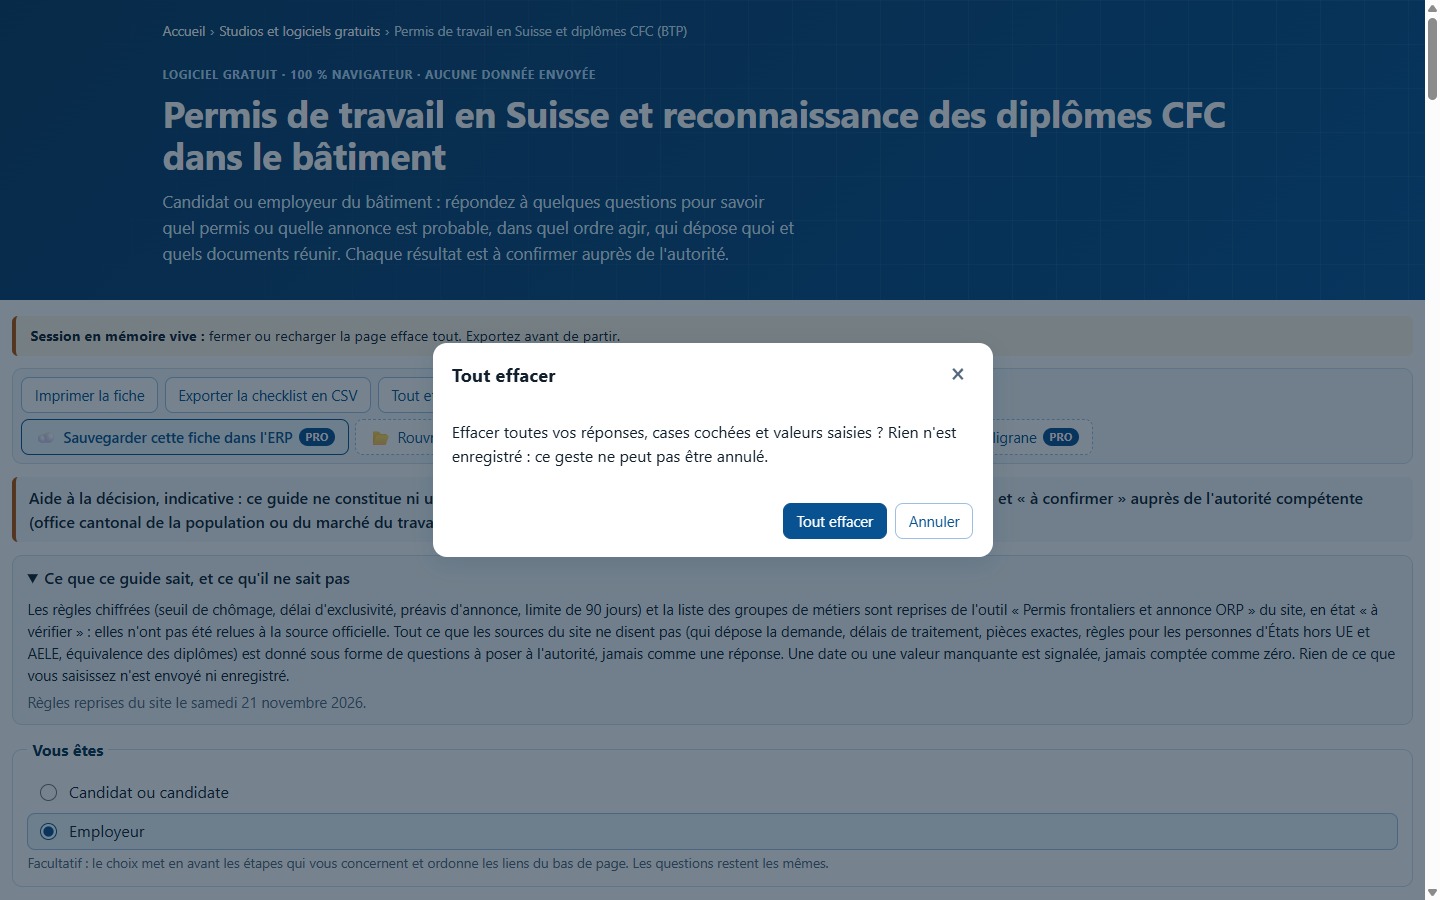
Tout effacer resets the answers, ticked boxes, and entered values to zero, after confirmation. As nothing is saved, this action cannot be undone. If you close the page with unexported work, the browser warns you.
7. Going further: Jobs and ERP
24Using the links to Jobs and the ERP
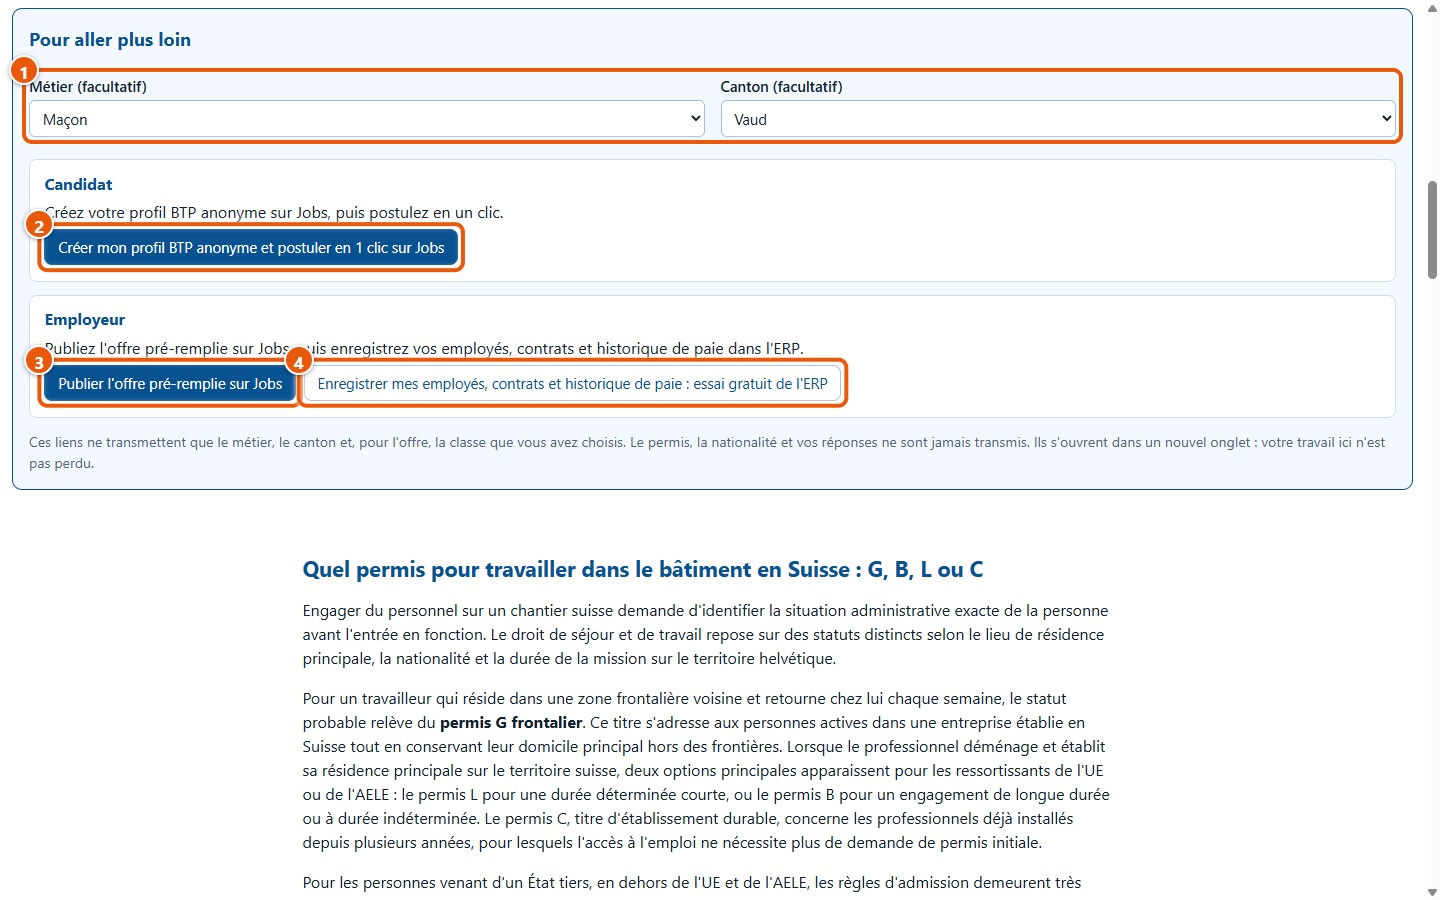
At the bottom of the page, the Pour aller plus loin section offers three links: Créer mon profil BTP anonyme et postuler en 1 clic sur Jobs (2), Publier l'offre pré-remplie sur Jobs (3), and « Enregistrer mes employés, contrats et historique de paie : essai gratuit de l'ERP » (4). You can first select a trade and a canton (1), this is optional. These are simple links, opened in a new tab: they only transfer the trade, the canton, and, for the job offer, the grade you selected. The permit, nationality, and your answers are never transferred.
8. What this software does not do
- It makes no decisions: each result is « probable » and must be confirmed with the competent authority. This is neither legal advice nor an official authority's opinion.
- It does not provide answers when the website sources are silent: who submits the application, deadlines, fees, the exact list of documents, rules for nationals of non-EU and non-EFTA states, the contract duration that changes an L permit into a B permit. These points are questions to put to the authority.
- It does not reproduce the list of EU and EFTA states: in case of doubt, ask the cantonal office.
- It does not provide an equivalence table between foreign qualifications and CFC, and it does not state which profession is regulated.
- It never guesses the wage category: you choose it yourself according to your collective agreement.
- The numerical rules come from another site tool and have not been cross-checked against the official source: they remain « à vérifier ». The job registration calendar counts working days from Monday to Friday, without deducting public holidays.
- It saves nothing and produces neither a PDF nor a file to reopen: you print the sheet or export the list to CSV. The four buttons marked PRO (save, reopen, work as a team, export without watermark) open an information window: these features belong to the ERP.
- It submits no application to any authority and fills in no official form.
A question? Send a request to support