Guide Construction final settlement, notice periods and work certificate
This guide shows, step by step, how to calculate the termination date of an employment contract, prepare the final settlement line by line, draft a work certificate, and decode the phrases in a certificate you have received. The orange numbers on the images refer to the text.
1. Getting started
1Opening the software
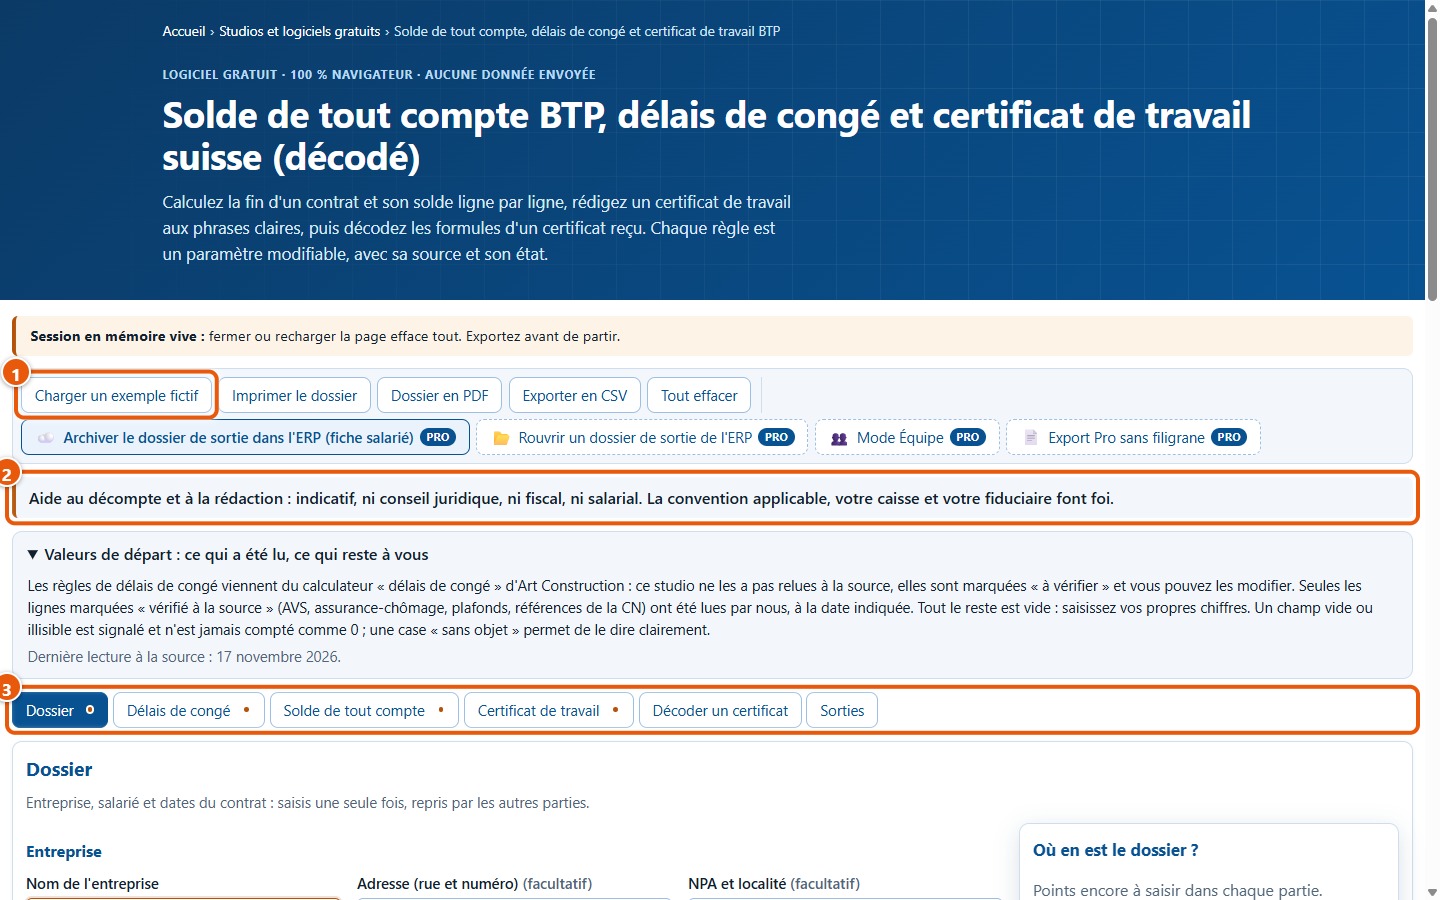
The Charger un exemple fictif button (1) loads an example to test. Below the button bar, the warning (2) points out that the result is indicative. Six tabs (3) cover the work: Dossier, Délais de congé, Solde de tout compte, Certificat de travail, Décoder un certificat, and Sorties.
2Reading initial values
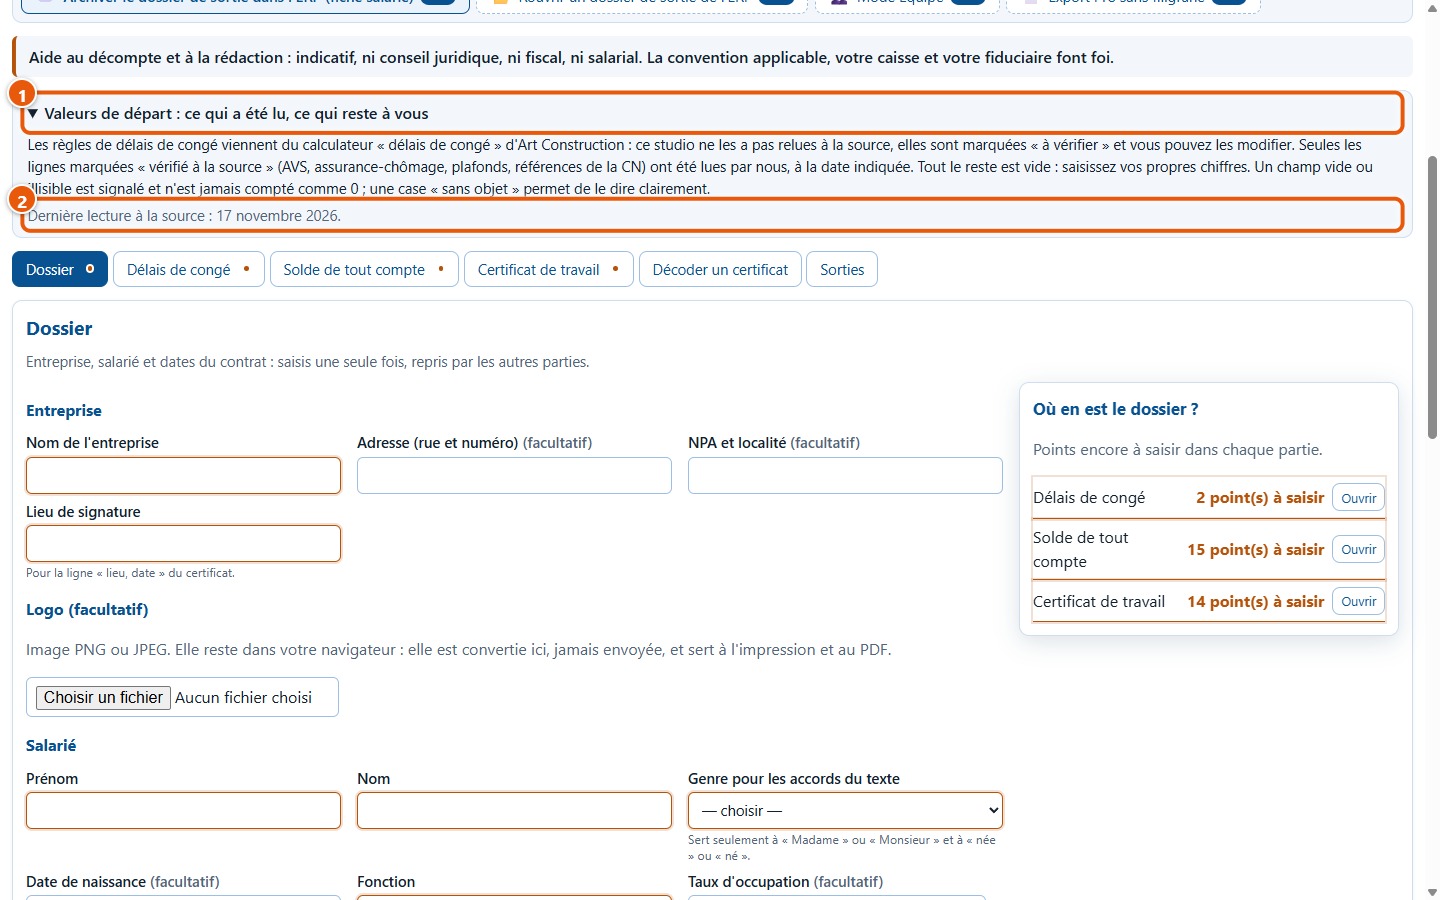
The Valeurs de départ : ce qui a été lu, ce qui reste à vous box (1) states what was retrieved from a source, along with the retrieval date (2), and what remains your responsibility. Notice period rules come from the Art Construction calculator and have not been re-checked against the source: they are marked « à vérifier » and you can amend them. Everything else is empty: you enter your own figures.
3Understanding « À saisir »
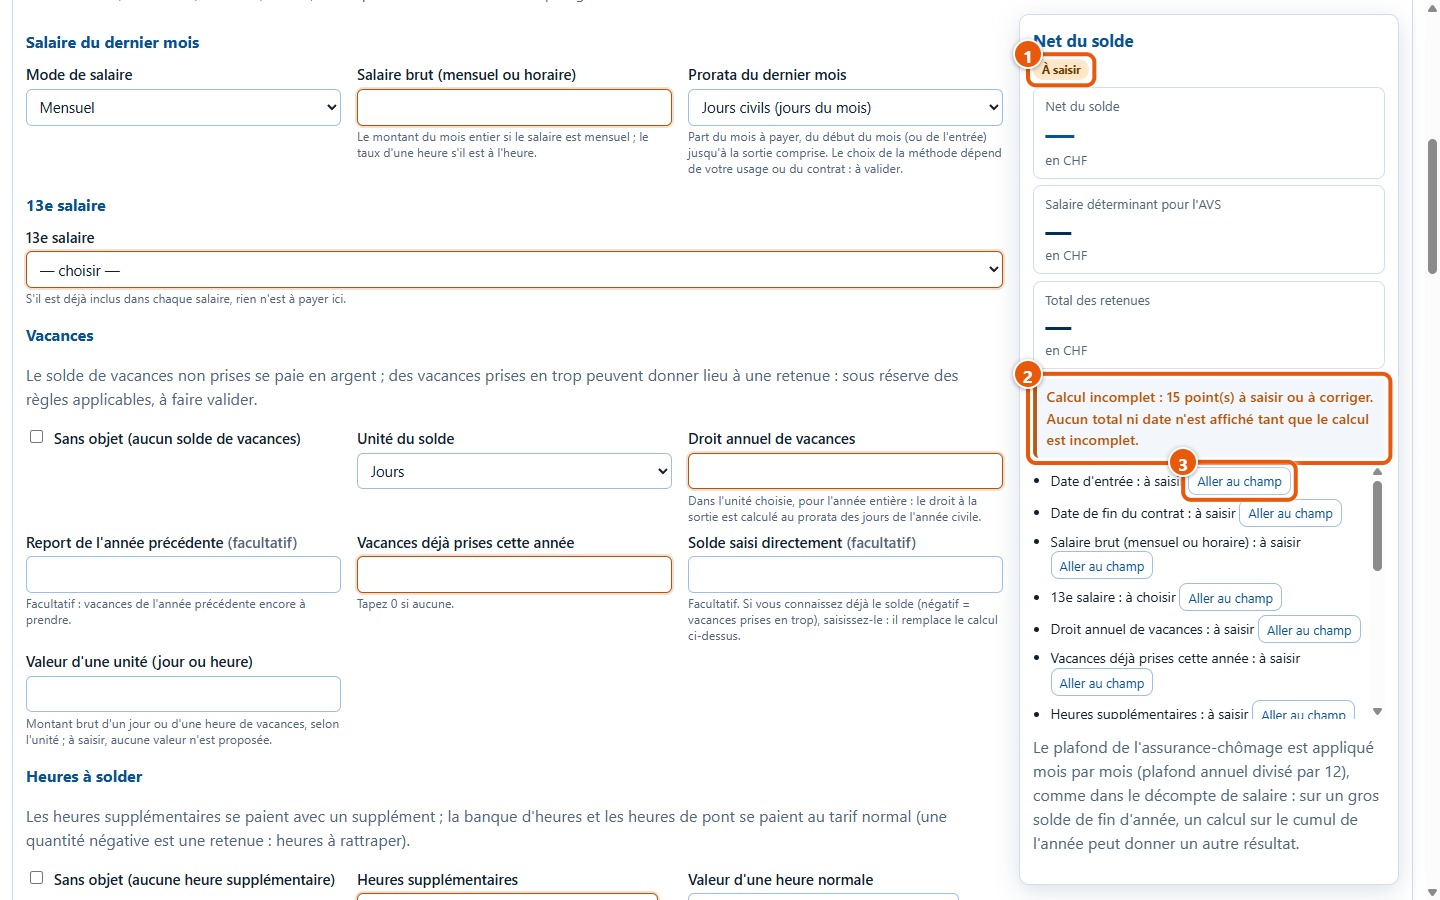
At first, almost nothing is filled in. The result shows the label « À saisir » (1) and displays no total: an empty field is never counted as 0. The message (2) indicates how many items still need to be entered, and the Aller au champ button (3) opens the relevant field and places the cursor there. Tabs marked with an orange dot still contain fields to complete.
4Loading a fictional example
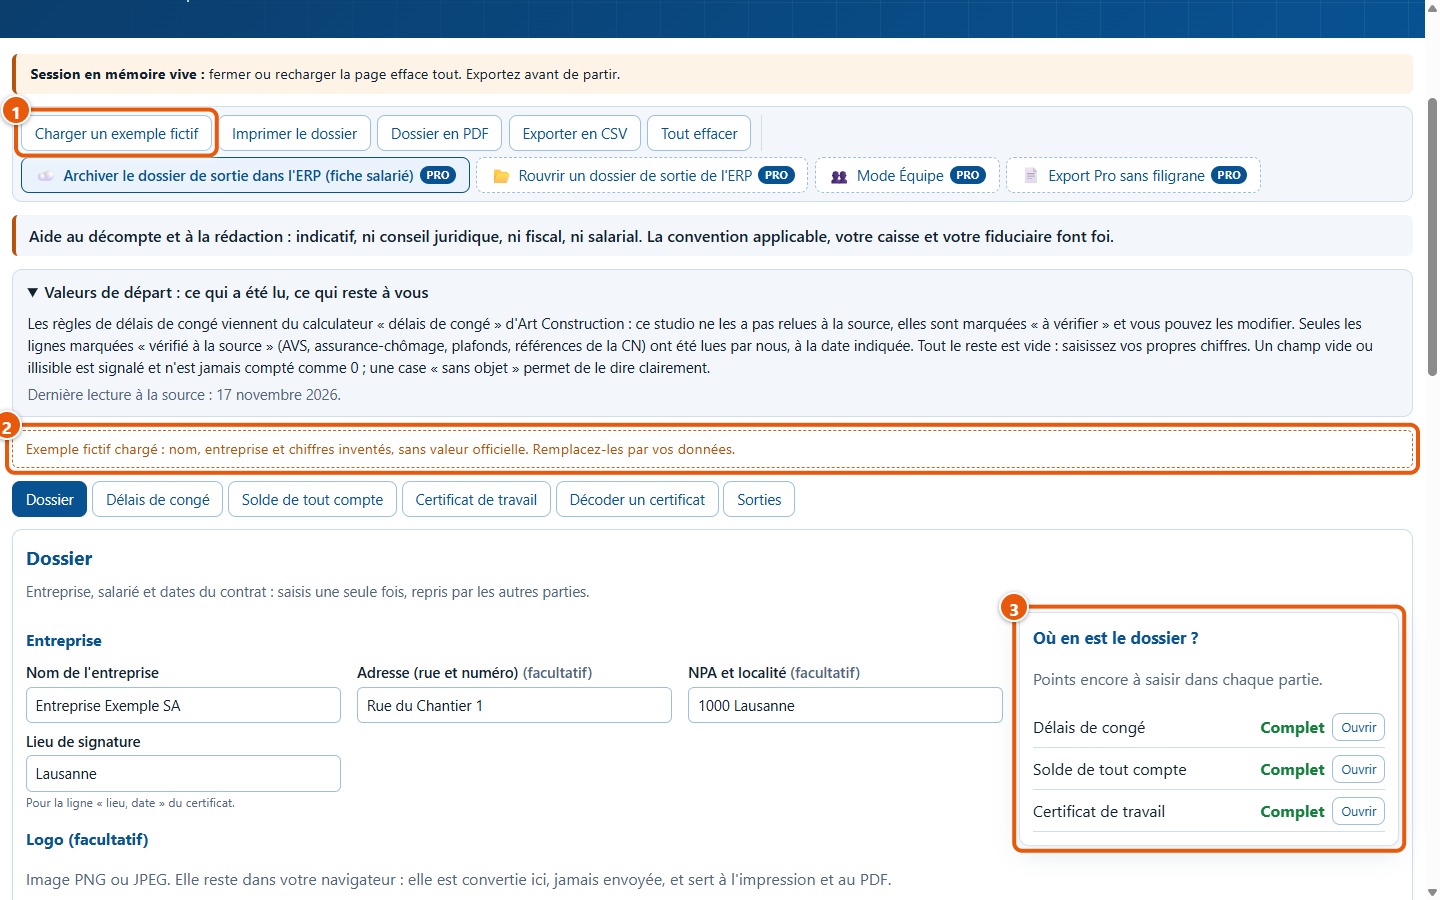
To try the tool without entering anything, click on Charger un exemple fictif (1). A line indicates that names and figures are fictional (2). The Où en est le dossier ? box (3) shows that all three parts are complete. The images in this guide use this example.
2. The departure file
5Entering the company details
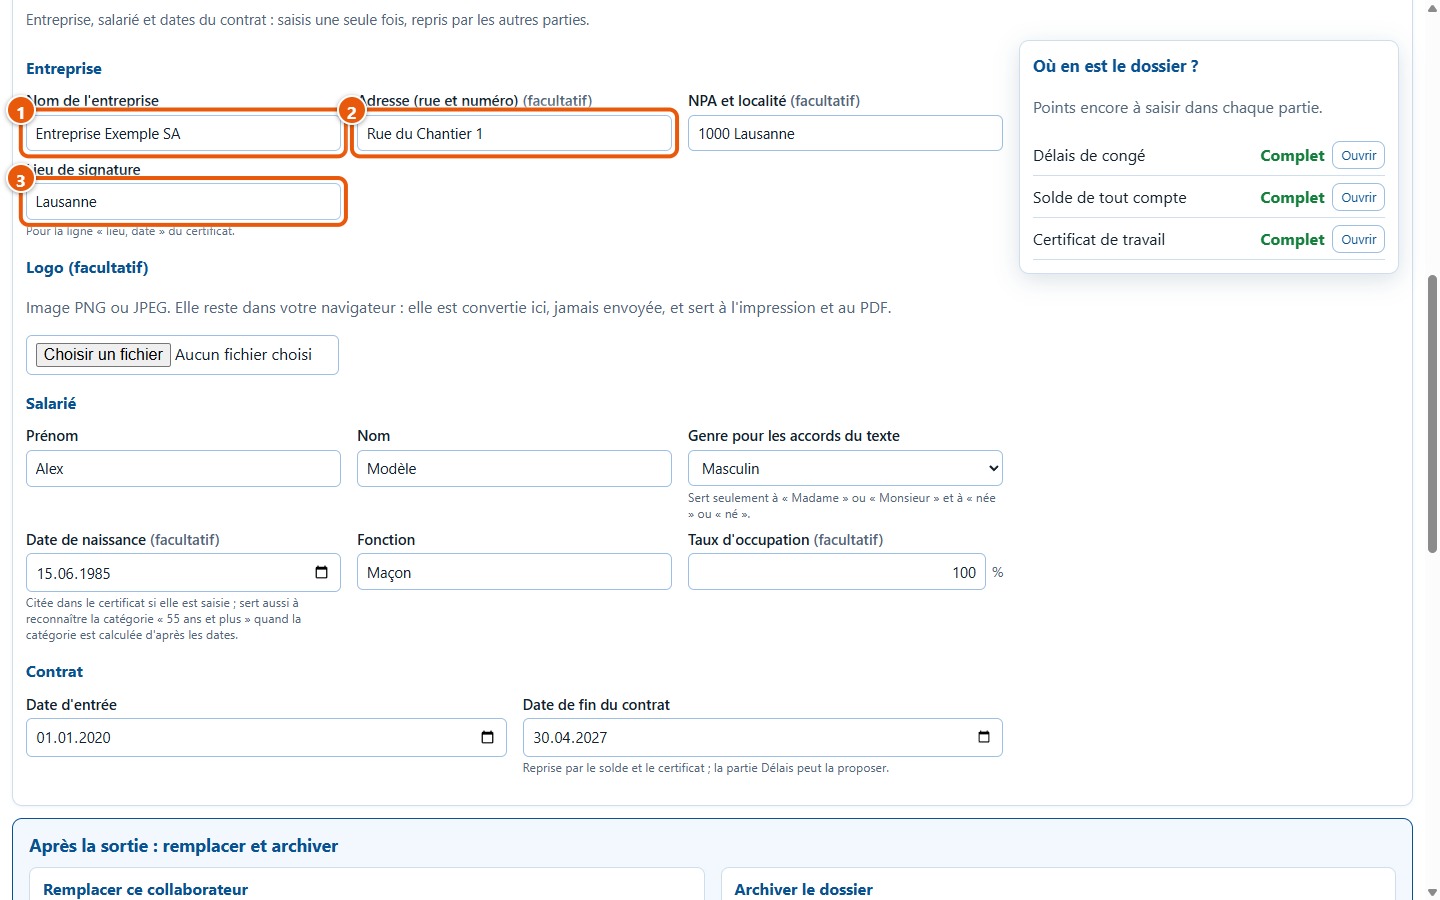
In the Dossier tab, enter the company name (1), its address (2), and the place of signing (3). This information is used for the certificate and printouts: you enter it once, and the other tabs reuse it.
6Adding a logo
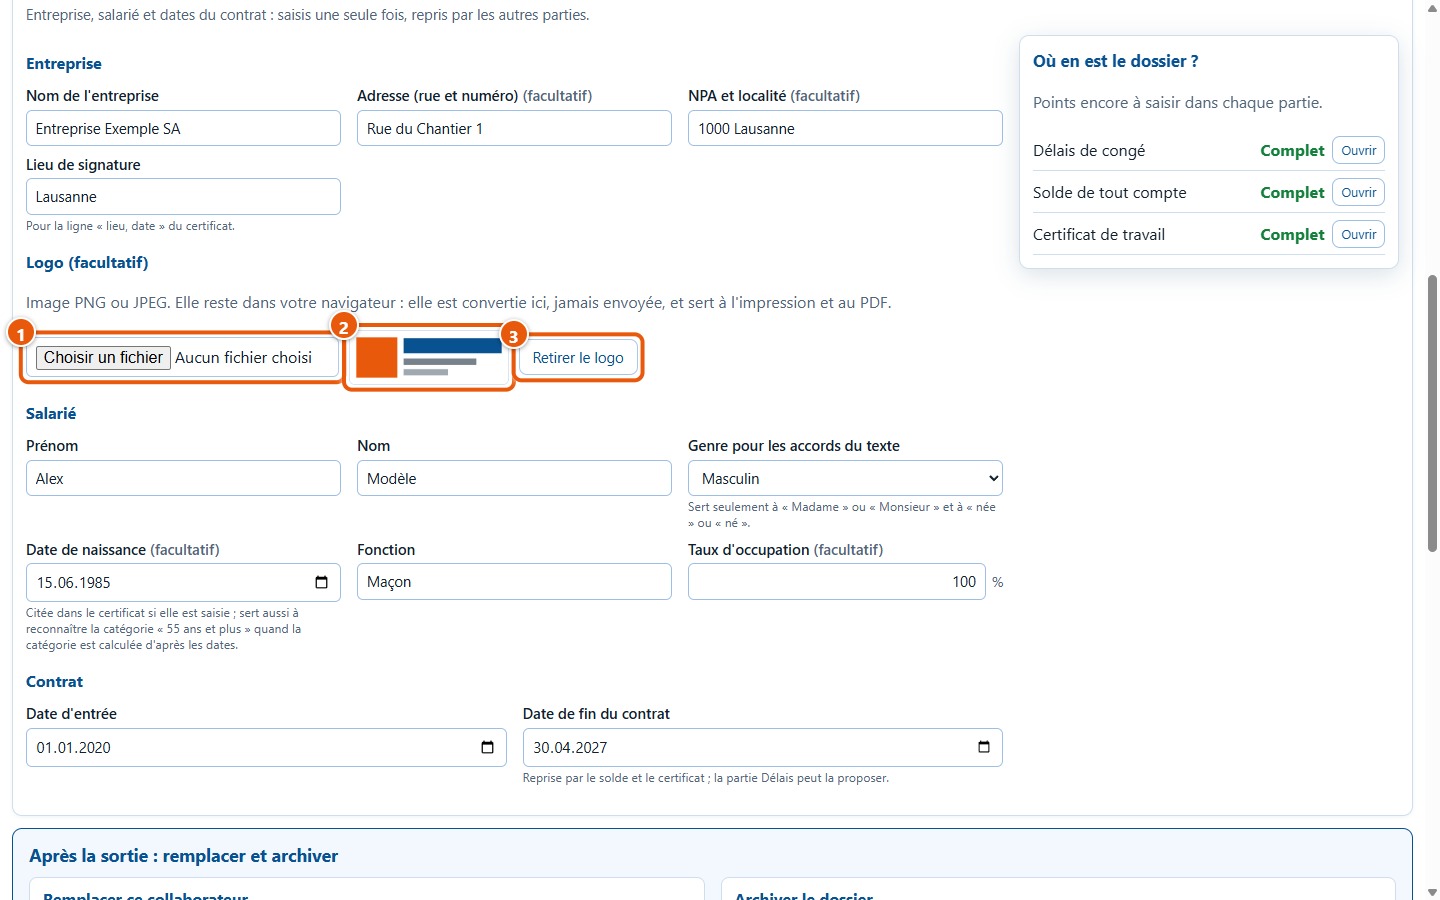
Choose a PNG or JPEG image (1). It stays in your browser: it is converted locally, never sent, and is used for printing, PDF export, and the certificate preview. A preview appears (2), and Retirer le logo (3) removes it. An unreadable or oversized image (over 8 MB) is rejected with a message.
7Entering employee details and dates
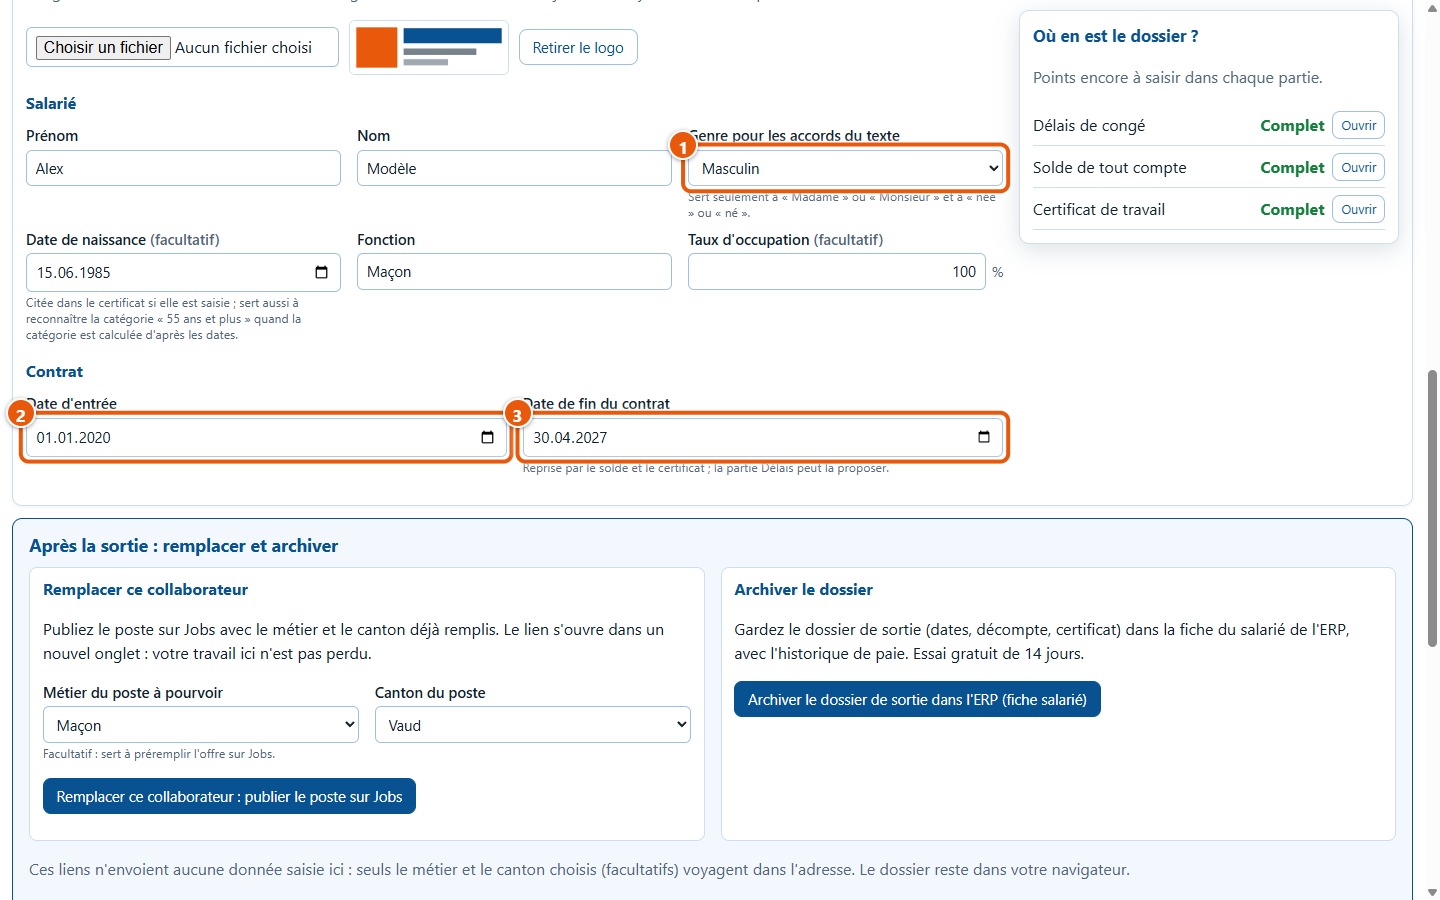
Enter the first name, last name, job title, and, if you wish, the employment level. Gender (1) is only used to write « Madame » or « Monsieur », « née » or « né » in the certificate. The start date (2) and contract end date (3) are reused by the other tabs.
3. Notice periods
8Selecting collective agreement and seniority
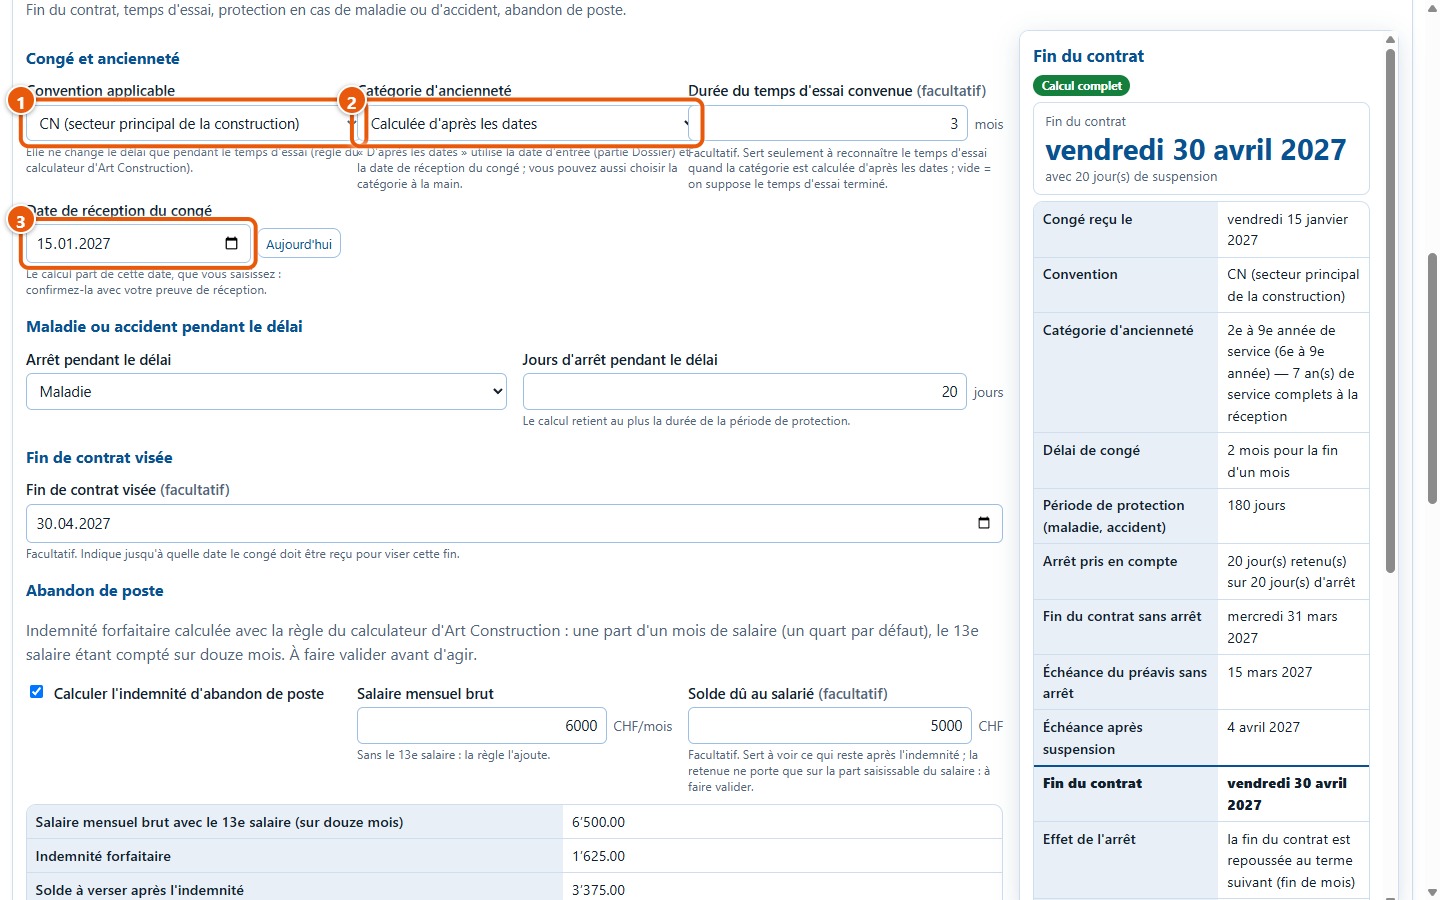
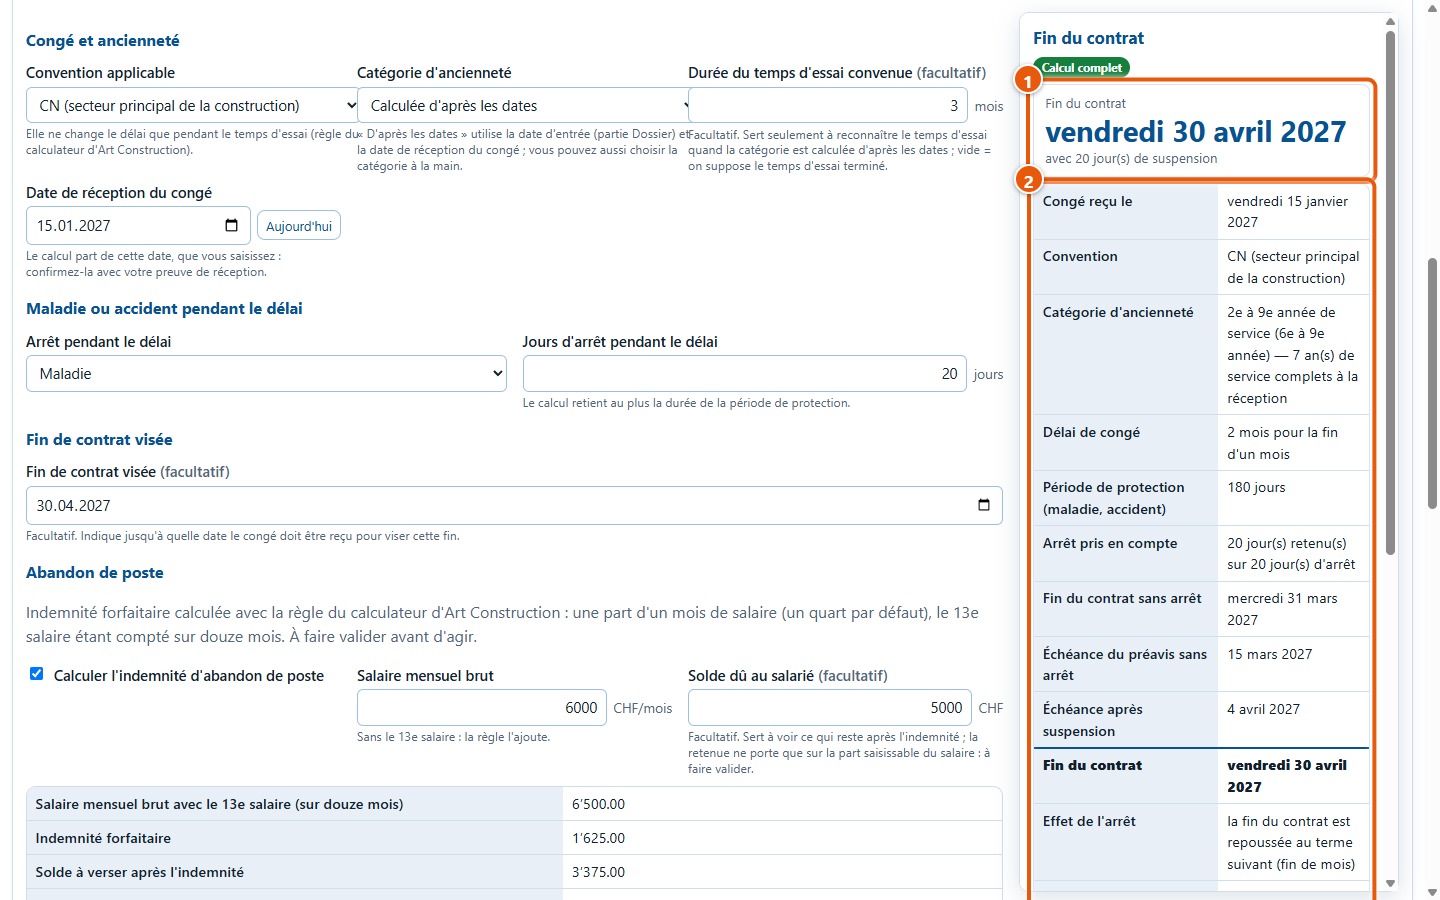
In the Délais de congé tab, select the applicable collective agreement (1): it only changes the notice period during the probationary period. The seniority category (2) can be calculated from the dates or selected manually. The notice receipt date (3) is the starting point for the calculation: confirm it with your proof of receipt.
9Reading the contract end date
On the right, the result updates with each entry. The contract end date (1) is displayed in large print; the table (2) shows each calculation step. In the example, the notice is received on 15 January 2027 and the contract ends on Friday 30 April 2027.
10Take illness or accident leave into account
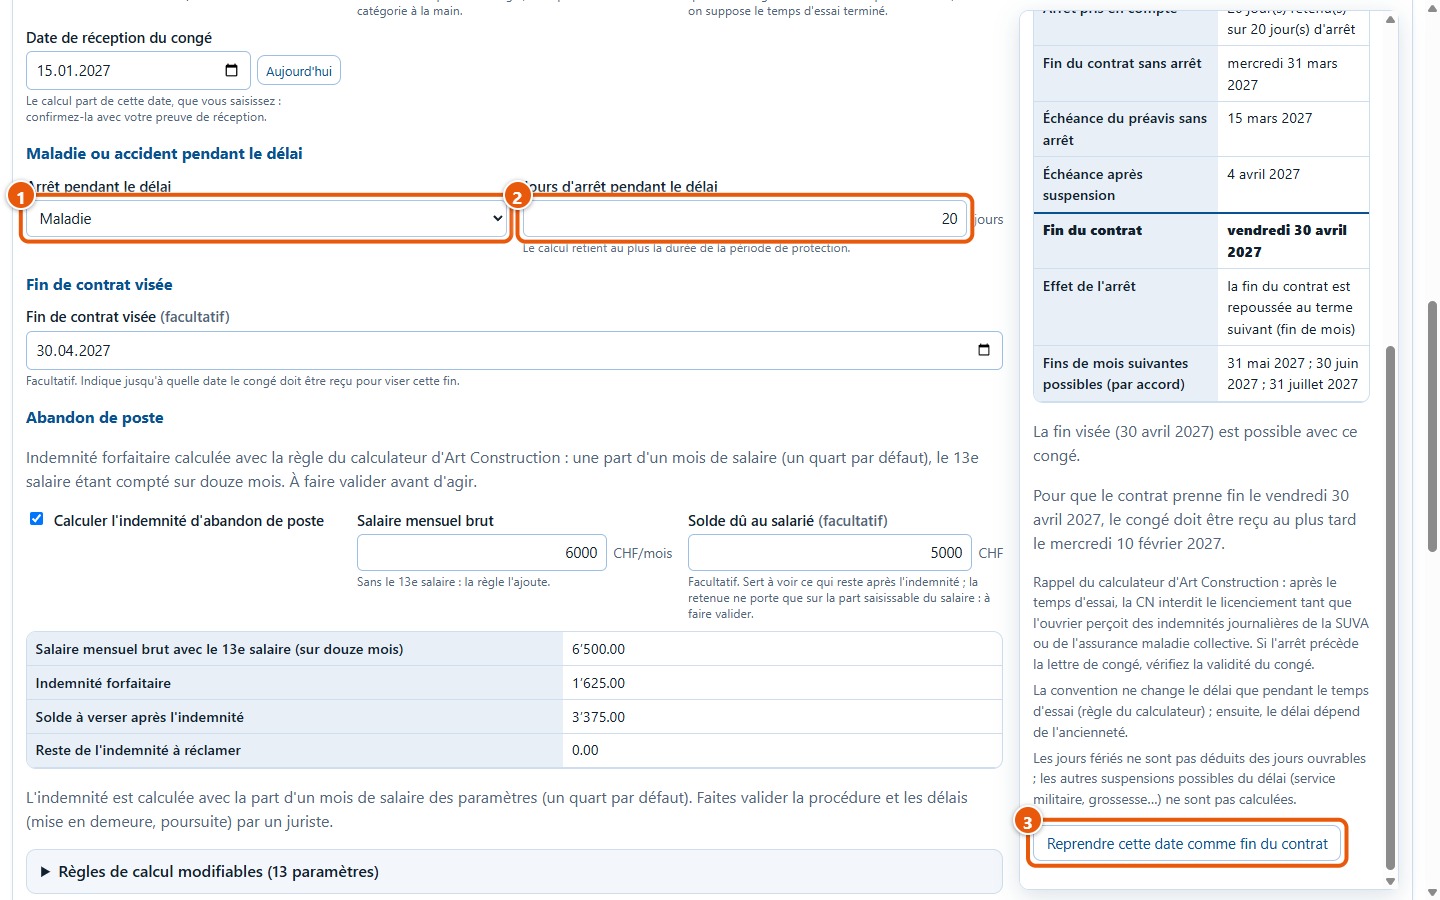
If the employee is on leave during the notice period, choose « Maladie » or « Accident » (1) and enter the days of absence (2). The calculation retains at most the duration of the protection period. In the example, 20 days of leave postpone the expiry from 15 March to 4 April and the end of the contract from 31 March to 30 April 2027. The Reprendre cette date comme fin du contrat button (3) transfers this date to the file.
11Target a contract end date
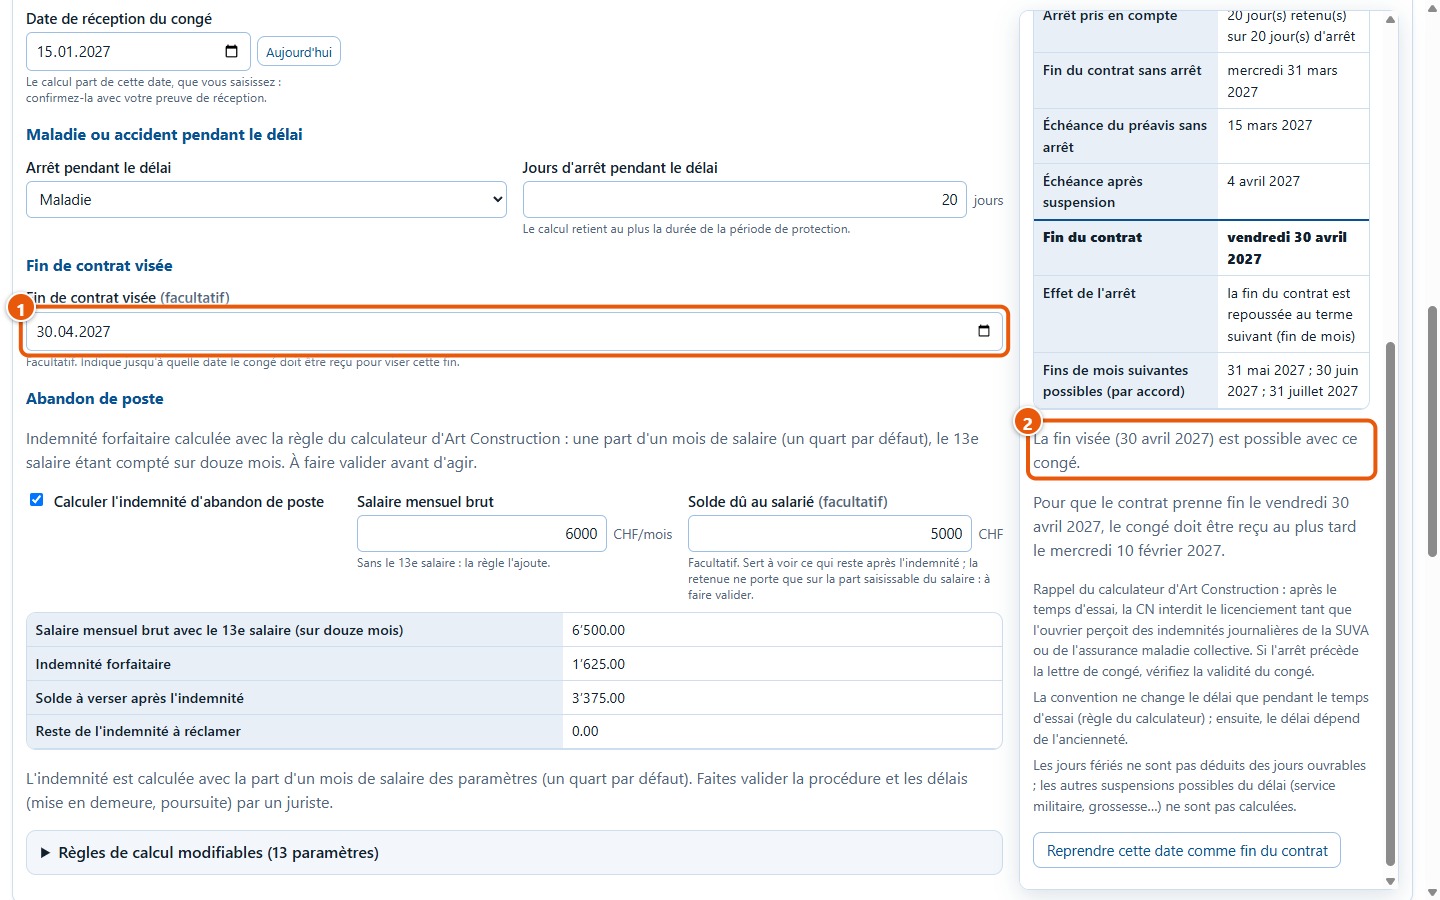
Enter in Fin de contrat visée (1) the date on which you want the contract to end. The software indicates whether this end date is possible with this notice (2) and provides the latest receipt date: in the example, notice must be received no later than Wednesday 10 February 2027 for the contract to end on Friday 30 April 2027.
12View and edit calculation rules
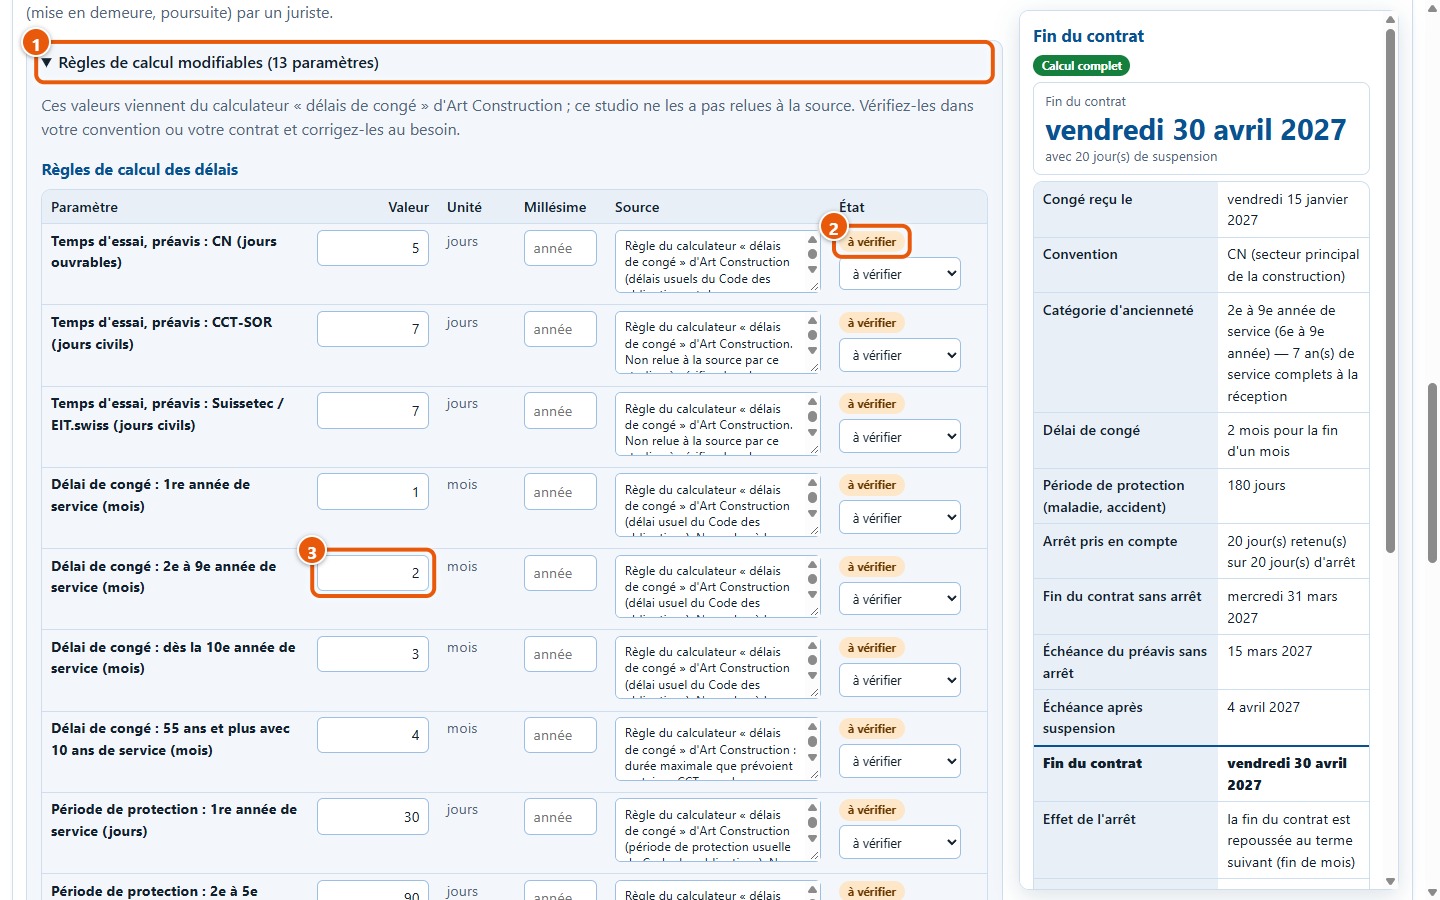
Open Règles de calcul modifiables (13 paramètres) (1). Each rule is a parameter with its value (3), unit, vintage, source and status. These rules carry the status « à vérifier » (2): the software has not re-checked them at the source. Check them in your collective agreement or contract and correct them if necessary.
13Calculate the job abandonment compensation
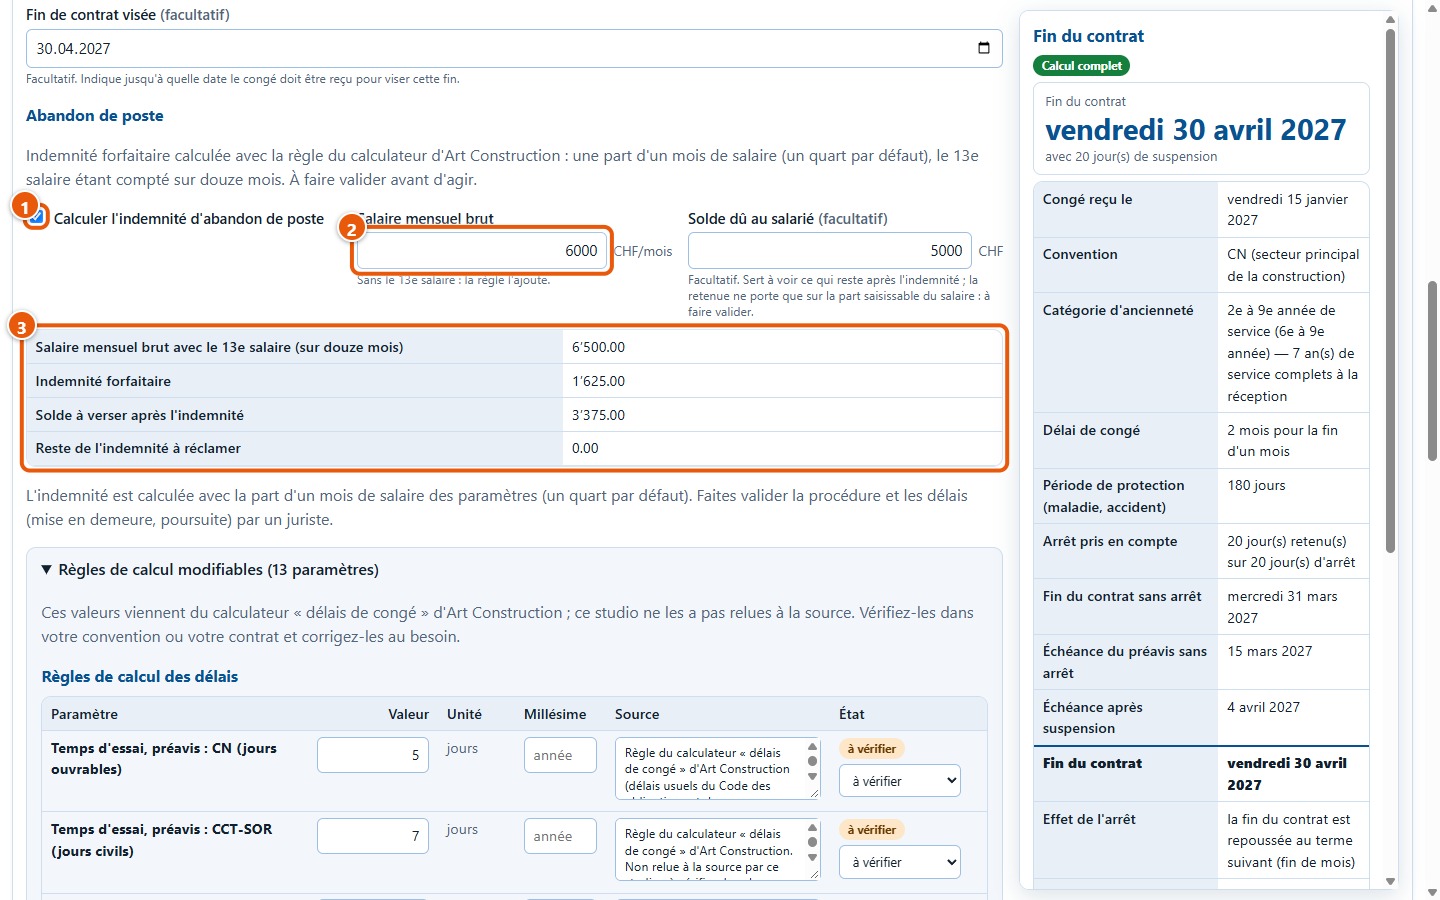
Tick Calculer l'indemnité d'abandon de poste (1) and enter the gross monthly salary (2). The table (3) provides the salary including the 13th-month salary counted over twelve months, the flat-rate compensation, the balance payable after the compensation and the remaining balance to claim. In the example (6’000 francs salary, 5’000 francs owed to the employee), the compensation is 1’625.00 and the balance is 3’375.00.
4. The final settlement
14Enter the final month's salary
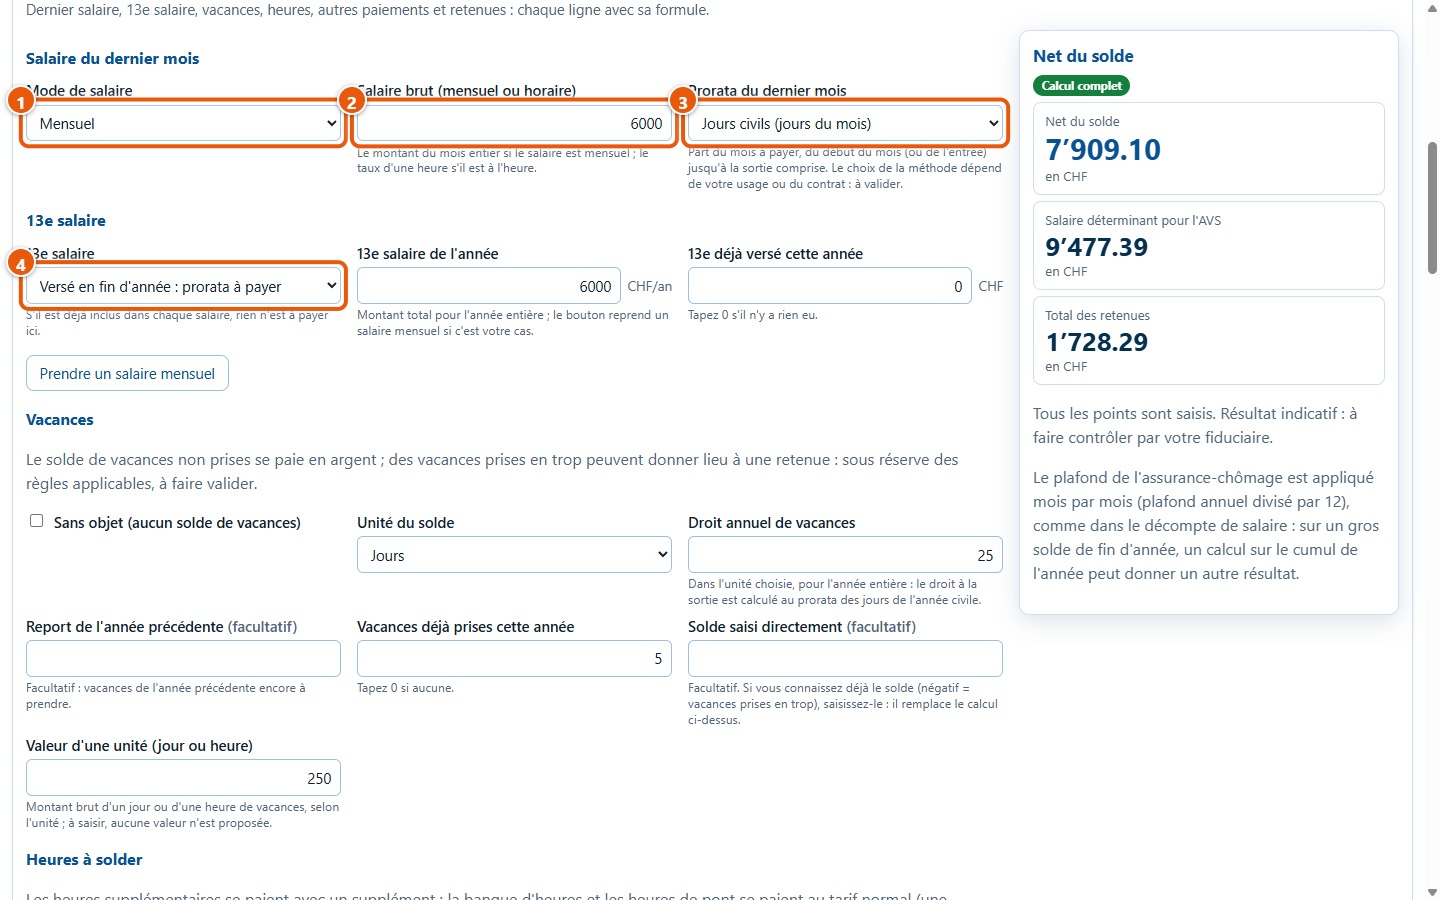
In the Solde de tout compte tab, choose a monthly or hourly salary (1), enter the gross salary (2) and the pro rata for the final month (3): calendar days, 30-day month or working days. The 13th-month salary (4) can be absent, already included in each wage or paid at year end: in the latter case, the share to be paid is calculated pro rata based on the days of the year.
15Count holiday and hours
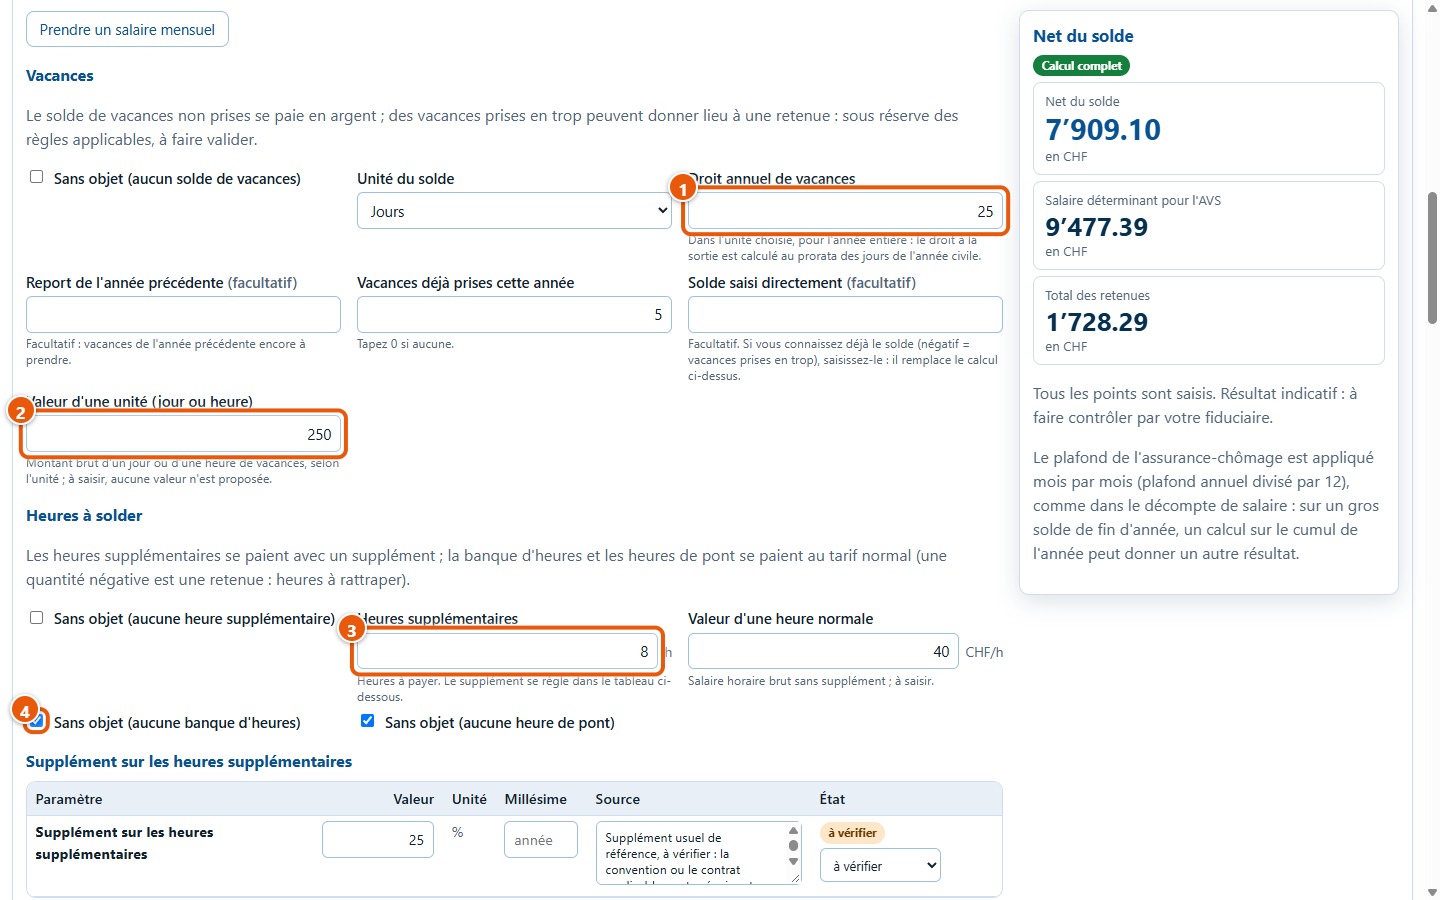
Enter the annual holiday entitlement (1): entitlement on departure is calculated pro rata based on the days of the year. Add the holiday already taken and the value of one day (2). Overtime hours (3) are paid with a supplement, which is an editable parameter. A « Sans objet » box (4) clearly indicates that a section does not apply.
16Check deduction rates and caps
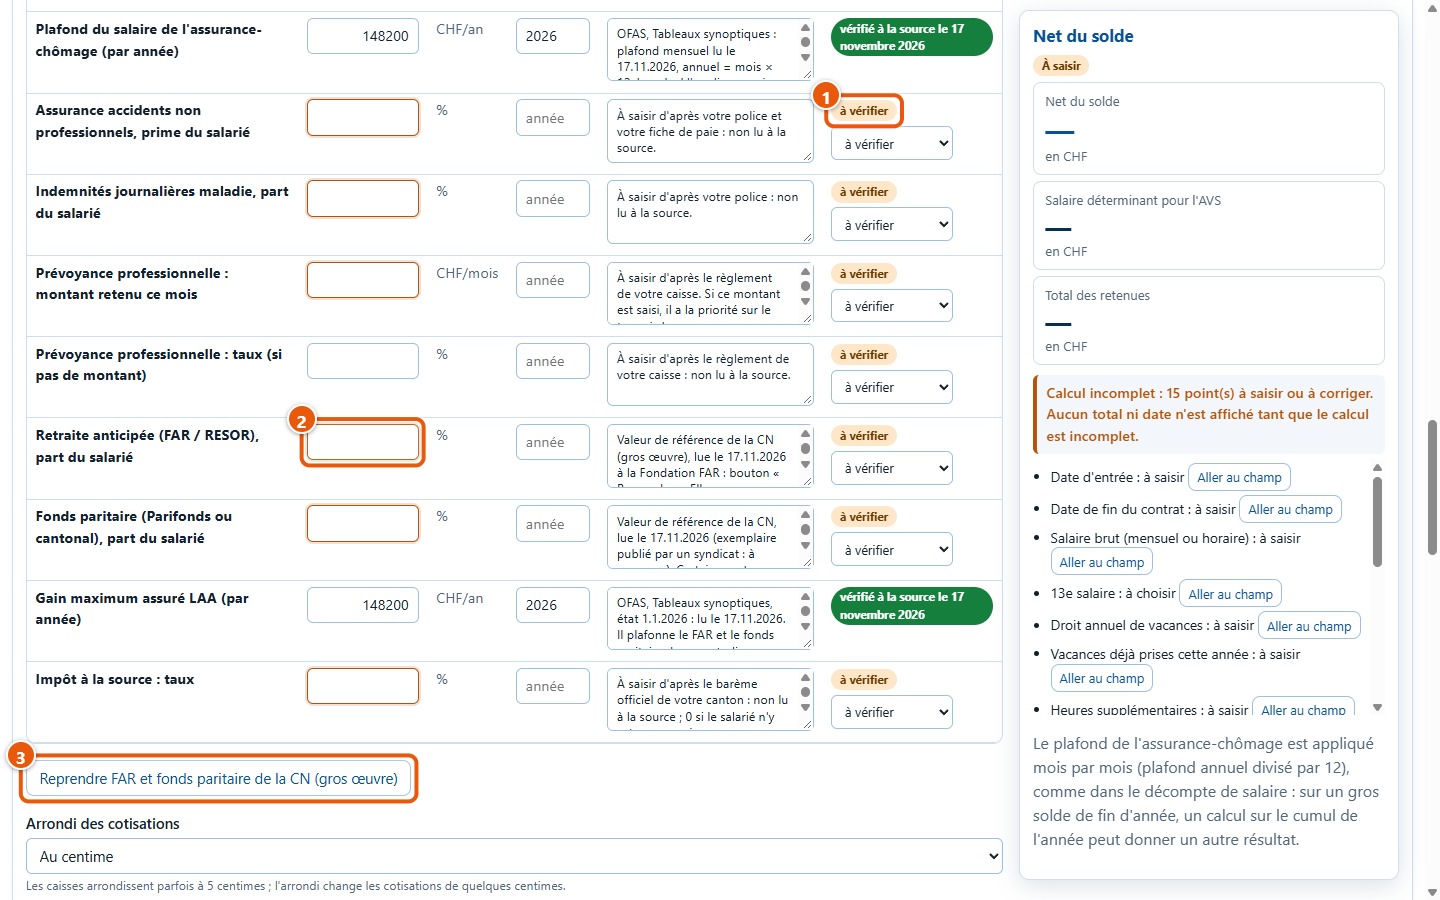
Each line of the table has a value, a vintage, a source and a status. Only the AVS and unemployment insurance rates and the caps are pre-filled: they carry the status « vérifié à la source » with their reading date. All other rates, such as those for non-occupational accident insurance (1) or early retirement (2), must be entered. The Reprendre FAR et fonds paritaire de la CN (gros œuvre) button (3) imports, for early retirement and the joint fund, the reference values from the collective agreement read at the source.
17Add other payments or deductions
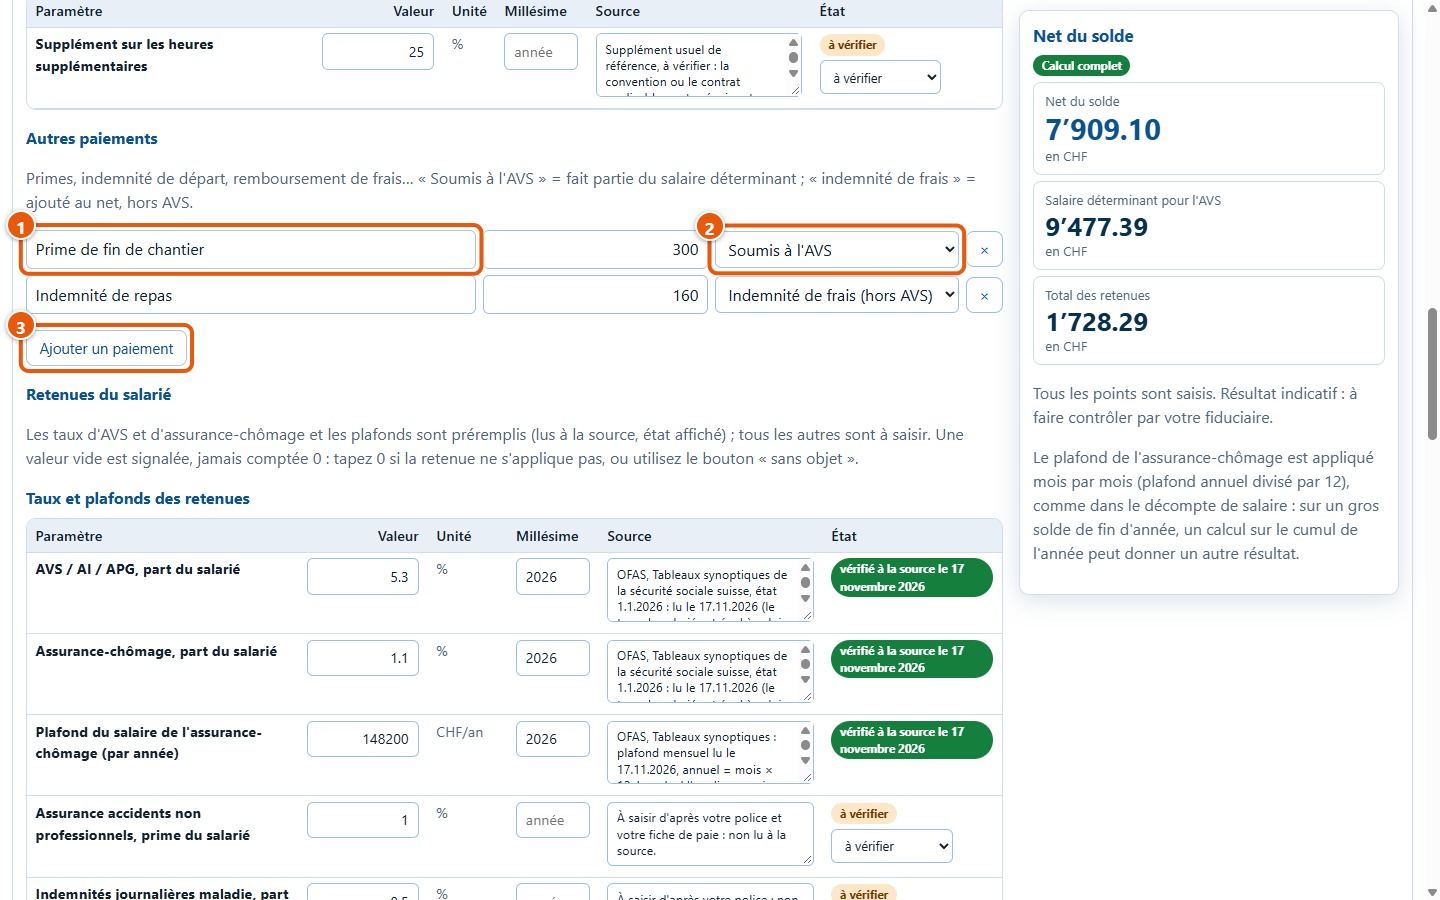
For each line of Autres paiements, enter a description (1), an amount and the line category (2): « Soumis à l'AVS » or « Indemnité de frais (hors AVS) ». Ajouter un paiement (3) adds a line; the × button removes it. The « autres retenues » are deducted from the net amount without changing the salary subject to AVS.
18Mark empty lines as not applicable
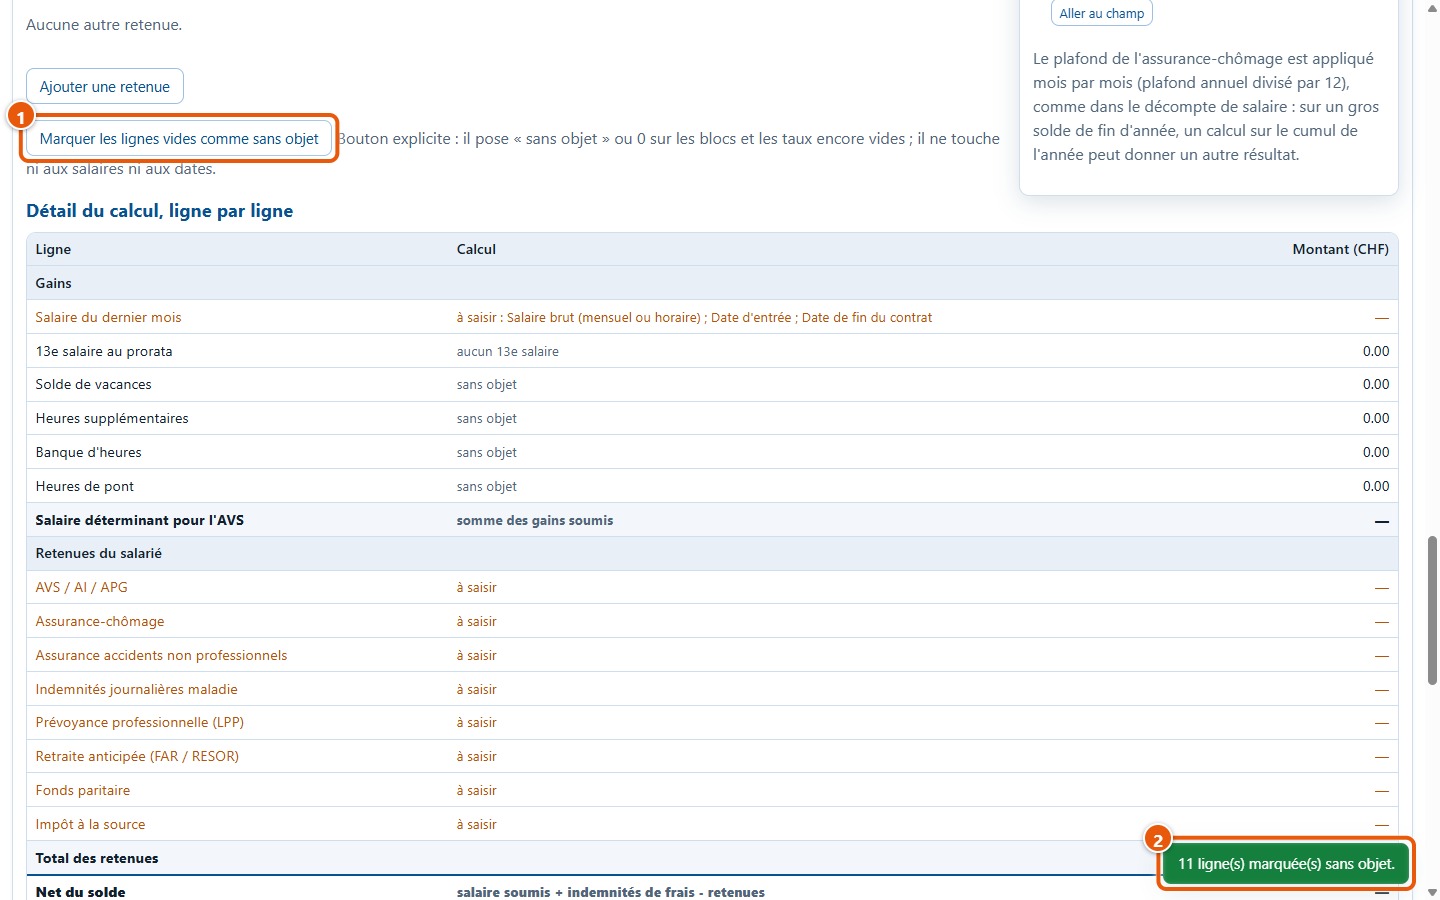
When sections do not apply, the Marquer les lignes vides comme sans objet button (1) sets empty sections and rates to « sans objet » or 0, then a message (2) indicates how many lines were marked. This is your choice: the software never does this on its own, and it does not modify salaries or dates. Lines depending on the salary remain « à saisir » as long as the salary is missing.
19Read the net settlement amount
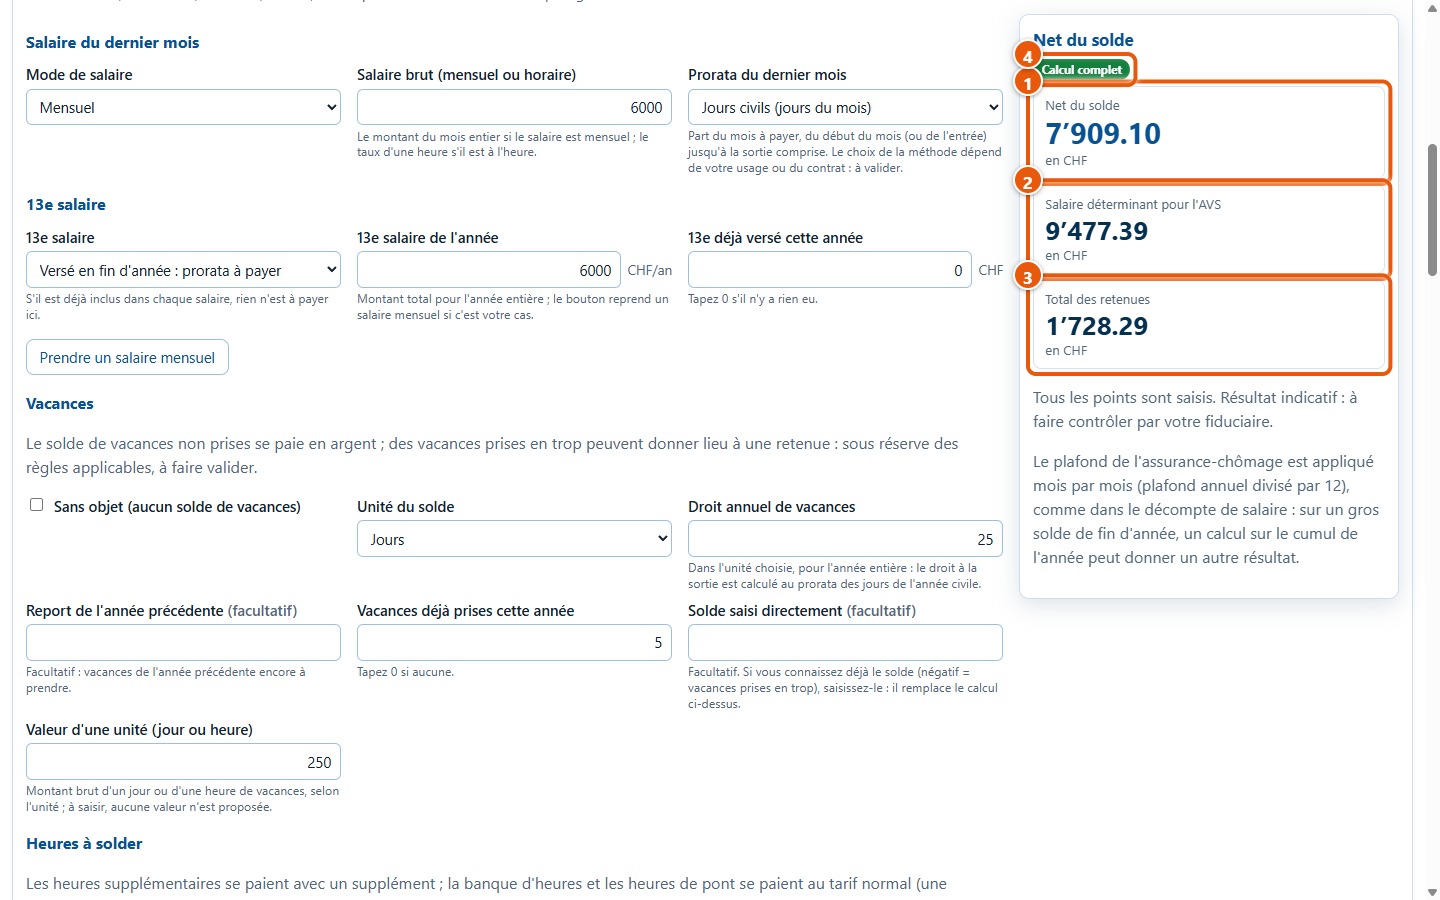
Three cards summarise the result: the net settlement (1), the qualifying salary for AVS (2) and total deductions (3). The Calcul complet badge (4) appears when all items are entered. In the example, the net amount is 7’909.10, the qualifying salary is 9’477.39 and deductions are 1’728.29.
20Read the line-by-line detail
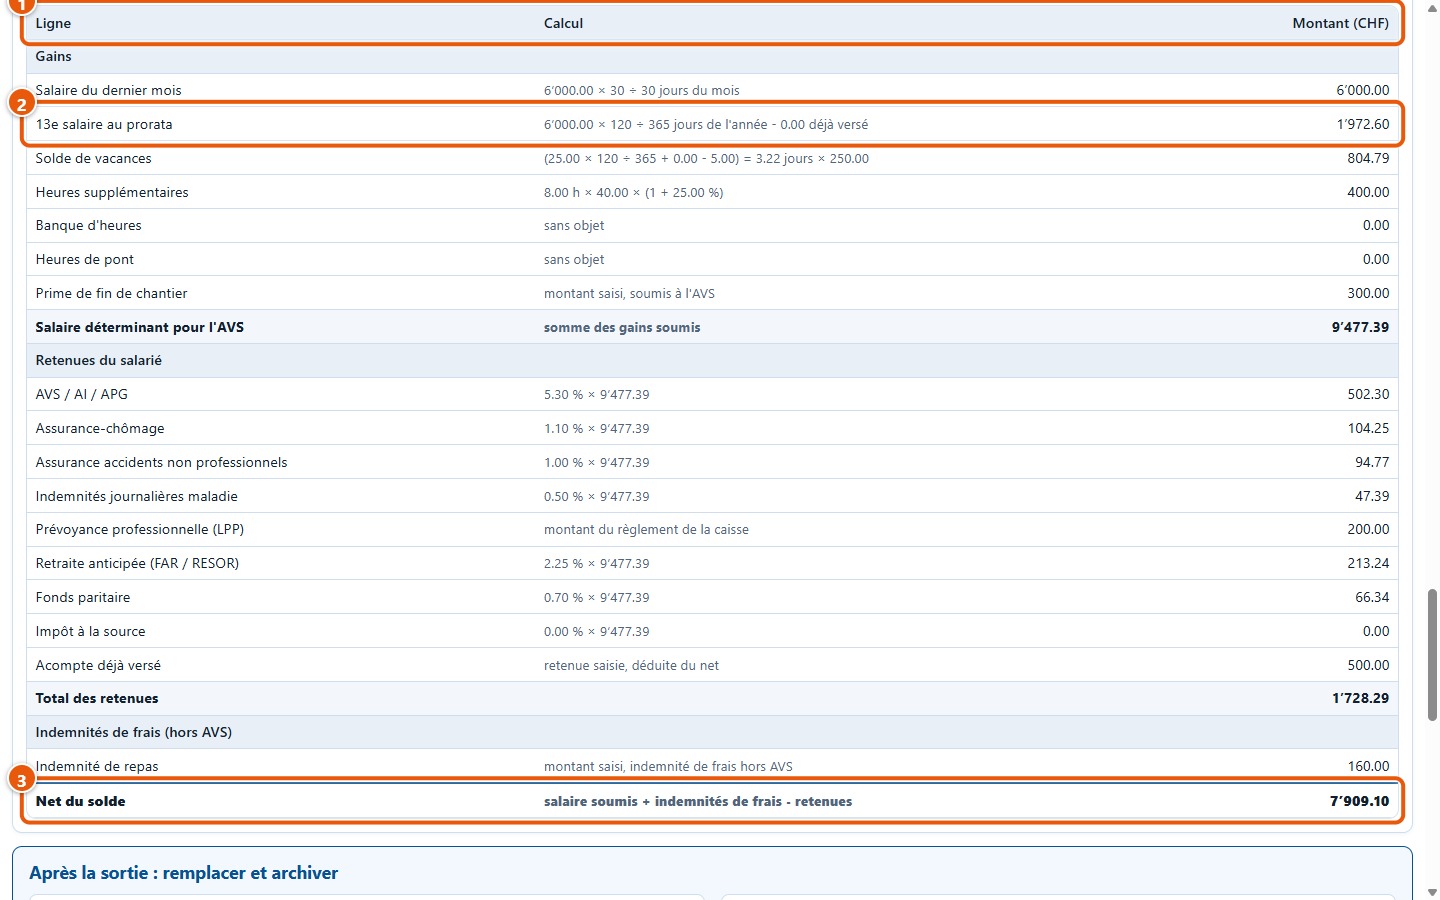
The table Détail du calcul, ligne par ligne (1) provides, for each line, its formula and its amount. For example (2), the pro-rata 13th-month salary: 6’000.00 × 120 ÷ 365 days of the year − 0.00 already paid = 1’972.60. The last line (3) gives the net total: subject salary + expense allowances − deductions = 7’909.10.
5. The work certificate
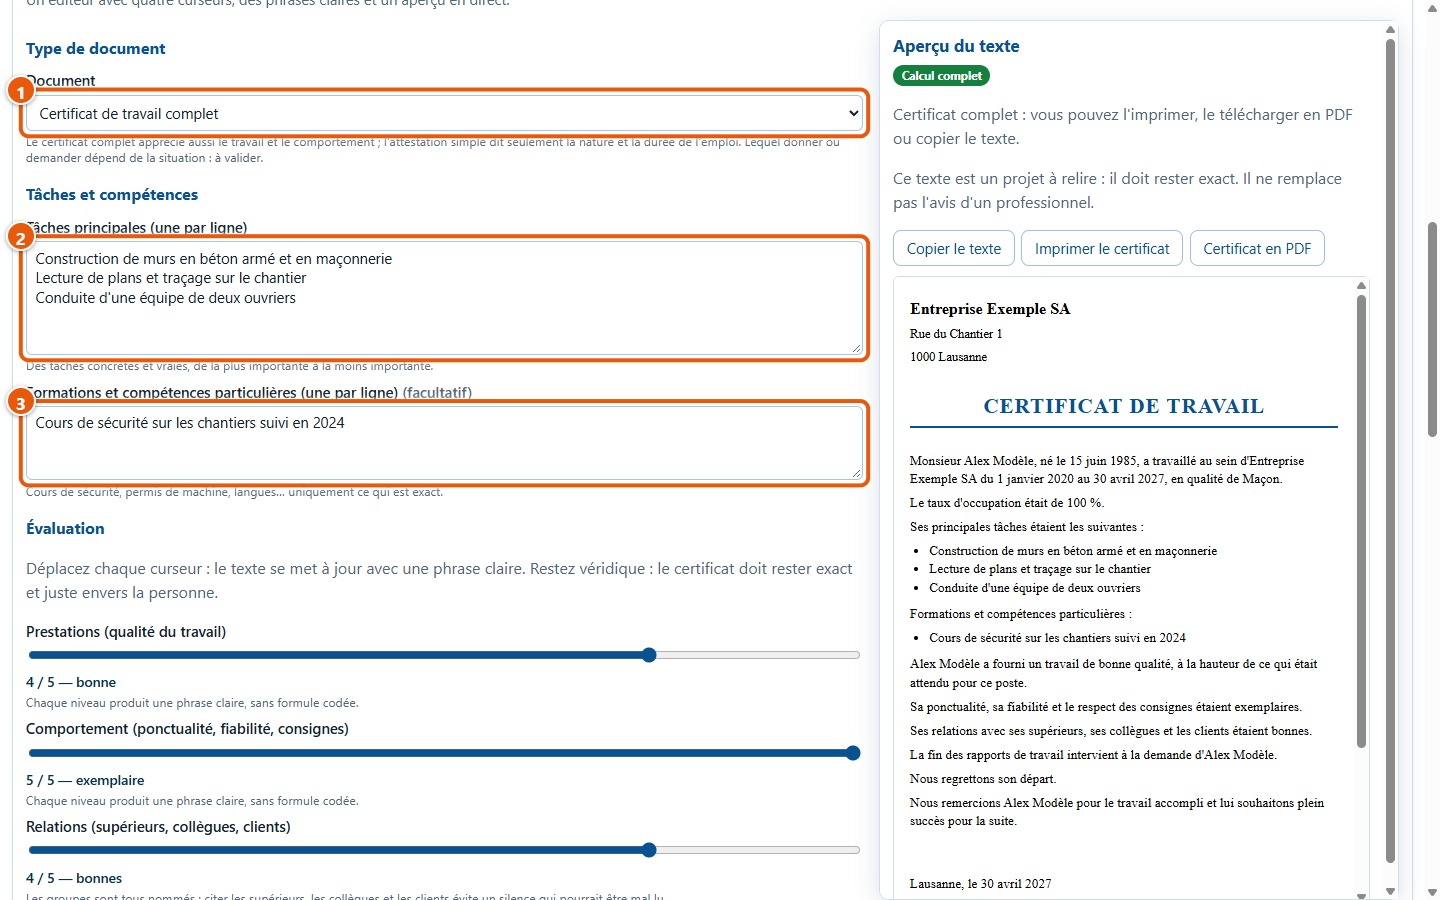
21Select the document and tasks
Under the tab Certificat de travail, select the document type (1): full certificate or simple confirmation, which only states the nature and duration of employment. Enter the main tasks, one per line (2), from most important to least important, then, if you wish, specific training and skills (3). The preview on the right updates with every entry.
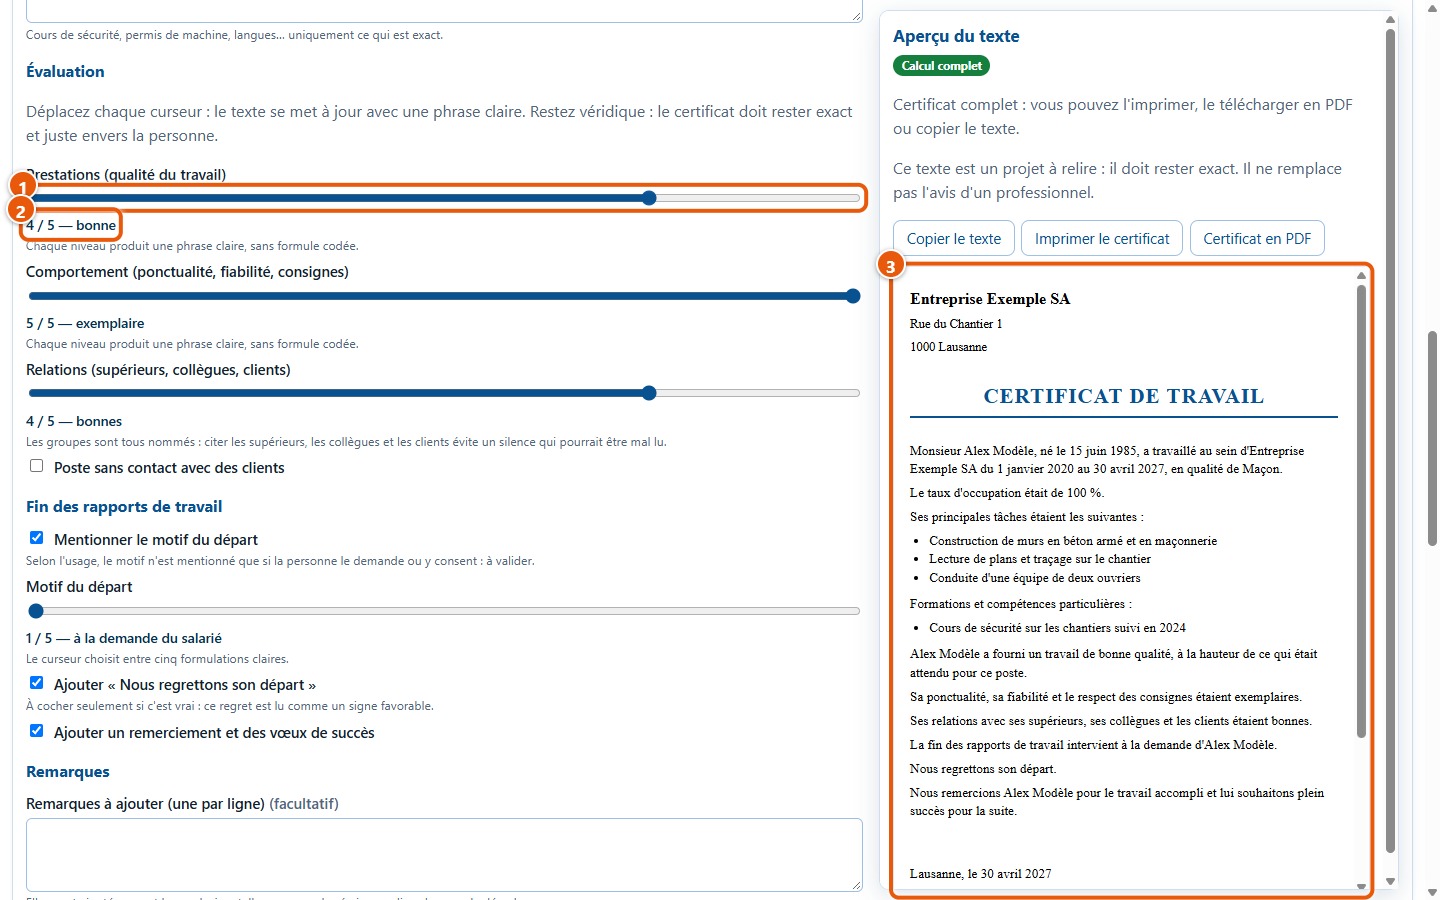
22Adjust the four sliders
Move the performance slider (1): the level (2) is displayed in full words, from 1 to 5, and the sentence in the preview (3) changes immediately. Conduct, working relationships and reason for leaving work the same way. Each level produces a clear sentence, without coded phrases. A low rating triggers a reminder: have the text checked by a professional before handing it over.
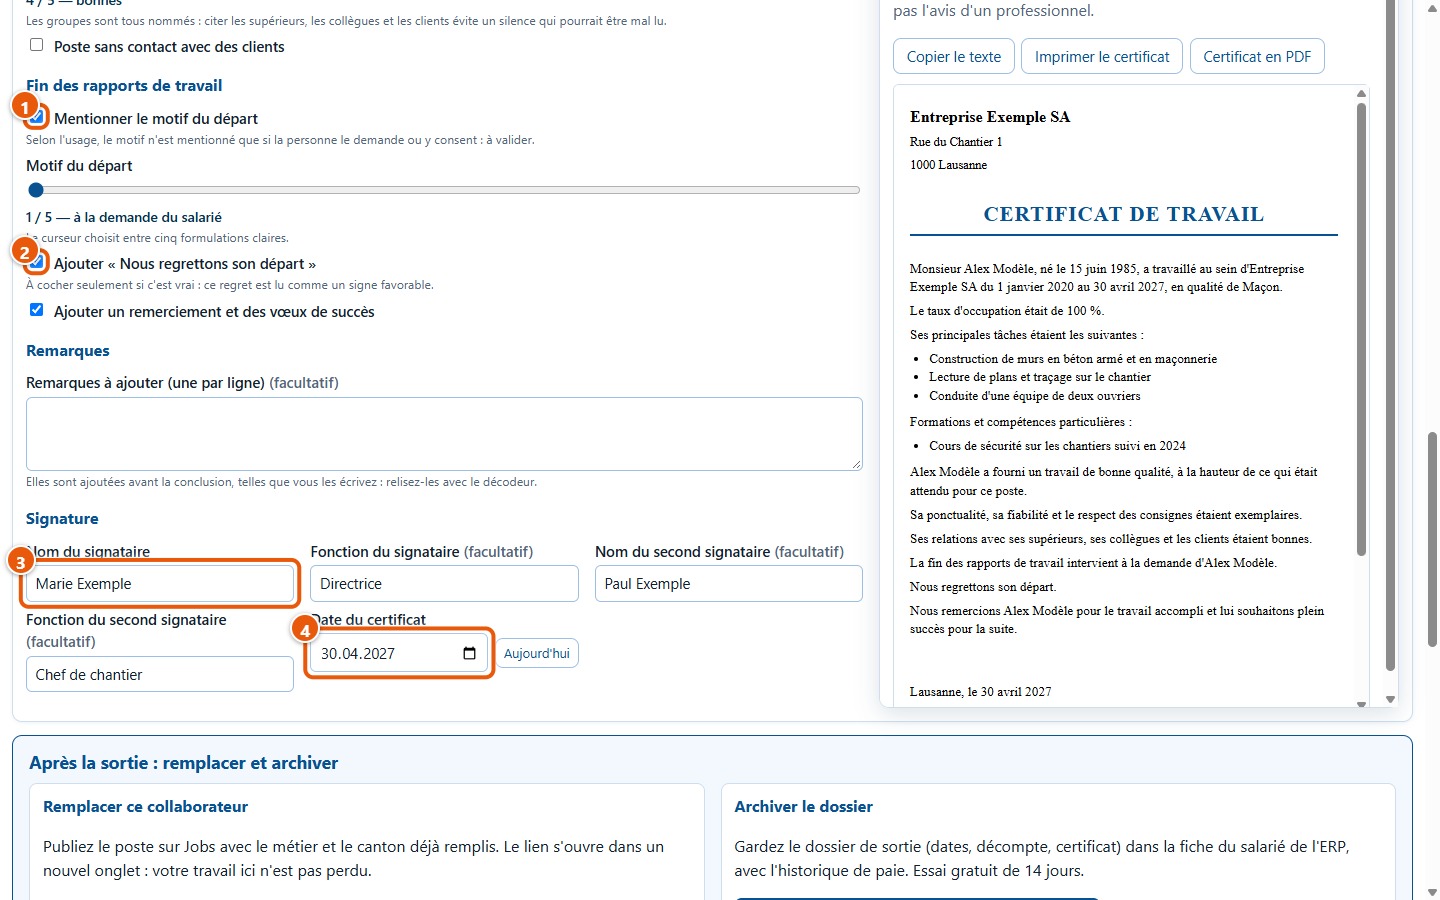
23Complete: reason, regrets and signature
Tick Mentionner le motif du départ (1) only if the individual requests or consents to it: a slider then chooses among five wordings. Ajouter « Nous regrettons son départ » (2) should only be ticked if true. Enter the signatory's name (3) and the date of the certificate (4); a second signatory is possible.
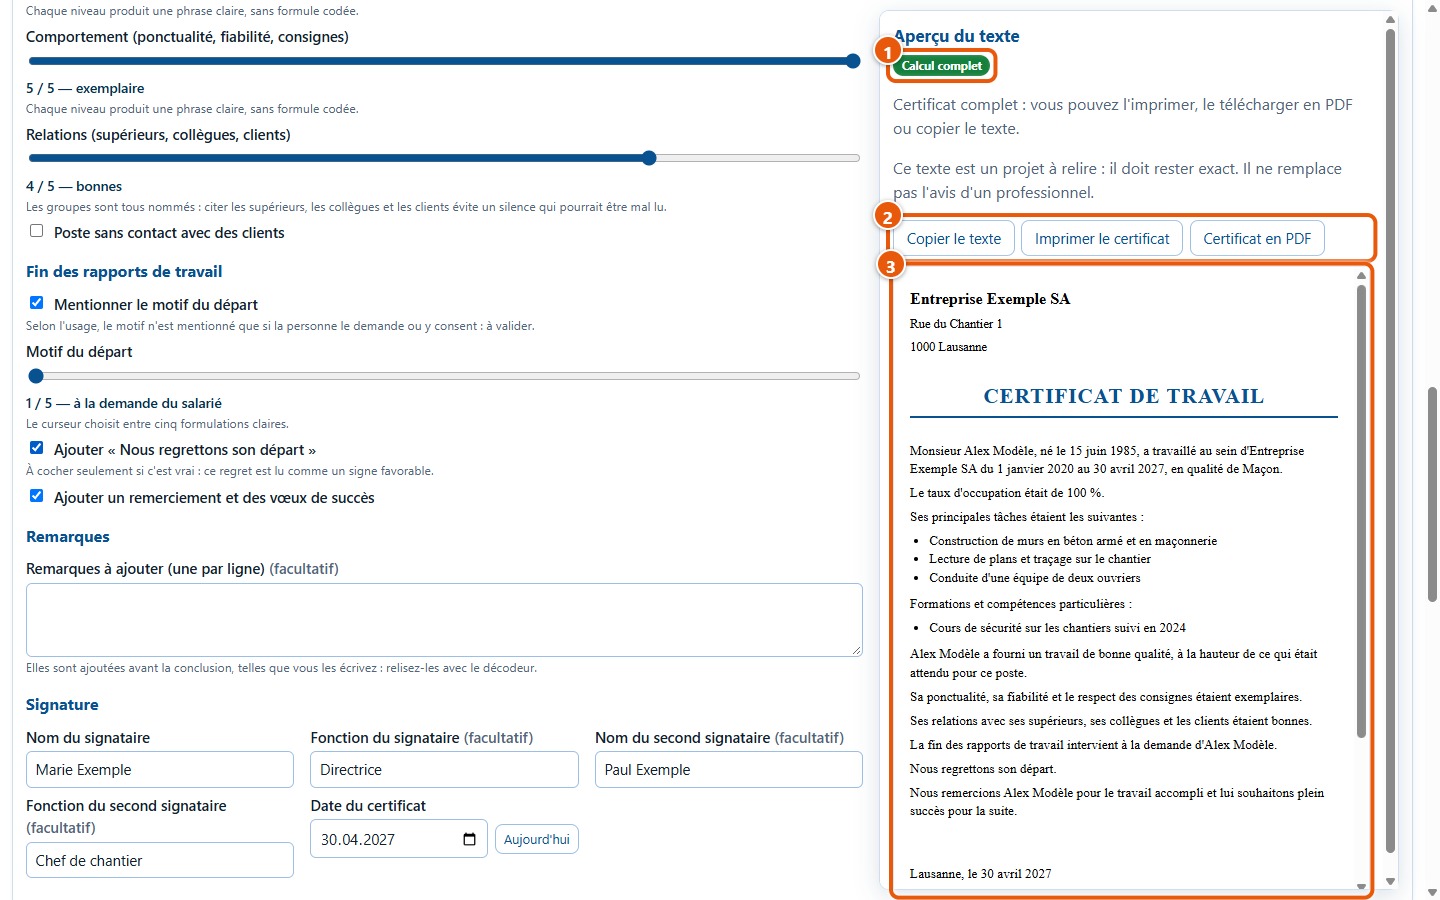
24Review the preview
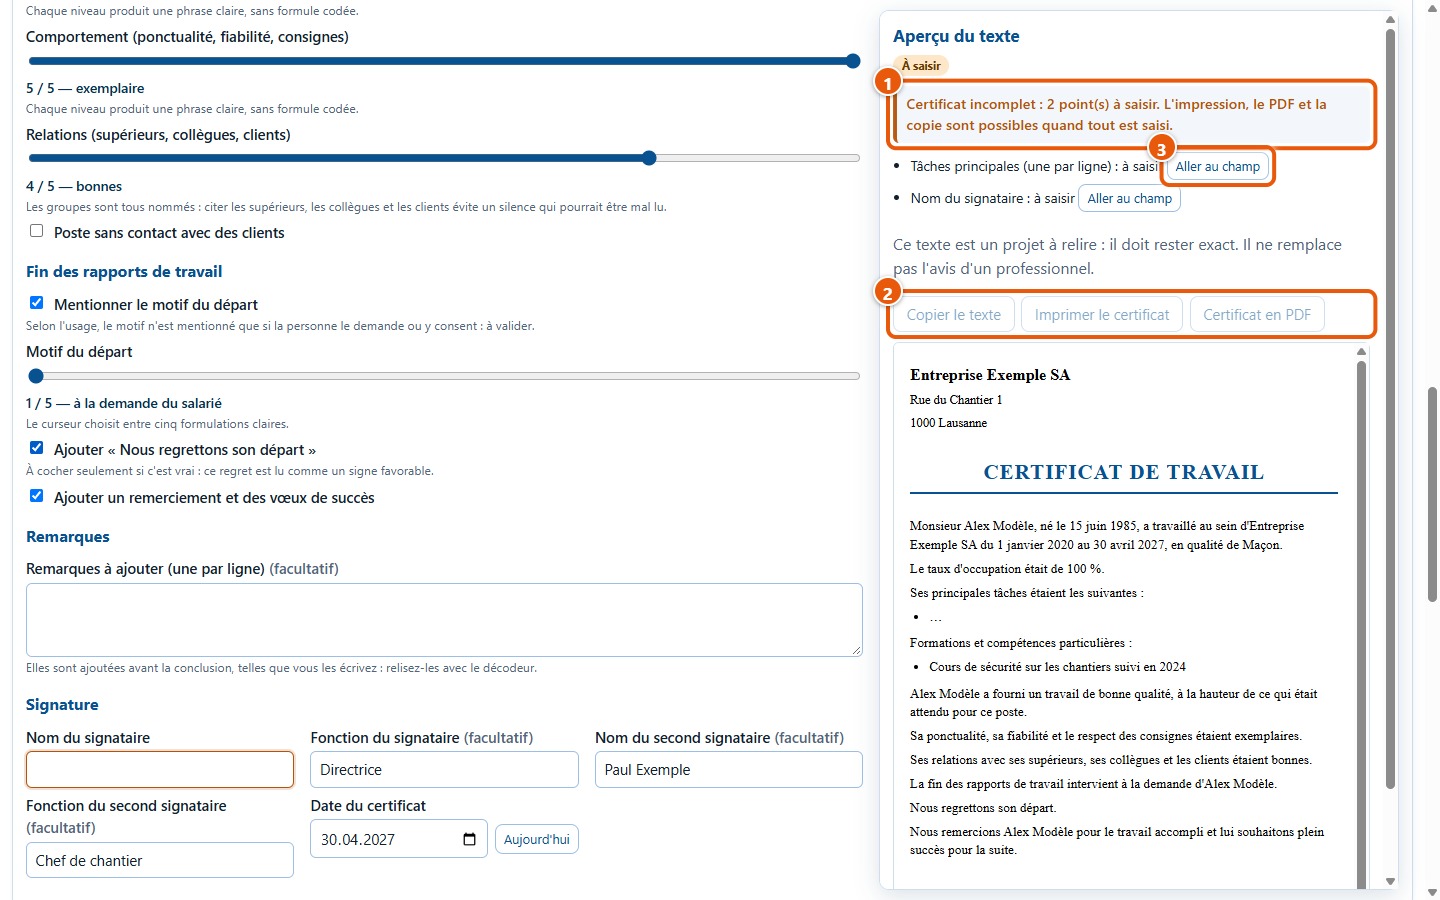
The preview (3) shows the text as it will be printed. When all items are filled in, the note Calcul complet (1) appears and the three buttons (2) become active: Copier le texte, Imprimer le certificat and Certificat en PDF. This text is a draft to review: it must remain accurate and does not replace professional advice.
25When an item is missing
If a mandatory field is empty, the software writes « … » in its place instead of making up text, and it blocks printing, PDF export and copying: all three buttons (2) are greyed out. The message (1) states how many items remain to be filled in, and Aller au champ (3) leads to the field.
6. Decode a certificate
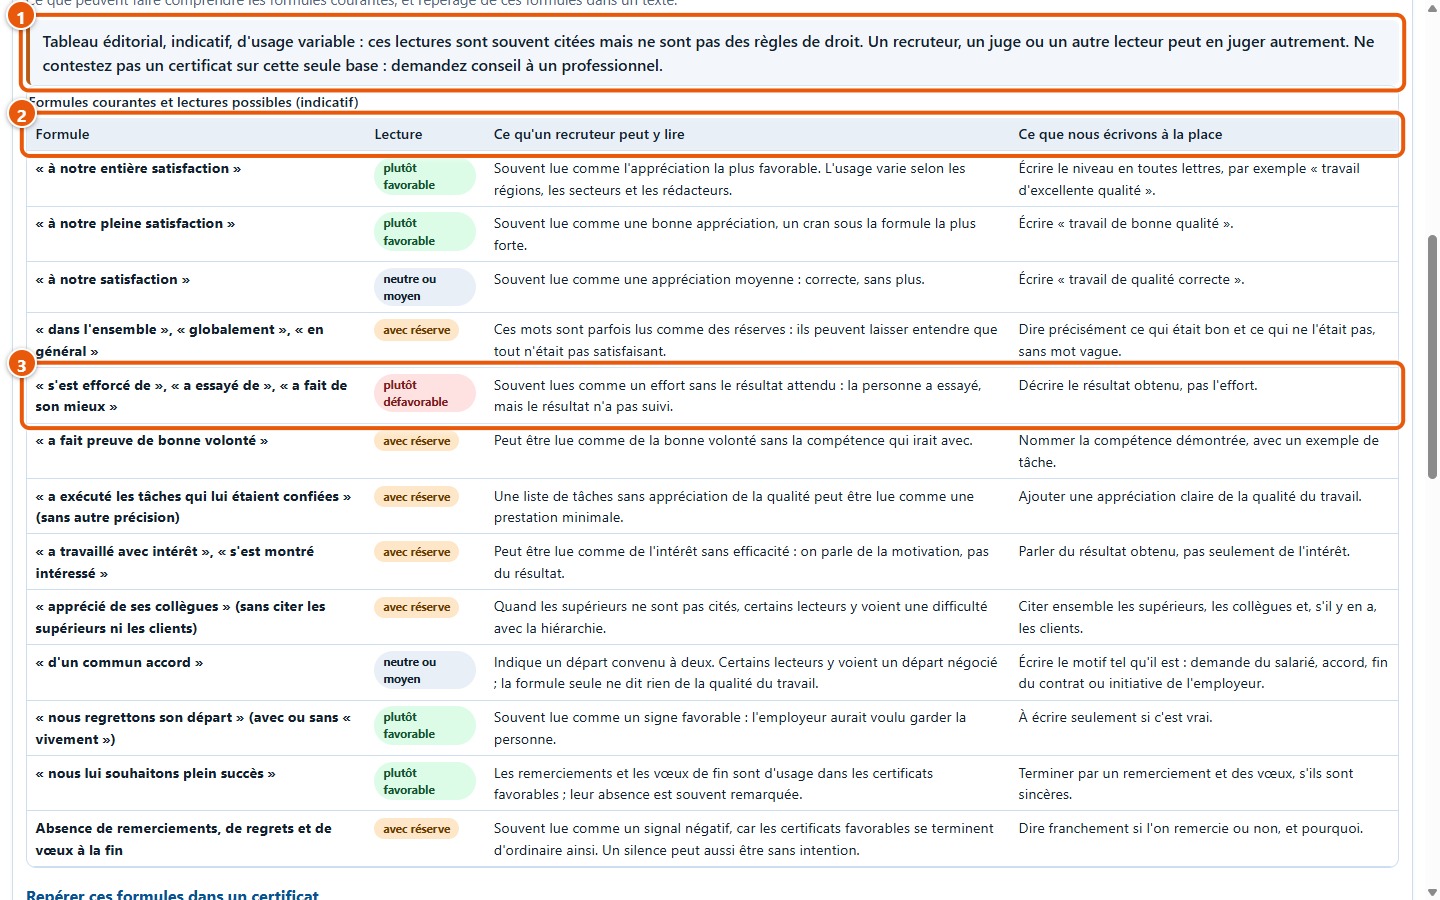
26Read the table of phrases
Under the tab Décoder un certificat, an editorial table shows common phrases, what a recruiter might read into them and what the software writes instead. The warning (1) points out that these interpretations are indicative and usage varies. The columns (2) provide the phrase, the interpretation and the clear phrasing; each line (3) has a badge: « plutôt favorable », « neutre ou moyen », « avec réserve » or « plutôt défavorable ».
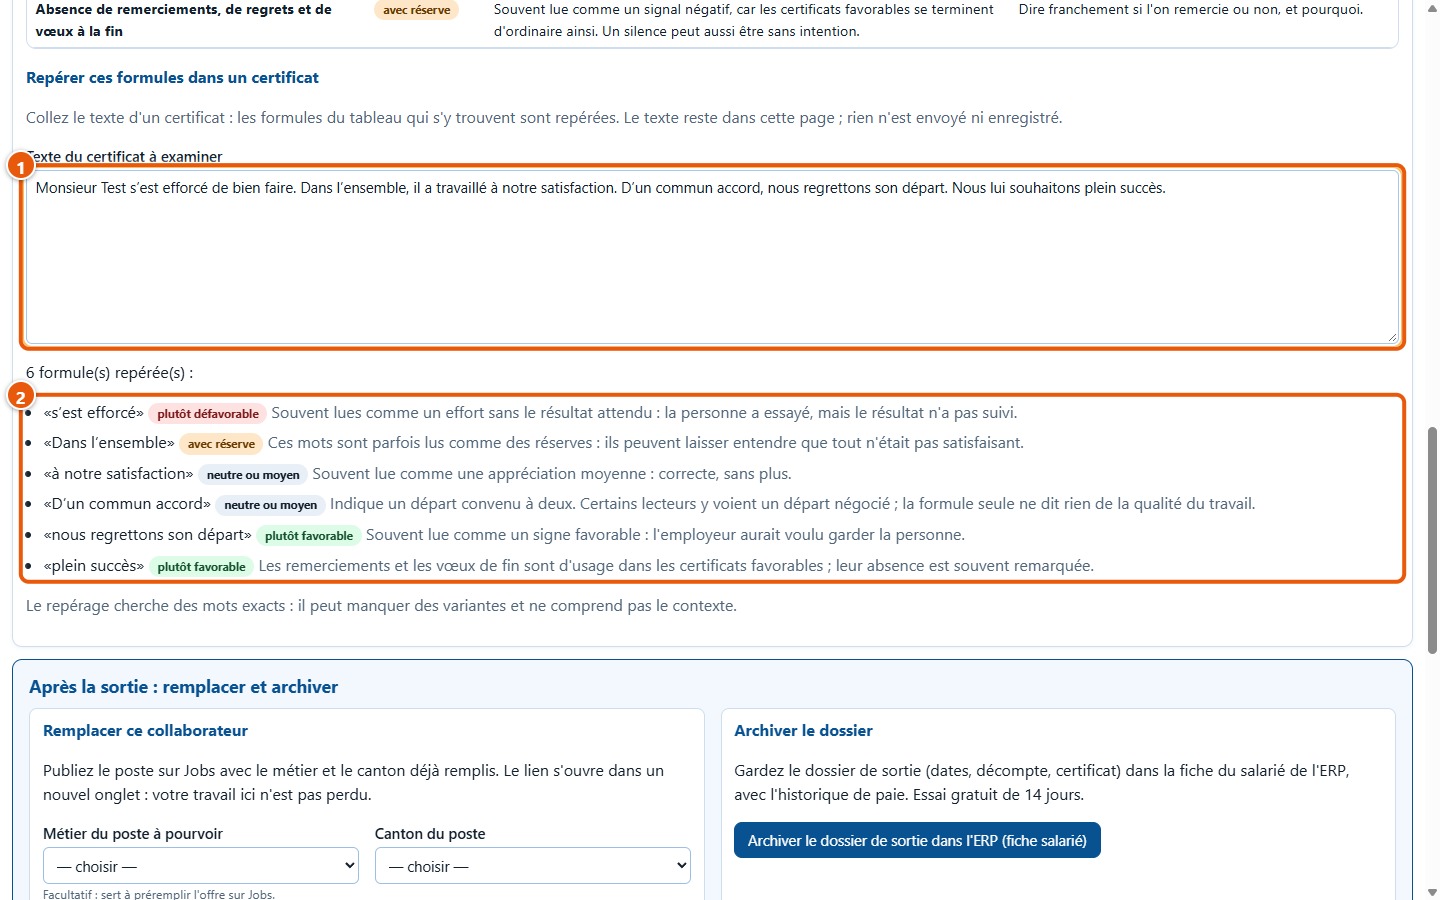
27Spot phrases in a text
Paste the text of a certificate into area (1). The phrases from the table found in it are listed (2), with their indicative interpretation. Spotting does not take into account capital letters, accents or apostrophe styles. The text stays on the page: nothing is sent or stored.
7. Print and export
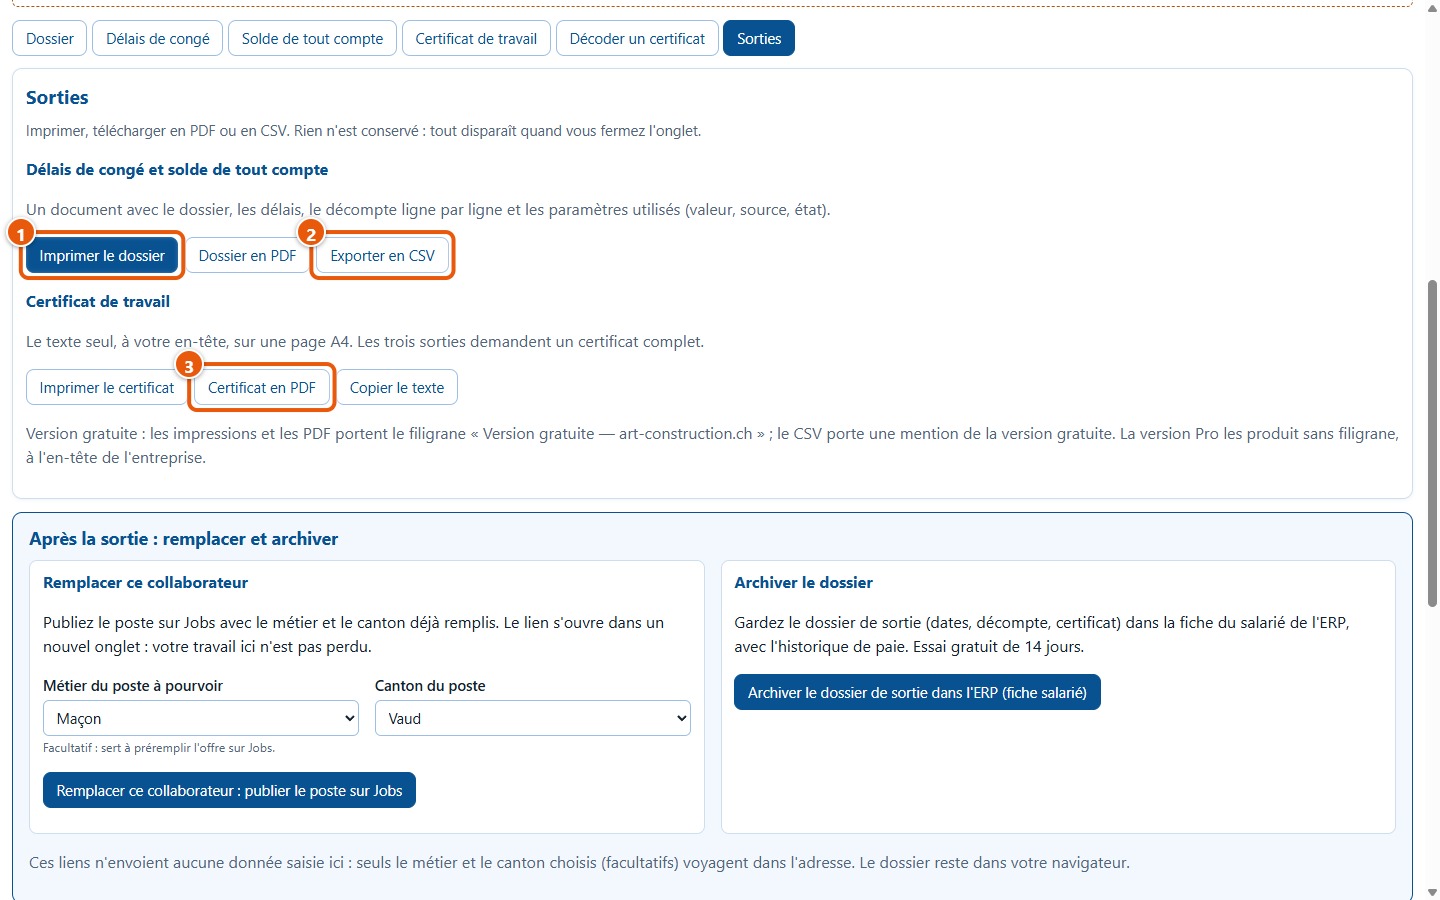
28Open the Outputs tab
The tab Sorties brings together all outputs. For the breakdown (notice periods and balance): Imprimer le dossier (1), Dossier en PDF and Exporter en CSV (2). For the certificate: Imprimer le certificat, Certificat en PDF (3) and Copier le texte. The certificate must be complete to be printed, downloaded or copied.
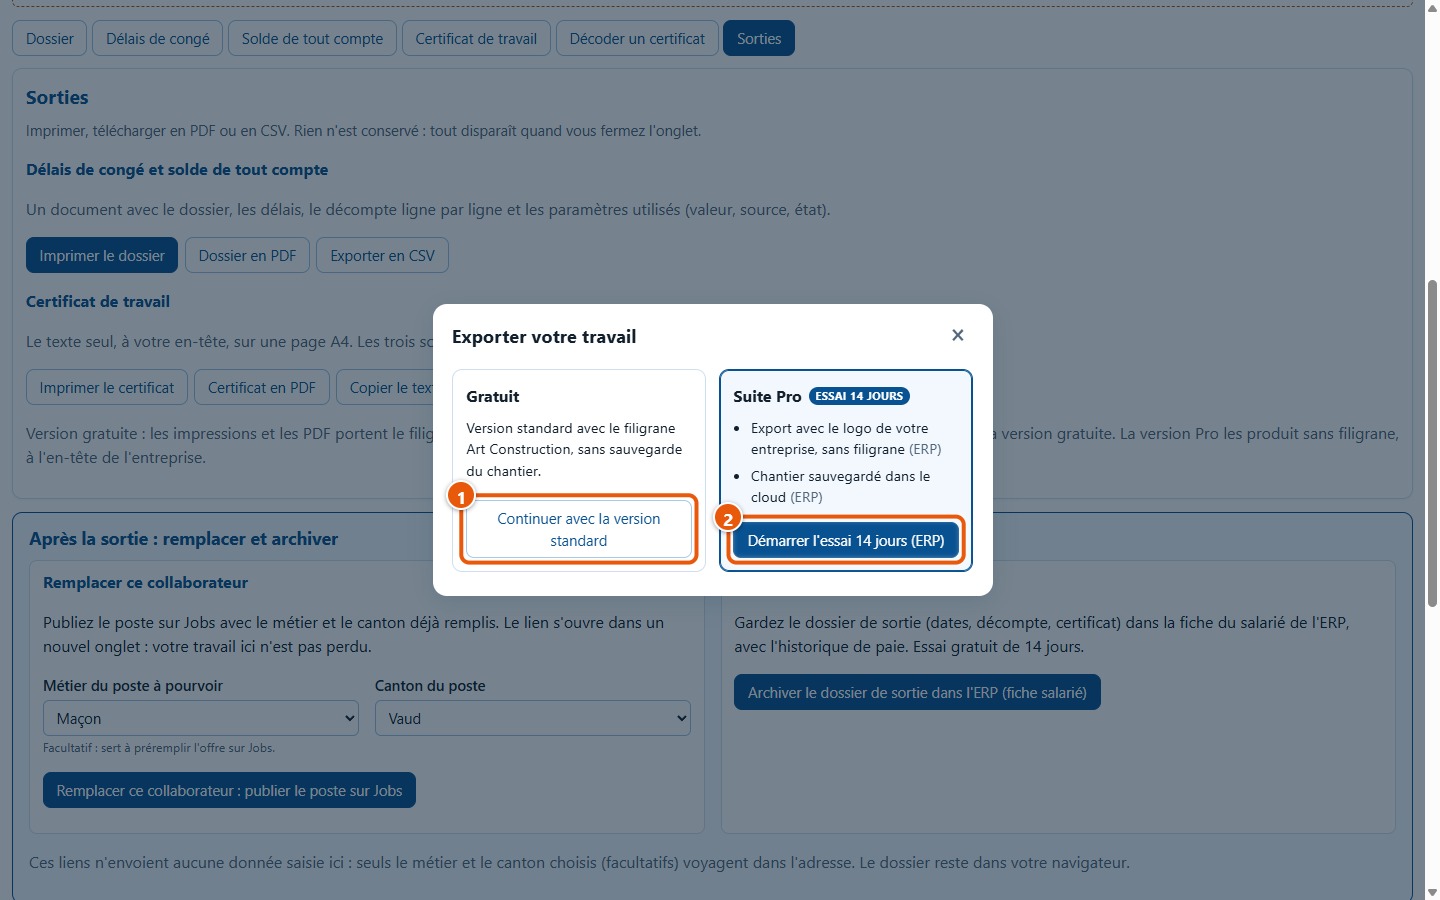
29Choose the standard version
On the first export of the visit, a window offers two options. Continuer avec la version standard (1) exports with the Art Construction watermark. The Pro Suite link (2) opens the ERP trial page in a new tab: your work here is not lost. If you close the window without choosing, nothing is exported; if you proceed, it will not appear again until the page reloads.
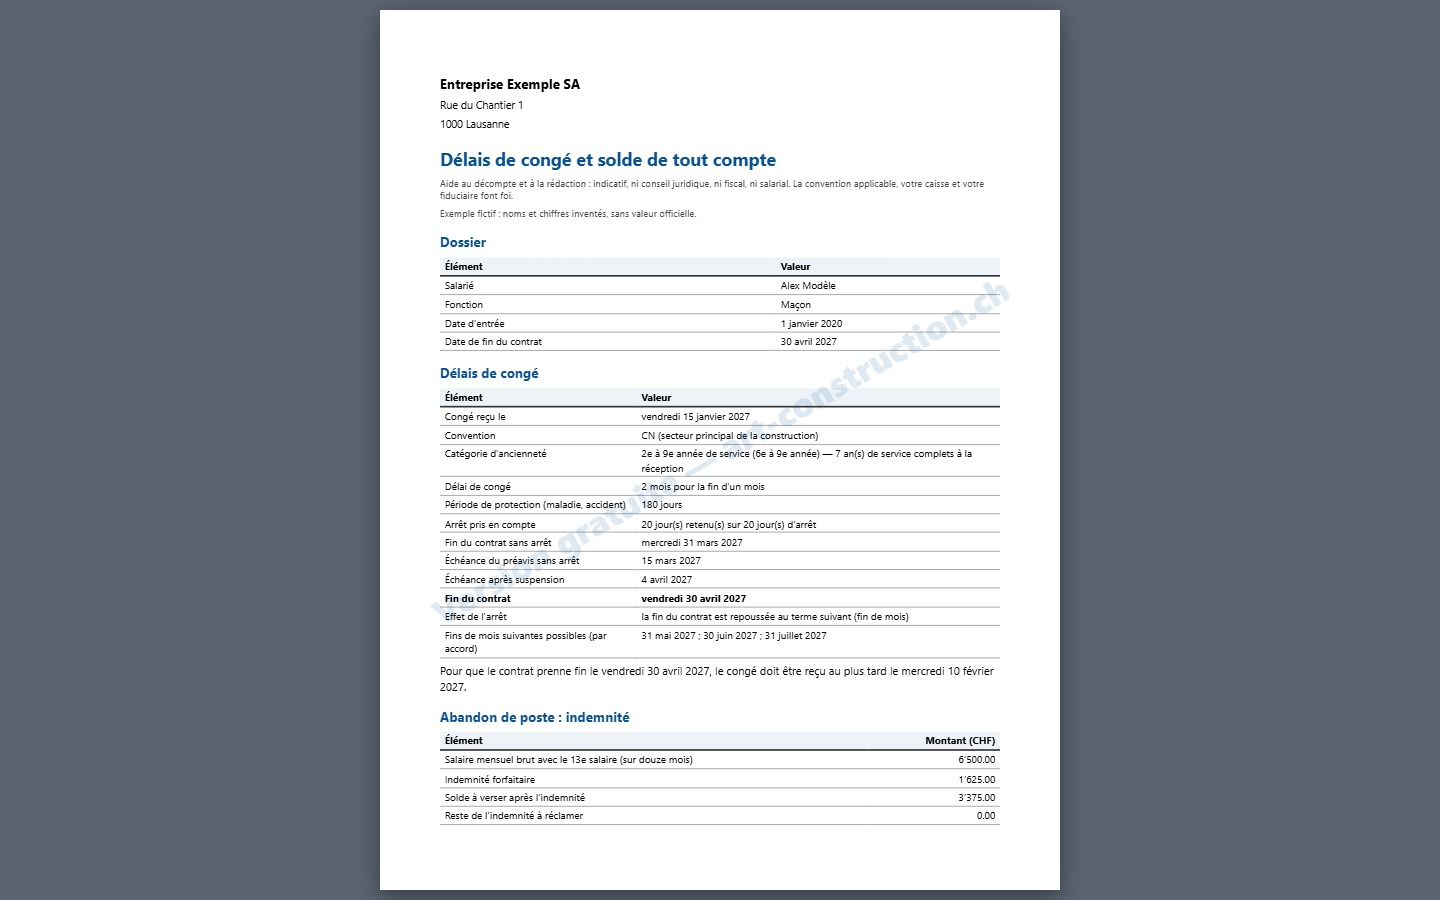
30Print the sheet
Imprimer le dossier prepares a sheet dedicated to printing: the screen is hidden and only the sheet is printed, with the watermark « Version gratuite — art-construction.ch ». The image shows what the browser prints for the example file (4 A4 pages). The certificate is printed in the same way, on one page.
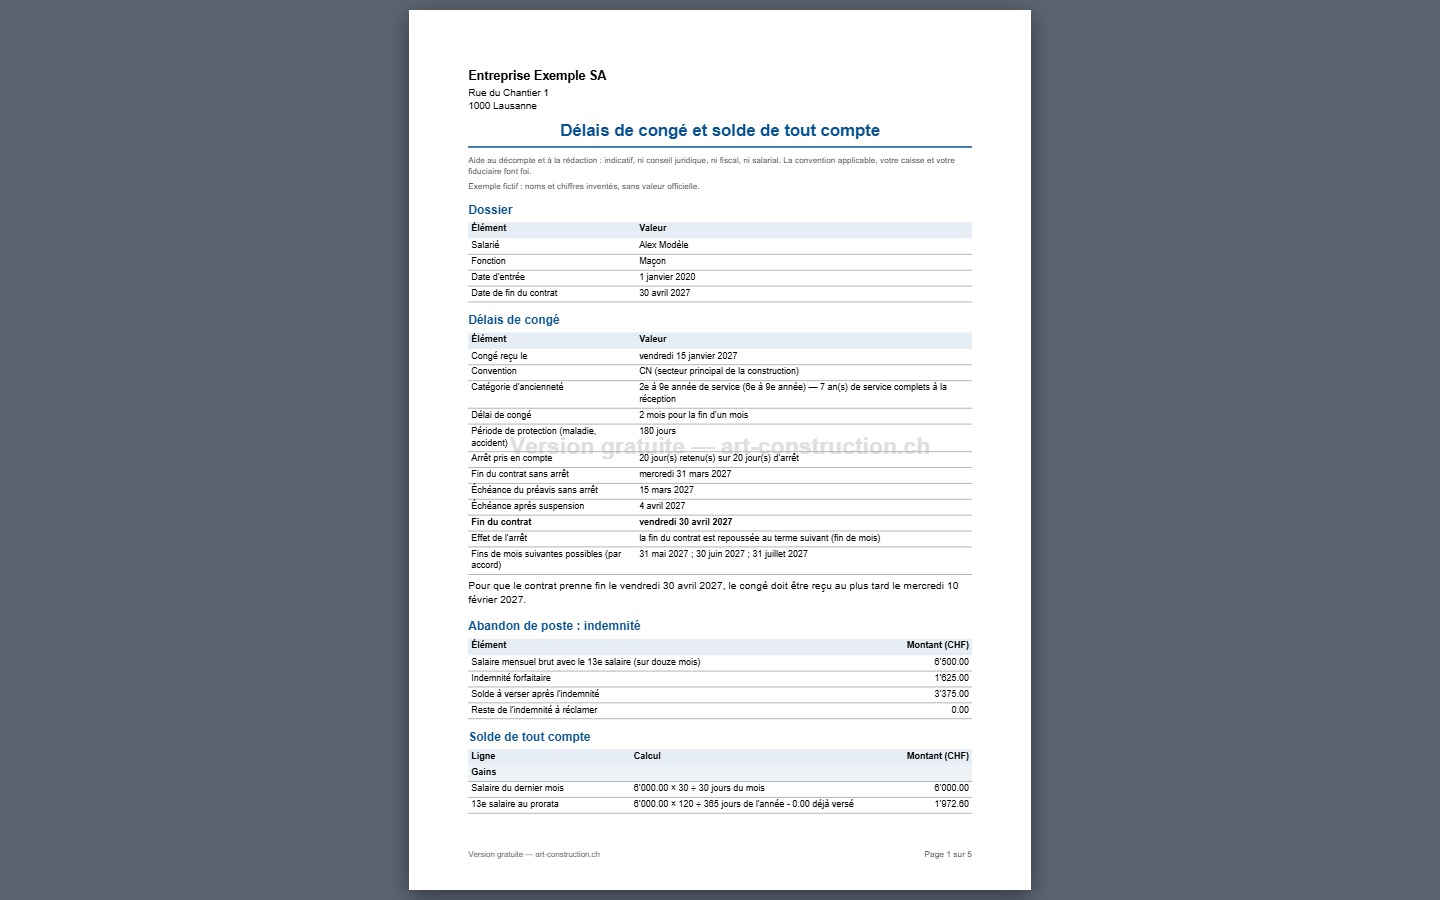
31Download the file as a PDF and a CSV
Dossier en PDF generates a PDF file (5 pages for the example) with the watermark, the note « Version gratuite » in the footer and the page numbering « Page 1 sur 5 ». Exporter en CSV generates a file you can open in a spreadsheet; its first line contains the note about the free version.
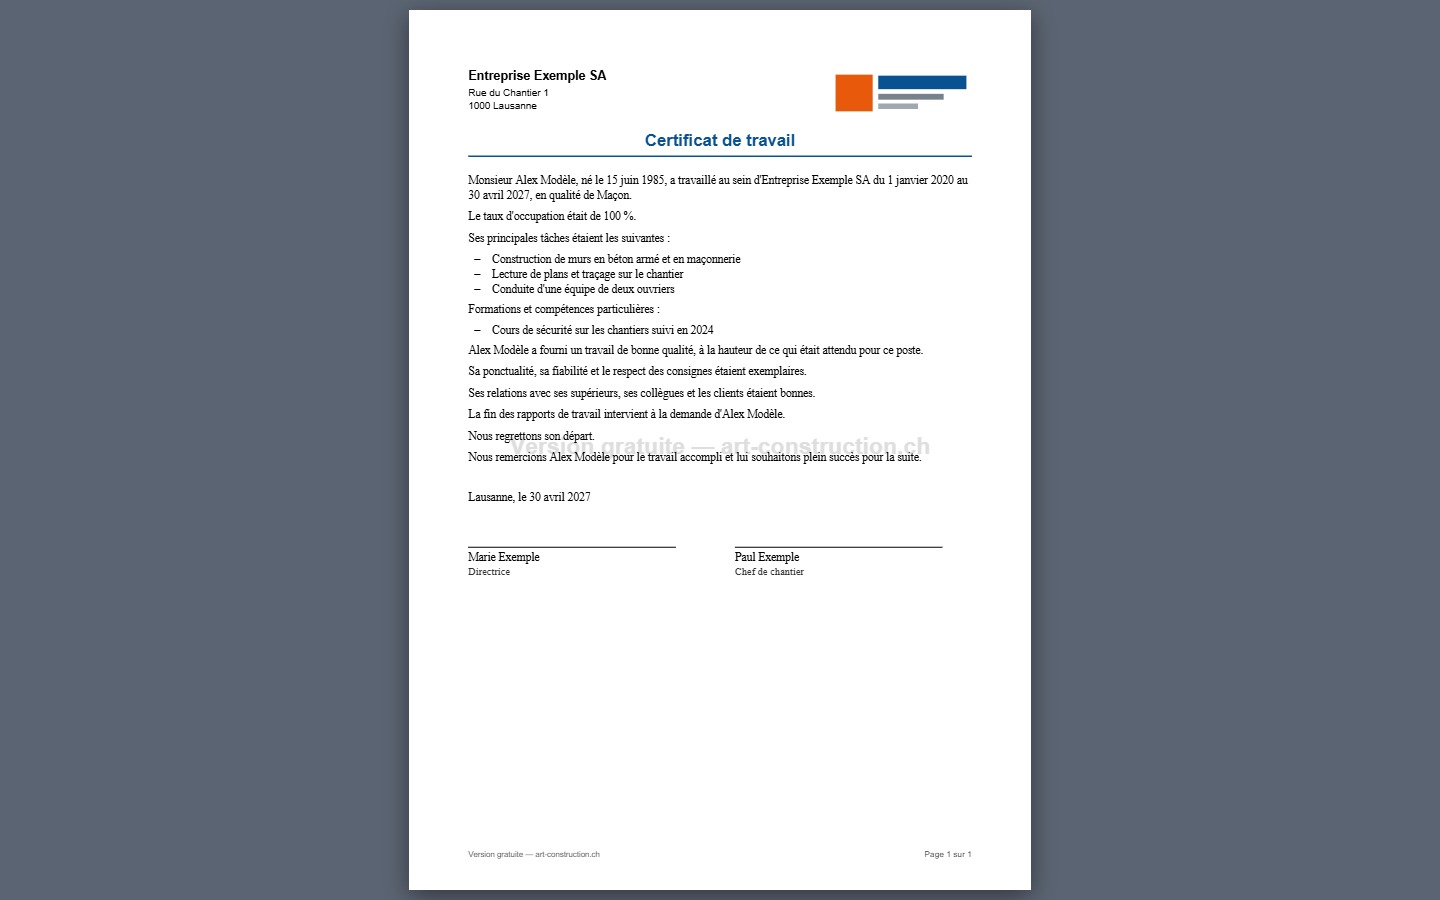
32Download the certificate as a PDF
Certificat en PDF generates an A4 page in a serif font, with the company logo if one was added, the signatures and the watermark.
8. After departure
33Replace the employee or archive the file
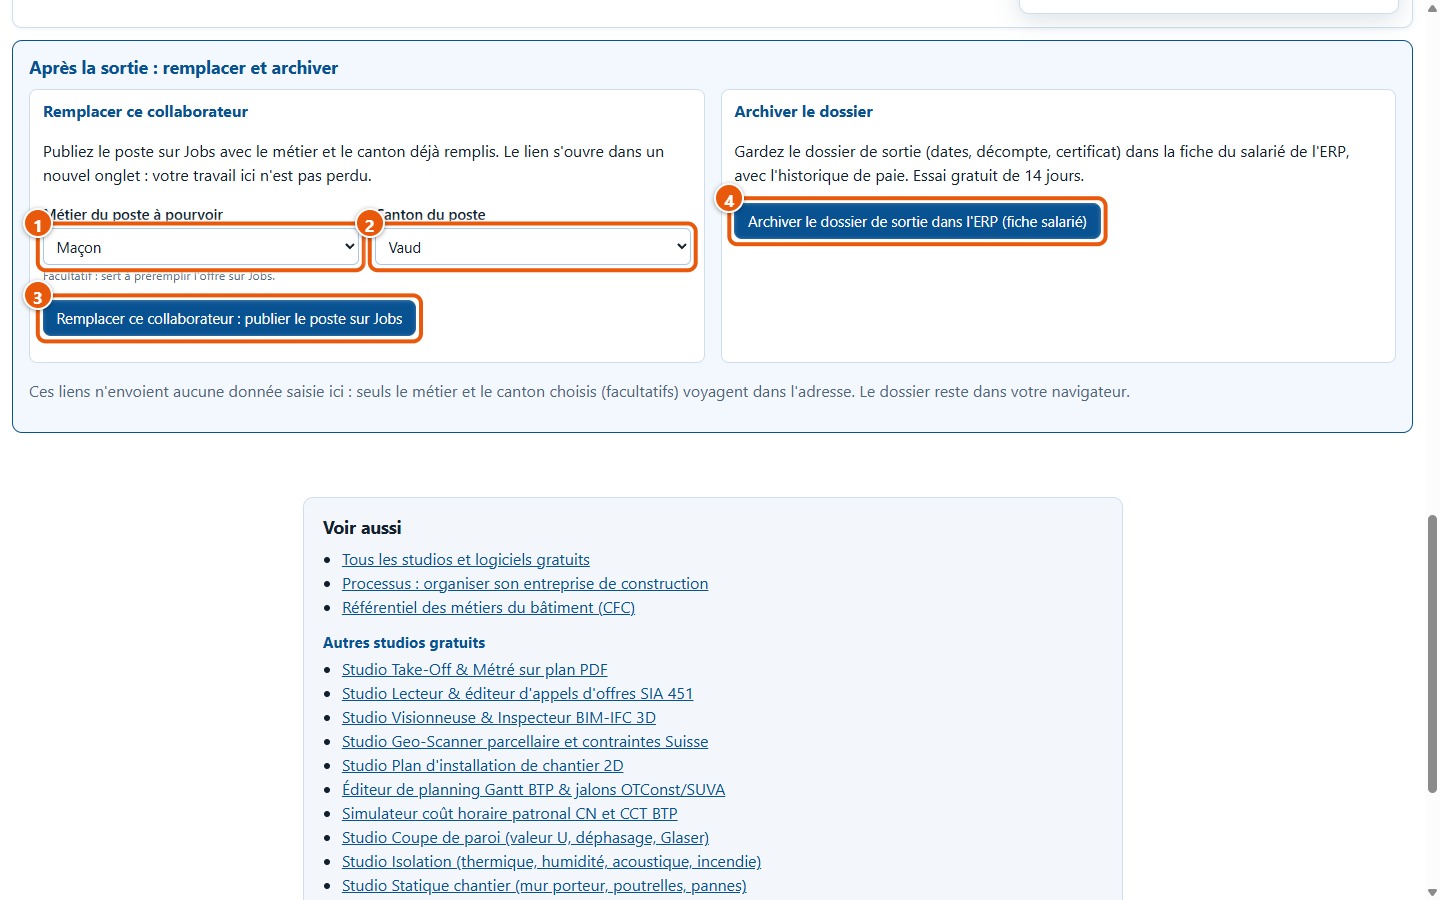
The Après la sortie : remplacer et archiver block offers two links that open in a new tab. Select the trade (1) and canton (2) for the position: Remplacer ce collaborateur : publier le poste sur Jobs (3) opens Jobs with these two details in the URL. Archiver le dossier de sortie dans l'ERP (fiche salarié) (4) opens the ERP page. No entered data is sent: only the selected trade and canton, which are optional, travel in the URL.
34Clear everything and exit
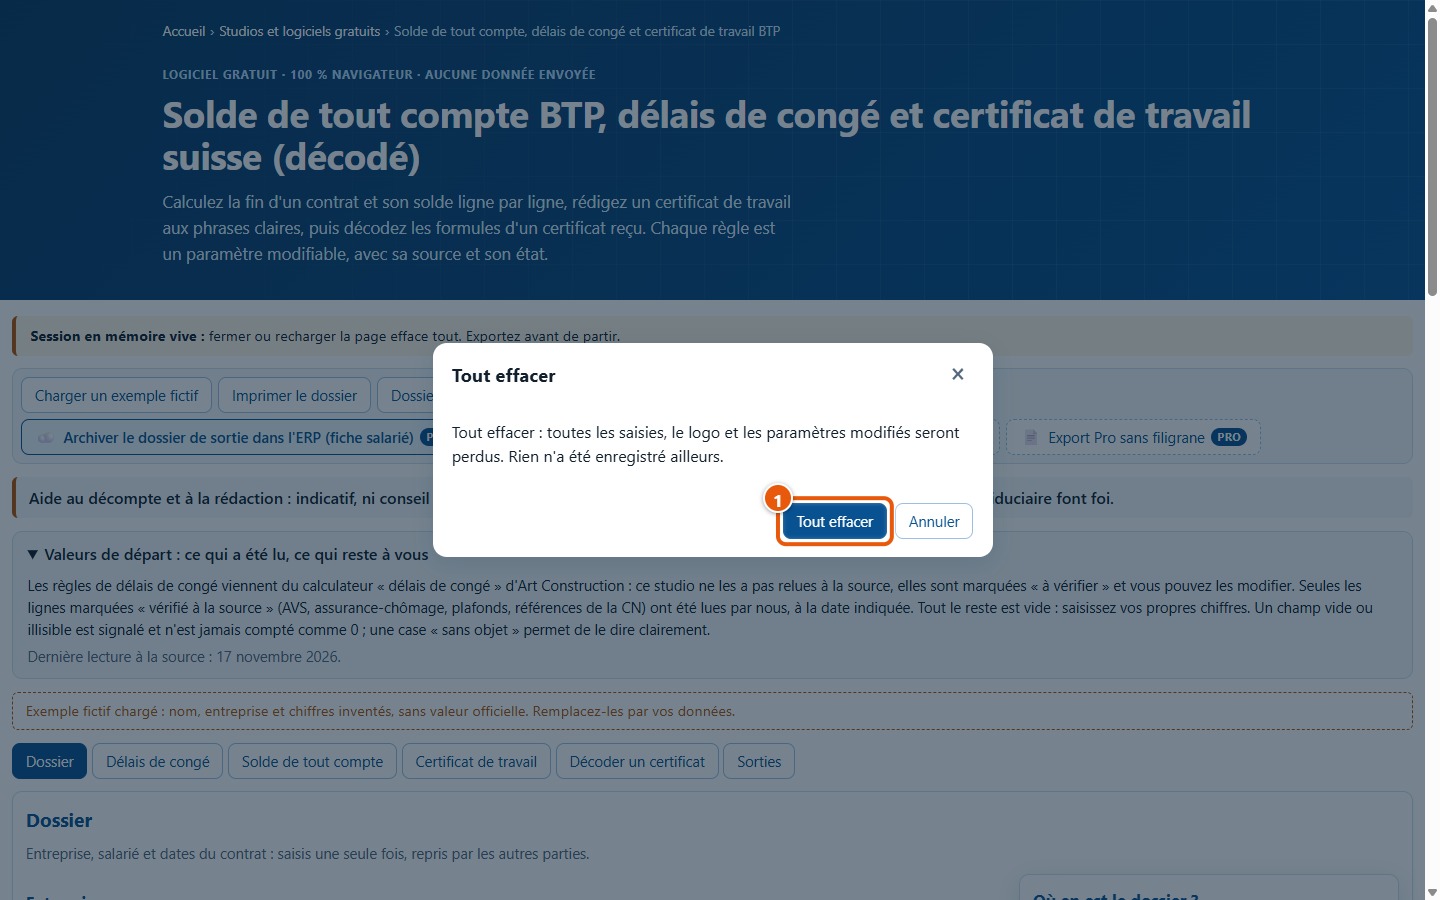
Tout effacer, at the top of the page, clears all entries, the logo and modified settings, following a confirmation prompt. Nothing is saved by the software: as long as the work has not been printed or exported, it asks the browser to alert you before closing the page.
9. What this software does not do
- It provides neither legal advice, nor tax advice, nor payroll advice. The results are indicative: the applicable collective agreement, your compensation fund and your fiduciary are authoritative.
- It has not re-checked the notice period rules at the source (probationary period, notice in months, protected periods, job abandonment). They come from the Art Construction « délais de congé » calculator, are marked « à vérifier », and must be checked against your collective agreement and your contract.
- It does not calculate the start of incapacity during the notice period, other suspensions (military service, pregnancy, etc.), public holidays, the seizable portion of the salary, limitation periods, the unemployment insurance ceiling on cumulative annual earnings, withholding tax based on tax scales, loyalty bonuses, or statutory deductions from the final salary.
- It does not fill in your fund rates for you: non-occupational accident insurance, daily sickness benefits, occupational pension plans and withholding tax must be entered manually.
- The certificate text is a draft to be reviewed: the software does not check whether evaluations are accurate or can be justified, and it does not replace professional advice.
- The decoder is an editorial table, provided for information, with variable usage. It searches for exact words: it may miss variations and does not understand context.
- It does not save anything and cannot reopen a file: closing or refreshing the page clears everything. Saving the file and exporting without watermarks are available in the ERP Suite Pro, which is not covered in this guide.
- The PDF only supports Western European characters.
Any questions? Send an enquiry to support